

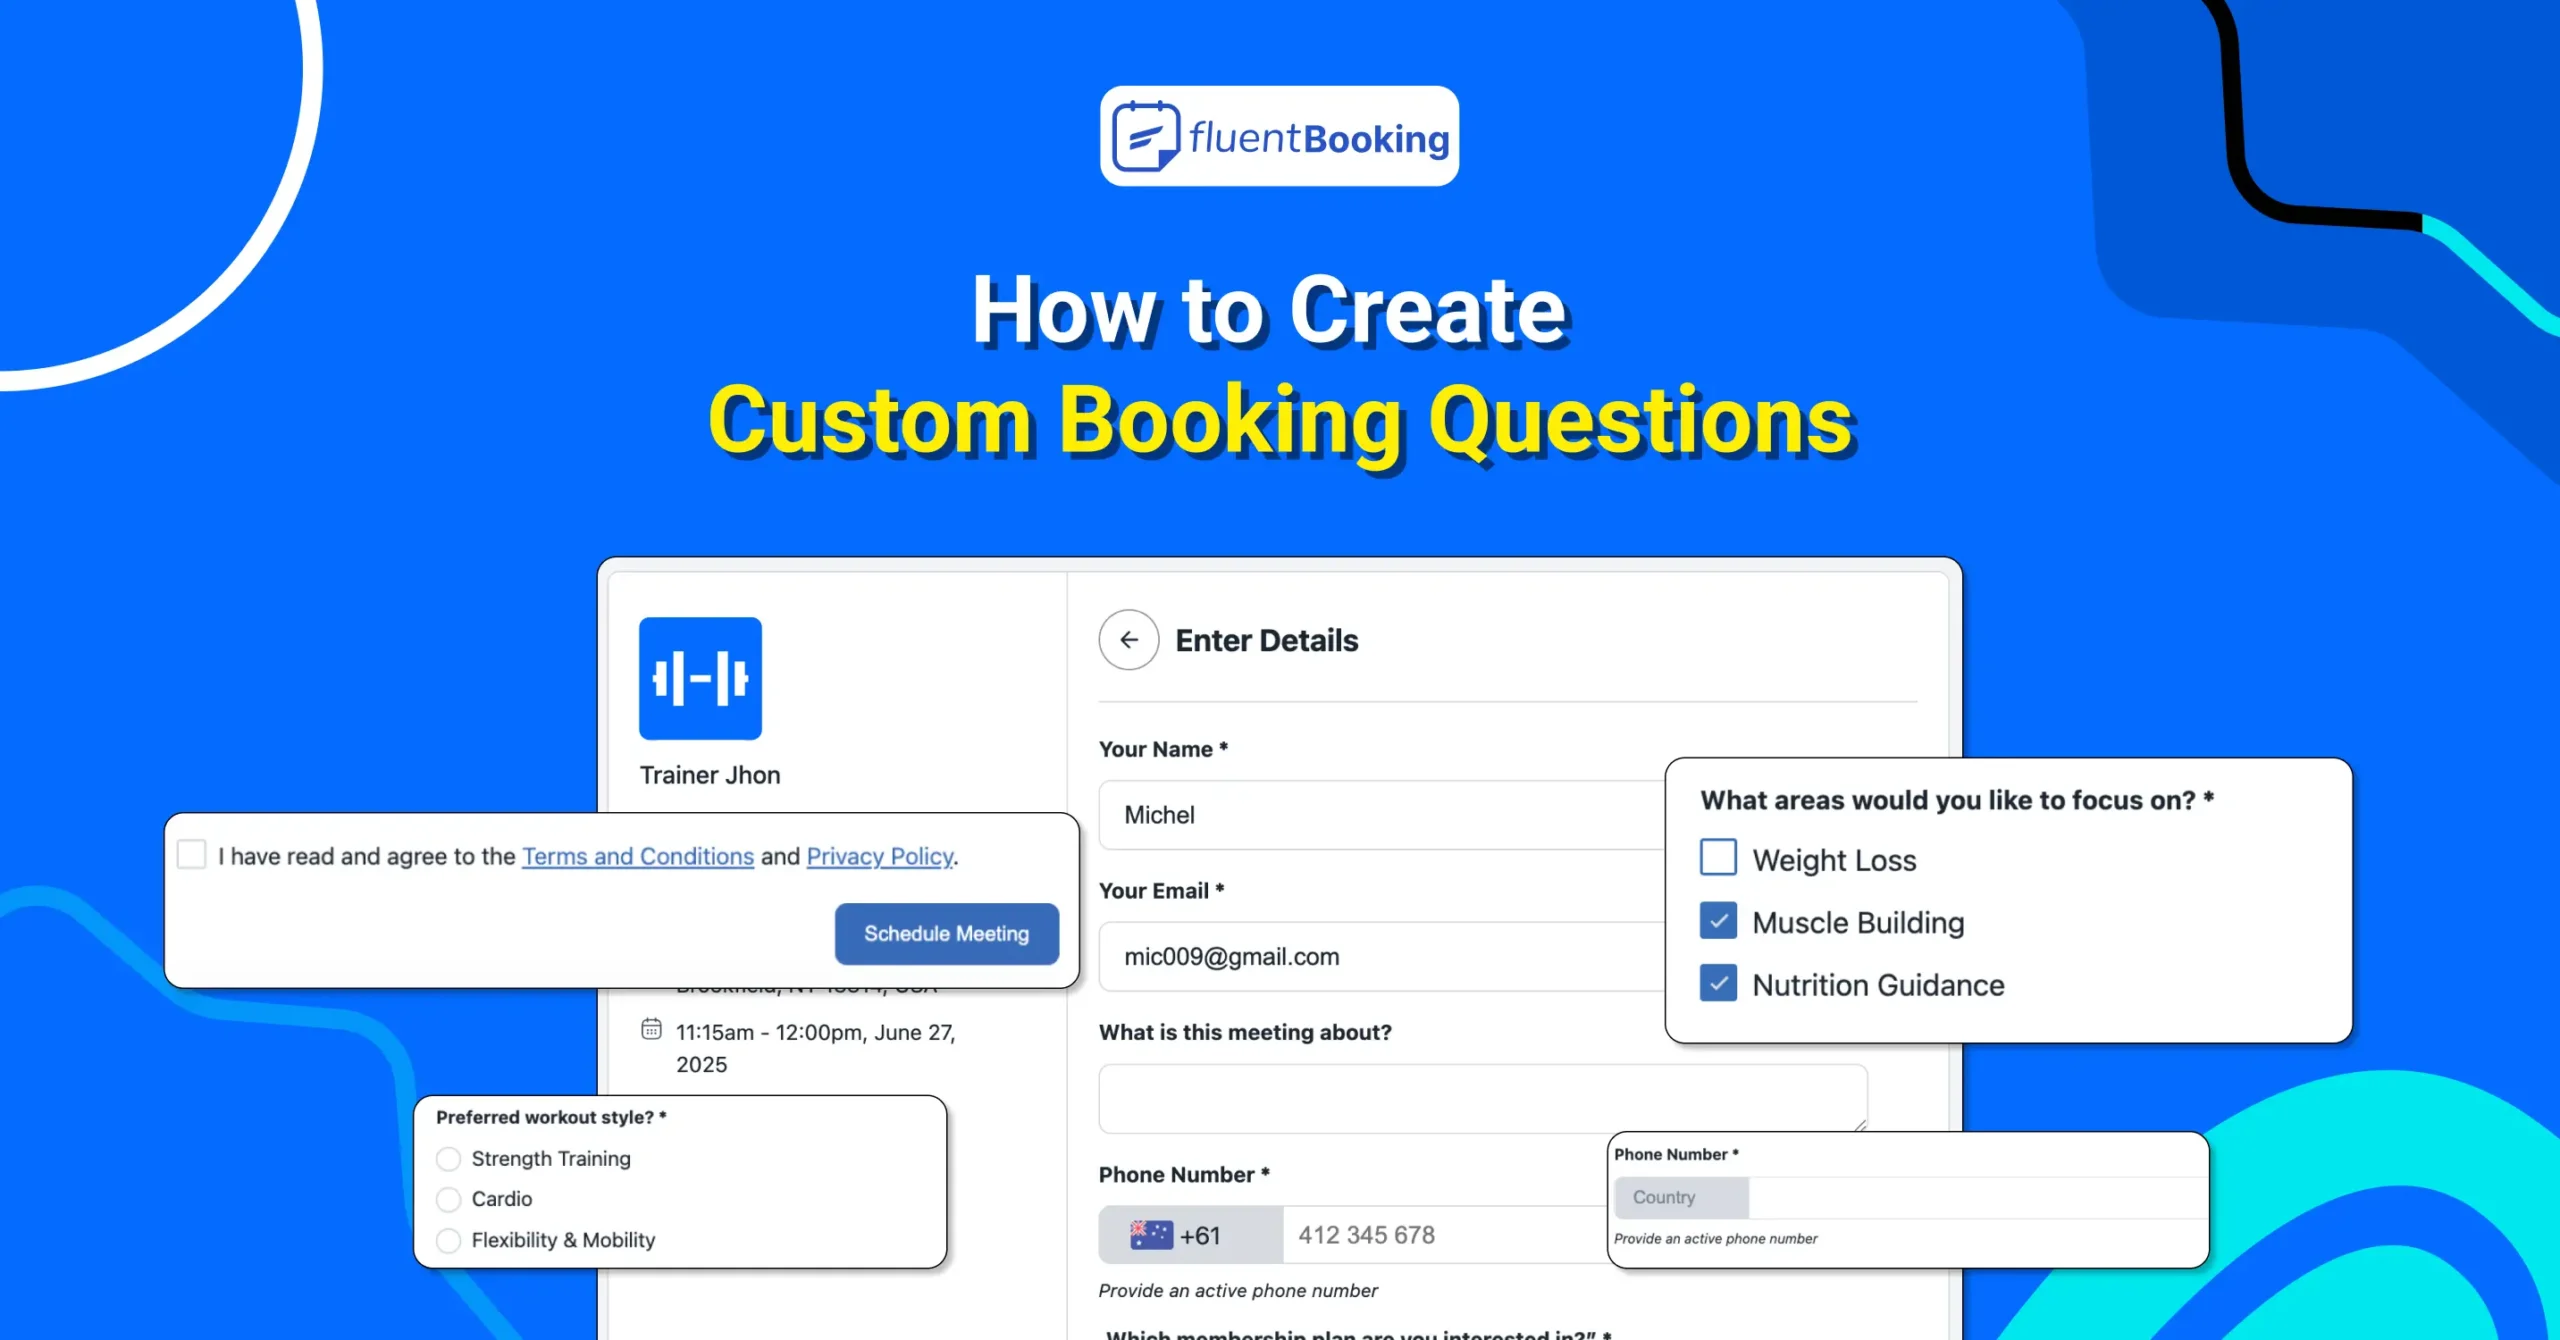
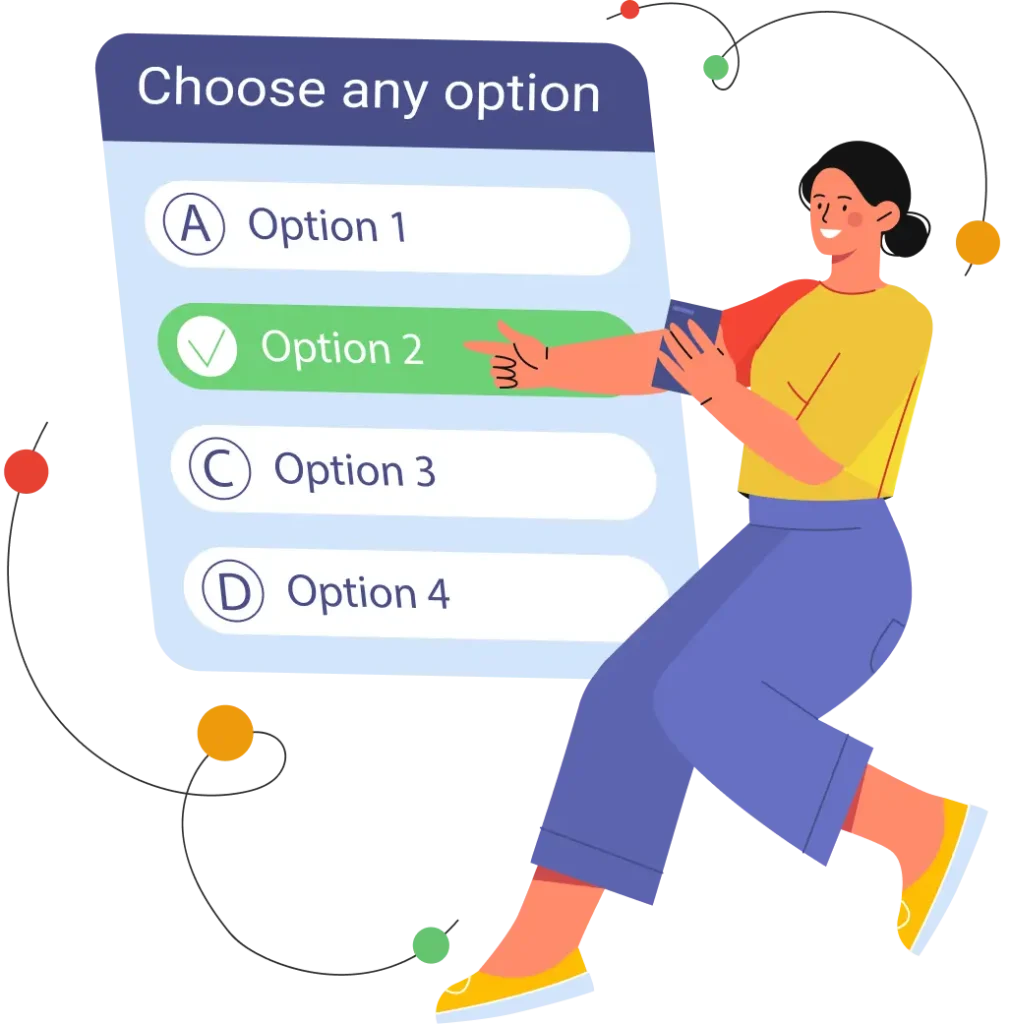
How to Create Custom Booking Questions for Your Attendees: A Quick Guide


Ever walked into a meeting not quite sure what the other person needed from you? Isn’t it awkward? Which makes the session less productive.
Whether you’re a coach, consultant, fitness trainer, or any kind of service provider, by collecting key details before the meeting, you can skip the back-and-forth and focus on what really matters.
With FluentBooking, you can collect all the information you need during the booking process. It lets you create and manage custom questions so every session is booked with clarity and context.
In this guide, we’ll walk you through how to create custom booking questions in FluentBooking, the different types of fields available, and how to make your booking process smarter and more organized.
Let’s get started.
Why Use Custom Booking Questions?
Custom booking questions aren’t just about collecting answers; they’re about improving the entire booking experience for both you and your attendees. Here’s why they matter:
- They help you collect important details like preferences, special requests, or contact info before the meeting
- You can use them to qualify leads and ensure the right people are booking your services
- They allow you to personalize sessions and follow-ups based on attendee responses
- Responses can be synced with tools like FluentCRM or calendar apps to automate your workflow
- They reduce no-shows and confusion by setting clear expectations from the start
Types of Custom Booking Questions: A Quick Overview
Before we dive into the setup process and detailed question types, here’s a quick overview of the most important question fields, which help you understand the purpose of booking questions.
| Field Type | When to Use It | Example Question |
| Phone Number | To contact attendees by phone | “Please enter your phone number.” |
| Dropdown | Choose one option from a list | “Select your preferred service.” |
| Radio Button | Display all choices, select only one | “Meeting type?” (Zoom / In-person) |
| Checkbox | Choose multiple options | “Topics you want to discuss?” |
| File Upload | For sharing documents | “Upload your resume or proposal.” |
| Terms & Conditions | To collect consent before booking | “I agree to the terms and conditions.” |
How to Add Custom Booking Questions in FluentBooking
Let’s explore how to set up these custom booking questions in FluentBooking.
Step 1: Go to Your Event Type
Open your FluentBooking dashboard and either select an existing event or create a new one.
Step 2: Head to the “Booking Questions” Tab
Inside the event settings, navigate to the Questions Settings tab.

Step 3: Add a New Question
Click “Add more questions for invitees.” A pop-up will appear, then configure:
- Field type (Short Text, Paragraph, Multiple Choice, Checkbox, etc.)
- Label the question (the question your attendees will see)
- Check the question required or optional and save

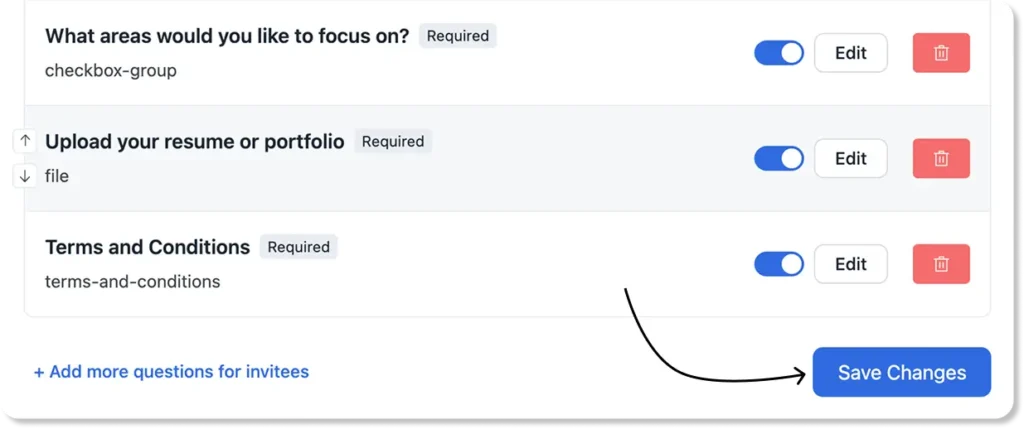
Step 4: Save & Preview
Use the up and down arrows to rearrange questions, or remove any you no longer need.
Then click Save Changes, and then preview your booking page to see how the questions appear to attendees.
Types of Custom Booking Questions Fields You Can Use on FluentBooking (with Examples)
Let’s discuss the most commonly used question fields you can use on your booking page to skip back and forth.
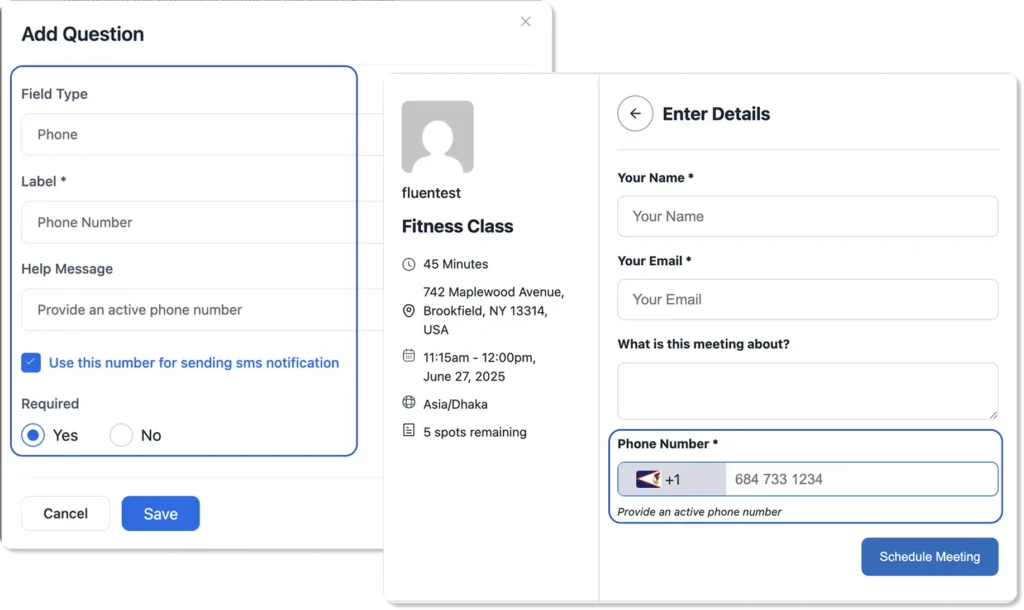
Phone Number
This field lets you collect your attendees’ phone numbers, which is helpful if you need to reschedule or send last-minute updates.
You can also connect Twilio with FluentBooking to send SMS reminders. This is great for clients with poor internet access and saves you time by reducing no-shows.
To set it up, just select the Phone Number field, add a label, write a help message (if needed), choose if it’s required, and save. Your attendees will see this question on the booking page and can easily select their country code and enter their number.
For example, here is a field setup and its preview on the booking page:
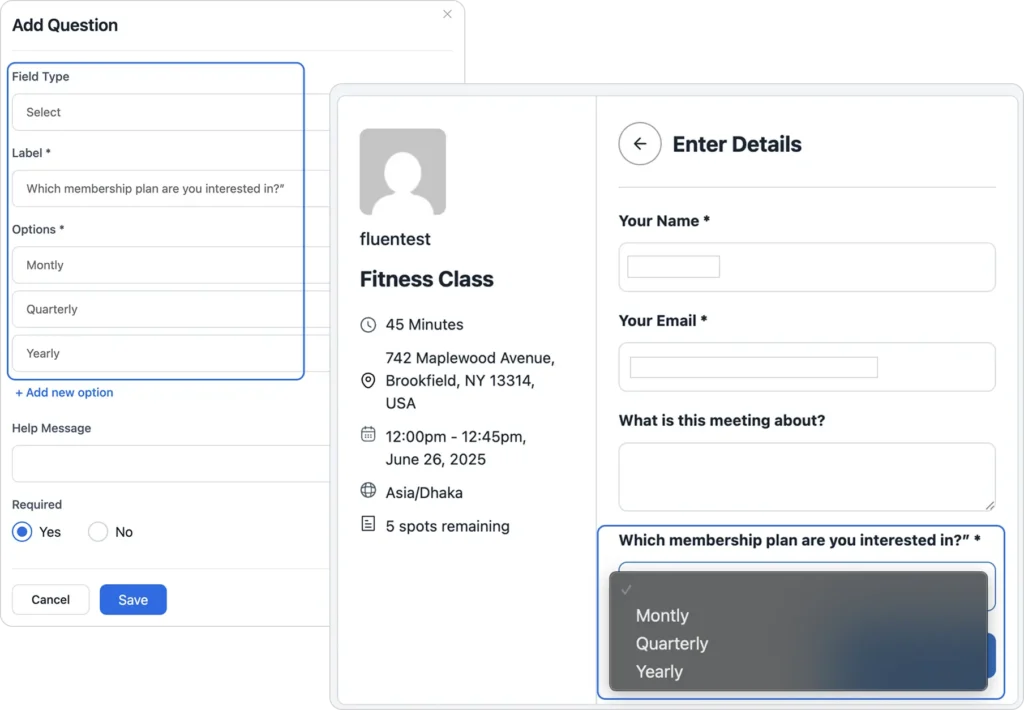
Dropdown
Use the dropdown field when you want attendees to pick one option from a list. It’s a great way to keep your form clean, especially when you have many choices and want to avoid overwhelming users.
To set it up, choose the Select field, add your question label, list the options, choose whether it’s required, and save it.
For Example, in a fitness program, you may ask your clients, Which membership plan are you interested in?” and add the option as monthly, weekly, quarterly, etc.
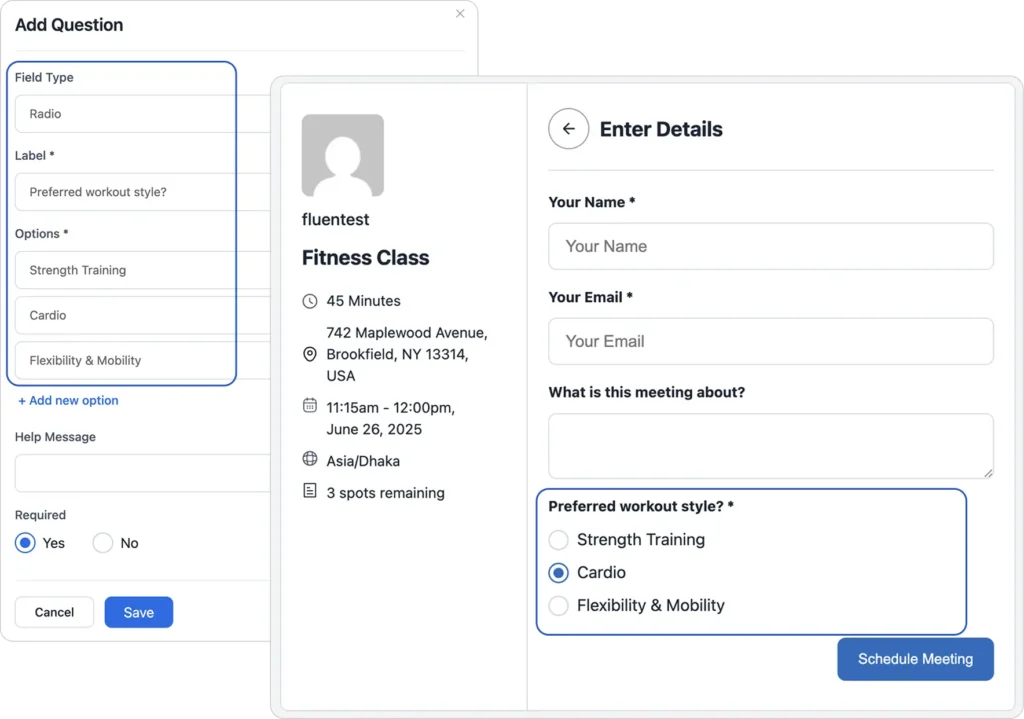
Radio Button (Single Choice)
The radio field shows all available options at once, making it easy for attendees to compare and choose just one.
To set it up, select the Radio field, add your question label, then enter multiple answer options. You can also mark the field as required or optional, and click Save.
For example, if you’re offering a fitness class, you might want to ask what type of session your client prefers. This helps you understand their needs better before the event.
So, set up the options, and your booking page will look like the page below.
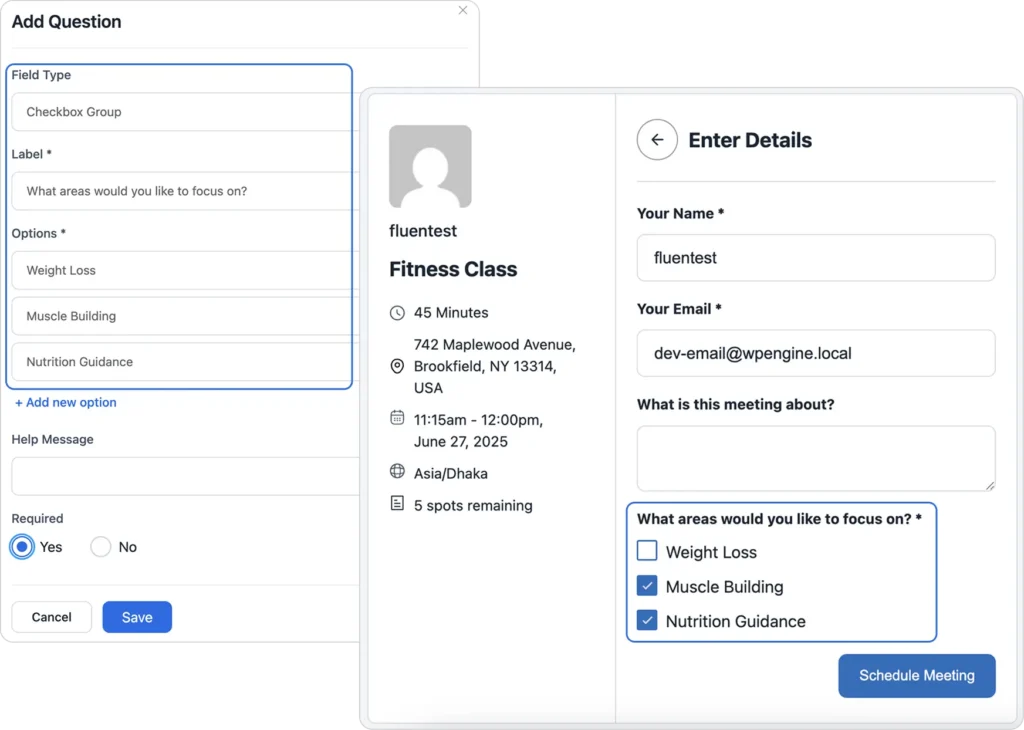
Checkbox (Single or Group)
You can use the Checkbox Group field when attendees may need to select more than one option. It’s ideal for sessions that cover multiple topics or when you’re offering bundled services. Also, you can choose the Checkbox field for adding a single checkbox.
To use it, select the Checkbox Group field, add your question label, list out the options, mark it required (if needed), and save.
Example (for a fitness consultation): You can add a question like, “What areas would you like to focus on?” and add some options like Weight Loss, Muscle Building, Flexibility, etc.
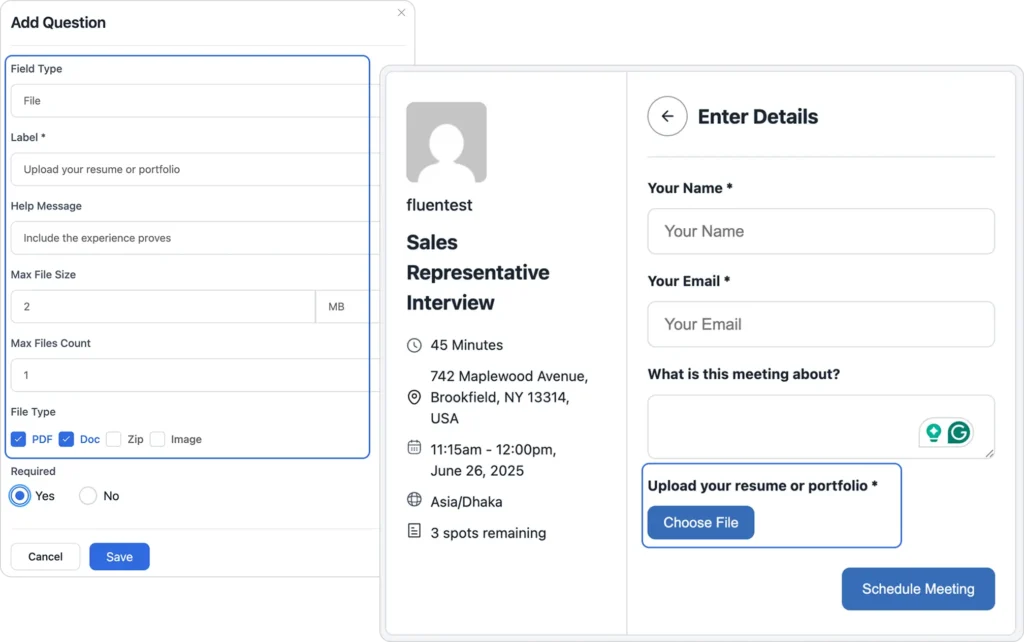
File Upload
You can use this field when you need attendees to upload files like resumes, proposals, documents, or reference images. It helps you gather important context before the meeting starts.
To add it, select the File field, write your question label, and add a short help message if needed. Also, you can set the limit of the file size, file count, and set the file format type for upload, mark it required or not, and then save.
For example, a recruiter can add a File field to collect a CV and other documents.
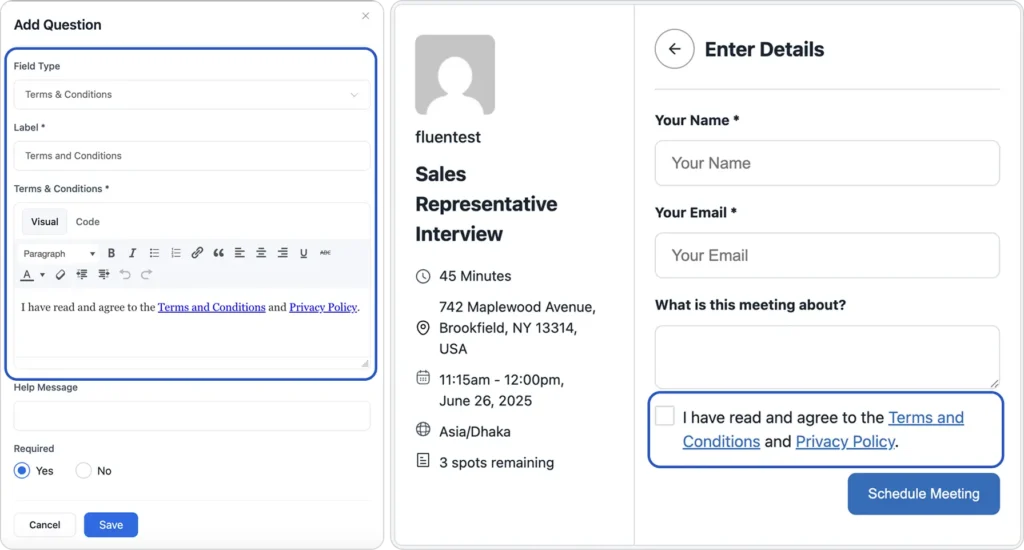
Terms & Conditions
This field is used to get your attendee’s consent before confirming the booking. It’s especially helpful for legal, privacy, or cancellation policy agreements.
Just select the Terms & Conditions field, add your statement, and include a link to your policy page if needed. Also, mark it as required so that the attendee can’t schedule without accepting the terms and conditions.
For example, you can add a statement like, “I agree to the terms and conditions.”, “I understand and accept the cancellation policy.”
Miscellaneous
So, we’ve shown you the important and mostly used question fields you can add to your booking page as a booking form. But there are also some booking fields you can use.
- Hidden Field: This field is not visible to your attendee, but you can store important internal data, such as UTM sources, referral IDs, campaign names, or other tracking information.
- Date: The date field lets your attendees enter a specific date other than the booking date, like any project starting date, birthdate, etc. This is helpful when you need to collect important timeline info ahead of the meeting.
- Text Area (Paragraph Field): This field is used when you want attendees to provide longer, open-ended responses like their problems, goals, or expectations, etc. It gives them more space than a short text field.
Your Next Meeting could be Smoother
Start using custom questions with FluentBooking and take control of your scheduling experience.
Best Practices for Using Booking Questions
Asking the right questions is just as important as offering a great service. To make sure your booking form is effective and user-friendly, here are some best practices to follow:
- Keep questions concise: Ask only for essential information to avoid overwhelming attendees
- Use clear language: Write straightforward questions like “What is your preferred time?” instead of vague ones like “When are you free?”
- Prioritize mandatory fields: Make important fields (like contact details or agreement checkboxes) required
- Use help text or placeholders: Add short hints or examples to clarify what kind of answer you expect (e.g., “DD/MM/YYYY” for date fields)
- Keep mobile users in mind: Make sure your form is easy to complete on mobile devices. Shorter forms, dropdowns, and checkboxes help
- Test regularly: Periodically check your booking form to ensure everything works smoothly, especially after plugin updates or new integrations
Final Thoughts: Ask Better Questions, Book Smarter
Custom booking questions might seem like a small detail, but they make a big impact on how smooth, professional, and productive your meetings turn out.
By asking the right questions upfront, you save time, reduce no-shows, and show up fully prepared every single time. And with tools like FluentBooking, creating smart, flexible booking forms becomes quick and effortless.
Start small, keep it simple, and always focus on what really matters to you and your attendees.
Ratul Hasan Ripon
I enjoy making complex ideas simple and engaging through my writing and designs. With a strong knowledge on content writing and SEO, I create technical content that’s both easy to understand and interesting.
Table of Content
Subscribe To Get
WordPress Guides, Tips, and Tutorials


Leave a Reply