

15 Apple Calendar Tips to Organize Your Schedule Like a Pro (iPhone & Mac)


Managing your time can feel overwhelming when you’re balancing work, family, and personal commitments. But, what if there is a tool which available on your iPhone, iPad, and Mac, which is more than just a simple date tracker, that’s a built-in productivity tool designed to keep your days organized and stress-free.
Yes, it’s Apple Calendar, and with the right tips, you can turn Apple Calendar into your personal assistant, helping you plan smarter, stay on top of deadlines, and avoid last-minute chaos.
In this guide, we’ll walk you through some effective Apple Calendar tips that work across your Apple devices. From quick scheduling tricks to advanced features you might not know about, these tips will help you unlock the full potential of Apple Calendar and take control of your time.
How to Use Apple Calendar: 15 Effective Tips
Let’s dive into some of the most effective ways to get the best out of Apple Calendar. These tips are based on years of everyday use and will help you stay more organized, save time, and make scheduling feel effortless. And at the end, I’ll also share a smart tool that can make your scheduling even smoother.
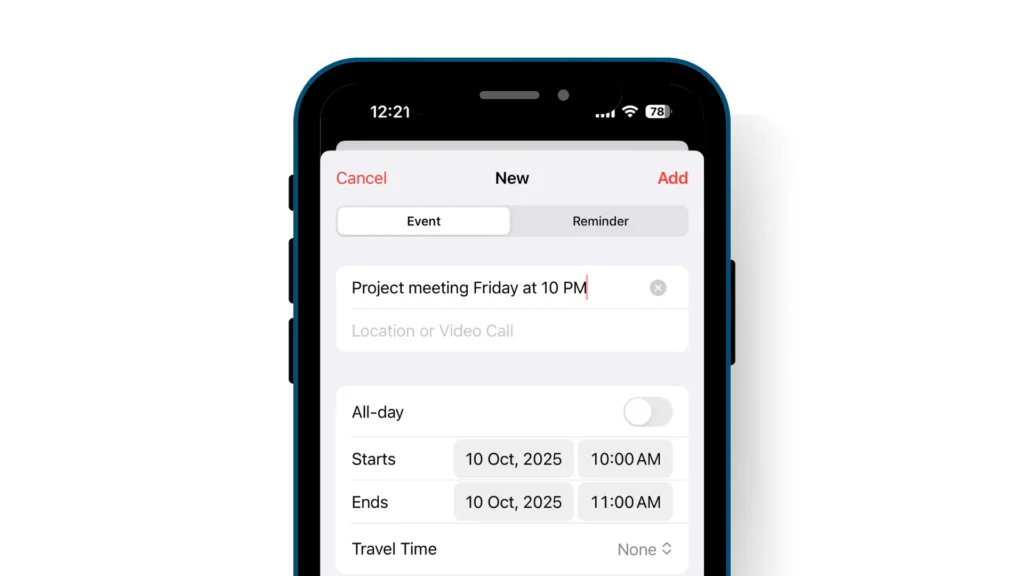
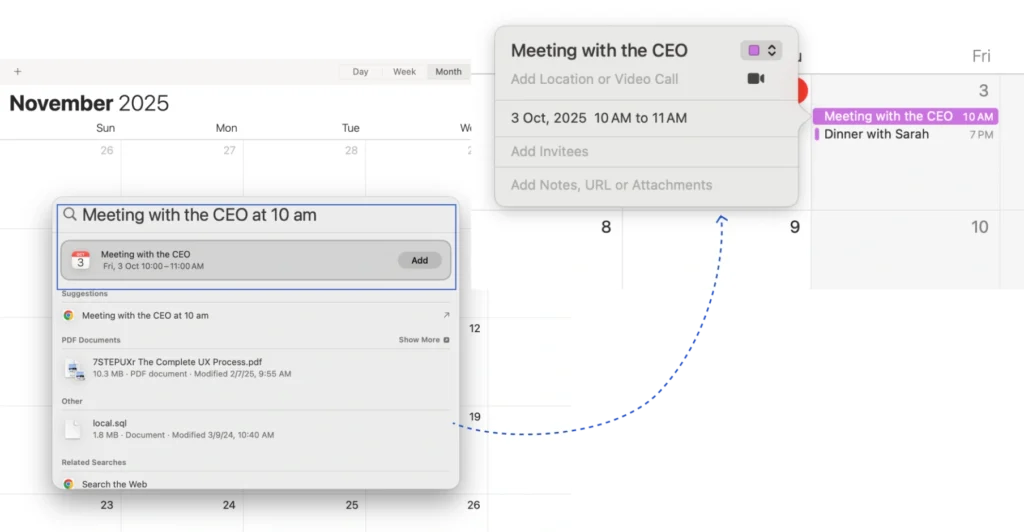
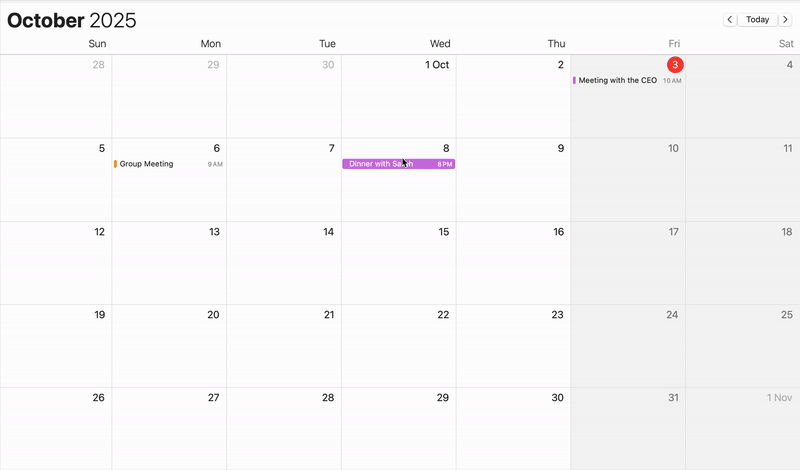
Use Natural Language to Create Events
Did you know you don’t need to tap through a bunch of menus to add something in Apple Calendar? You can just type the way you normally talk, and Calendar will figure it out for you. So, why type out every detail when Apple Calendar understands plain English?F
For iPhone or iPad:
- Open the Calendar app and tap the ➕ button.
- In the title box, type something like:
- “Dinner with Sarah tomorrow at 7 PM”
- “Project meeting Friday at 10 AM”
- The calendar will automatically set the right date and time for you.
For MacOS:
- Open the Calendar app and click the ➕ button at the top right corner
- Type the same phrase in the Create Quick event box
- Hit Enter, and the event will be created instantly.
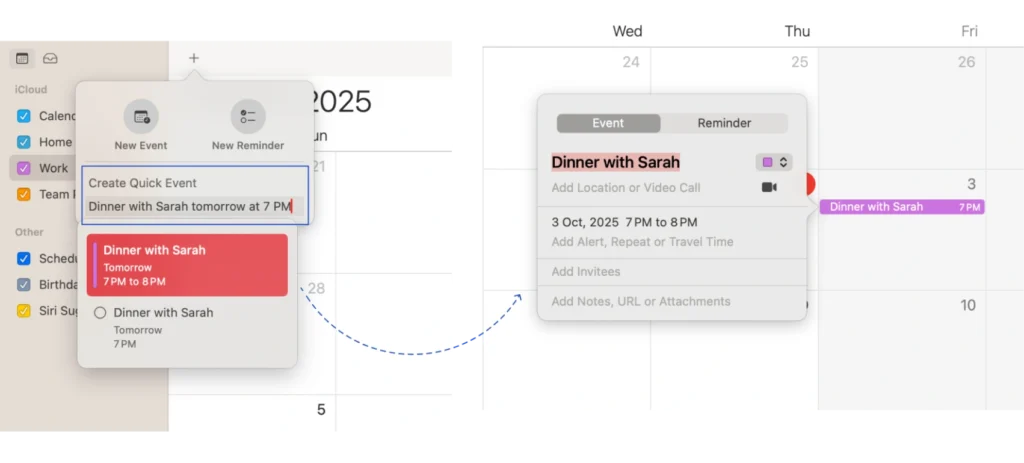
This little trick saves you time. Instead of tapping through date pickers and drop-downs, you just write it the way you’d say it out loud, and you’re done.
Use Siri for Quick Scheduling
Sometimes you don’t have time to open the Calendar app and type everything in. But Apple gives you an interesting feature, Siri. With just your voice, you can add events in seconds.
On iPhone or iPad:
- Say “Hey Siri” (or press and hold the side button).
- Tell Siri what you need, like:
- “Schedule a meeting with John tomorrow at 2 PM.”
- “Add a dentist appointment on Monday at 10 AM.”
- Siri will create the event and confirm the details with you.
On MacOS:
- Click the Siri icon in the menu bar or use the shortcut Command + Space for the Spotlight Search.
- Say something similar to what is said for the iPhone.
- The event shows up instantly in your calendar.
It’s fast, hands-free, and perfect when you’re on the go. Instead of fumbling through menus, you just tell Siri what you want, and it’s done.
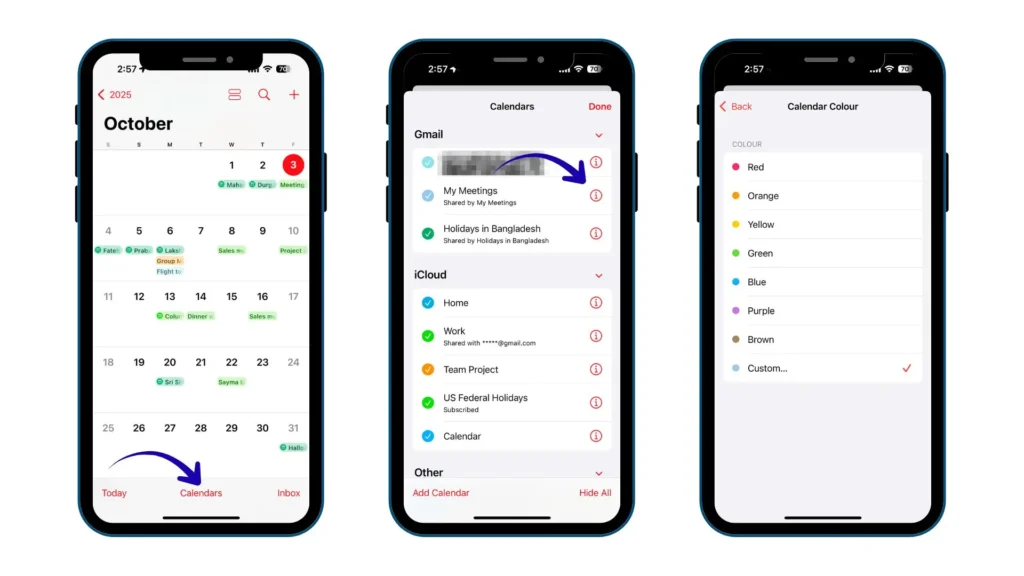
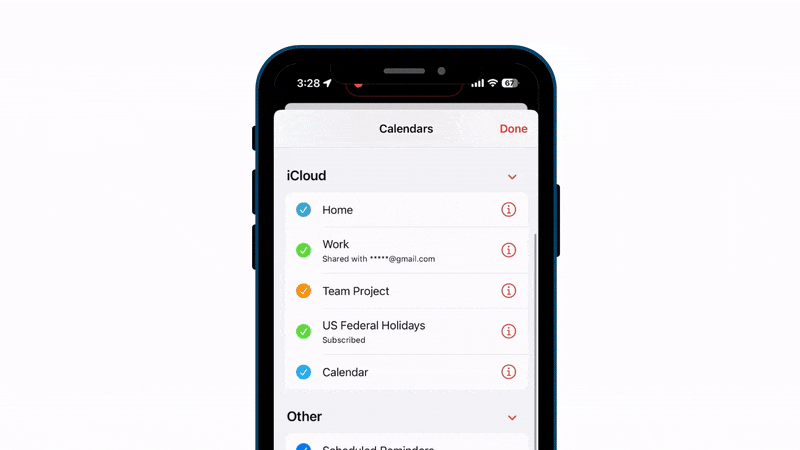
Color-Code Multiple Calendars
If you use Apple Calendar for all your work, family, and personal plans, it can get messy fast. That’s why Apple Calendar gives you easy tricks. Giving each calendar its own color makes it super easy to see what’s what at a glance.
On iPhone or iPad:
- Open the Calendar app and tap Calendars at the bottom.
- Tap the little (i) button next to the calendar you want to change.
- Choose a color that makes sense to you. For example:
- Blue for work
- Green for family
- Red for important reminders
On MacOS:
- Open the Calendar app and find the list of calendars on the left.
- Right-click (or Control + click) the calendar you want.
- Scroll down and choose a color for your calendar.

With colors, you don’t even need to read the event title — you’ll instantly know if it’s a meeting, a family dinner, or a workout. It’s a small change that makes your calendar way easier to scan.
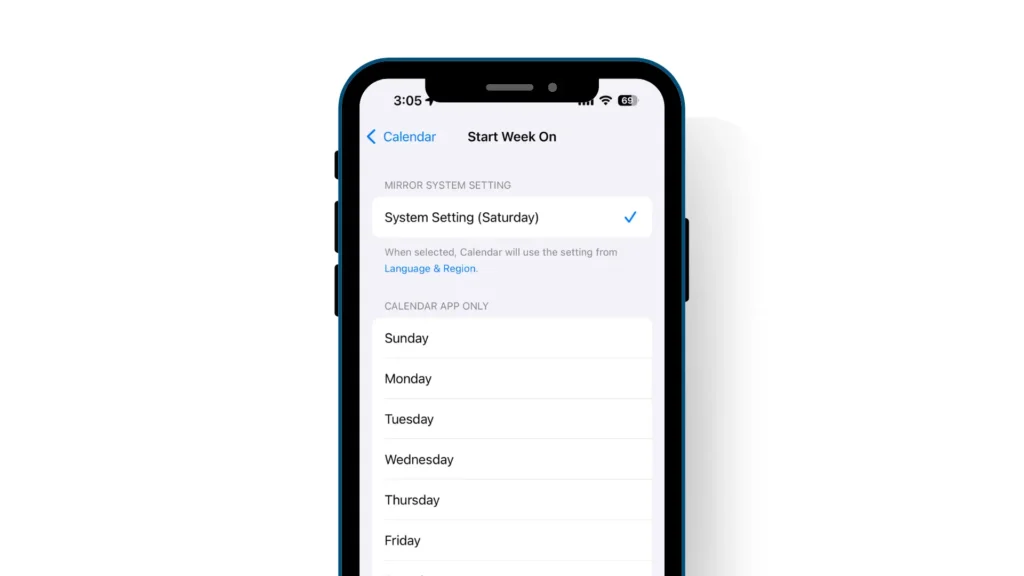
Change the Week’s Starting Day
Not everyone likes their week to start on the same day. Some people prefer seeing Monday at the beginning of their calendar, while others are more comfortable with Sunday kicking things off. Luckily, Apple Calendar lets you set it up the way you like.
On iPhone or iPad:
- Open Settings.
- Scroll down and tap Calendar.
- Tap Start Week On and choose Sunday or Monday (or whichever works best for you).
On MacOS:
- Open the Calendar app.
- Go to the Calendar menu in the top bar and select Settings.
- Under the General tab, choose your preferred day in Start Week On.
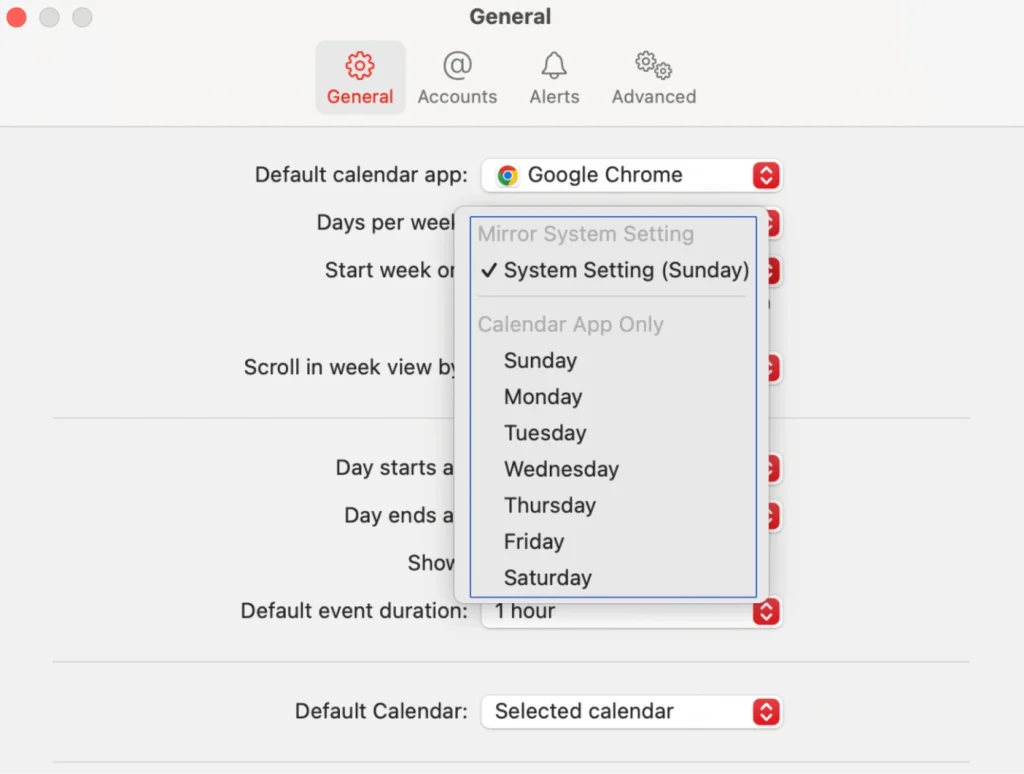
This small tweak can make your calendar feel more natural and easier to follow, especially if you’re used to a certain weekly rhythm.
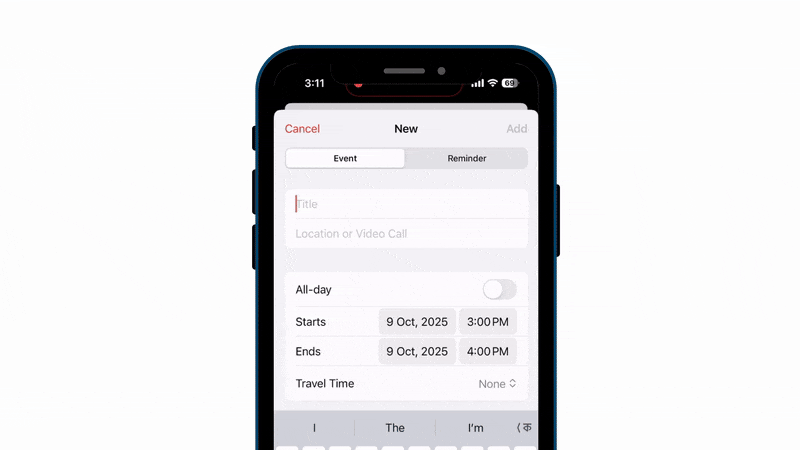
Turn On Travel Time Alerts
Ever missed a meeting because you forgot how long it takes to get there? Apple Calendar can help with that. When you add a location to an event, it can remind you when it’s time to leave, taking traffic and travel time into account.
On iPhone or iPad:
- Open the Calendar app and create a new event.
- Tap Location or Video Call and enter the place (like “Starbucks, Main Street”).
- Scroll down and tap Travel Time.
- Choose how long it usually takes, or let Calendar figure it out using Maps.
On MacOS:
- Open the Calendar app and double-click your event.
- Click Add Location and type the address.
- Check the box for Travel Time and select how long it should take.
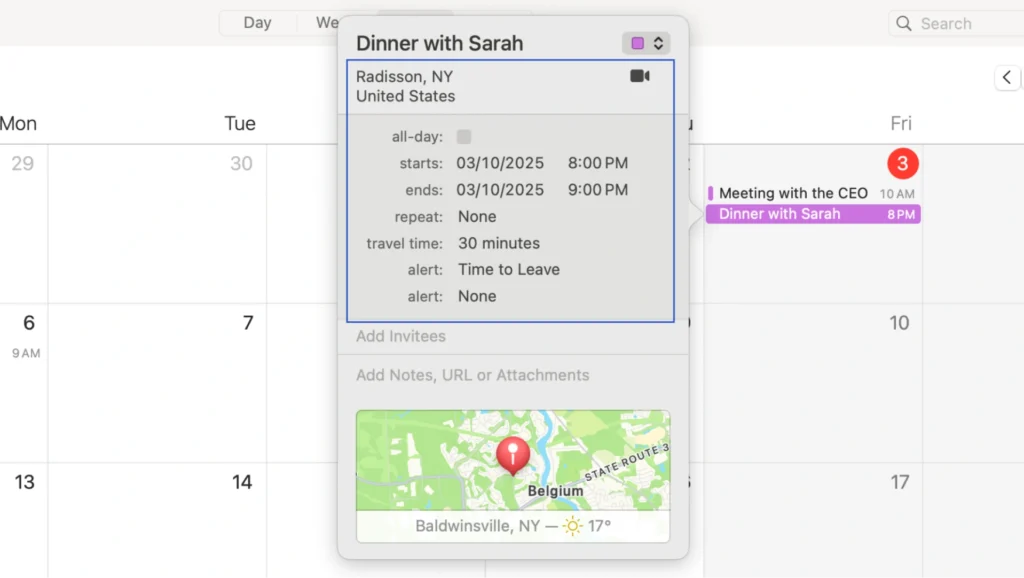
Example: If your meeting is at 3 PM and traffic takes 20 minutes, Calendar will remind you at 2:40 PM so you’re not late.
As a result, no more rushing out the door at the last minute. With travel time alerts, Apple Calendar acts like a personal assistant that nudges you to leave right on time.
Enable Time Zone Support
If you travel or work with people in different countries, events can get confusing fast. A 9 AM meeting in New York isn’t the same as 9 AM in London. That’s where Apple Calendar’s Time Zone Support comes in to keep your events accurate no matter where you are.
On iPhone or iPad:
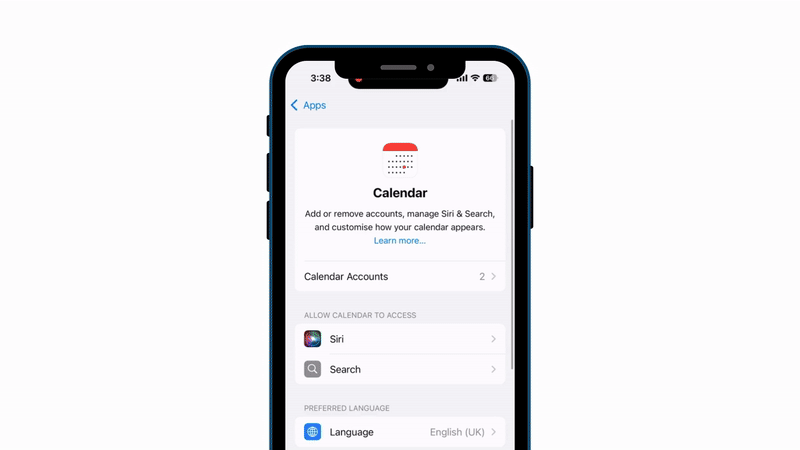
- Go to Settings → Calendar.
- Tap Time Zone Override.
- Turn it on and pick your home time zone.
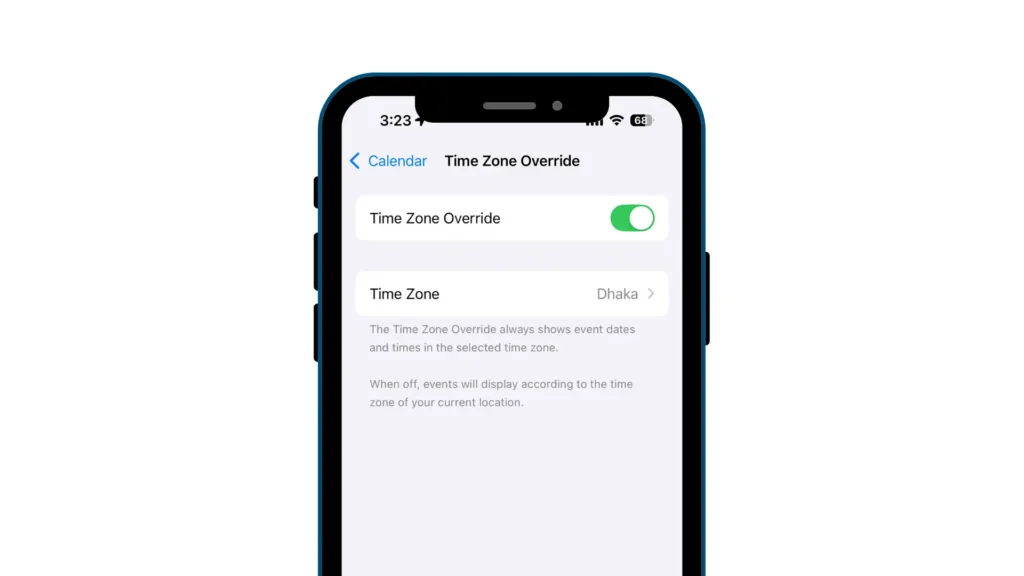
Now, your events will always stay fixed to that time zone, even if you’re traveling.
On MacOS:
- Open the Calendar app.
- Click Calendar in the top menu → Settings (or Preferences).
- Under the Advanced tab, check Turn on Time Zone Support.
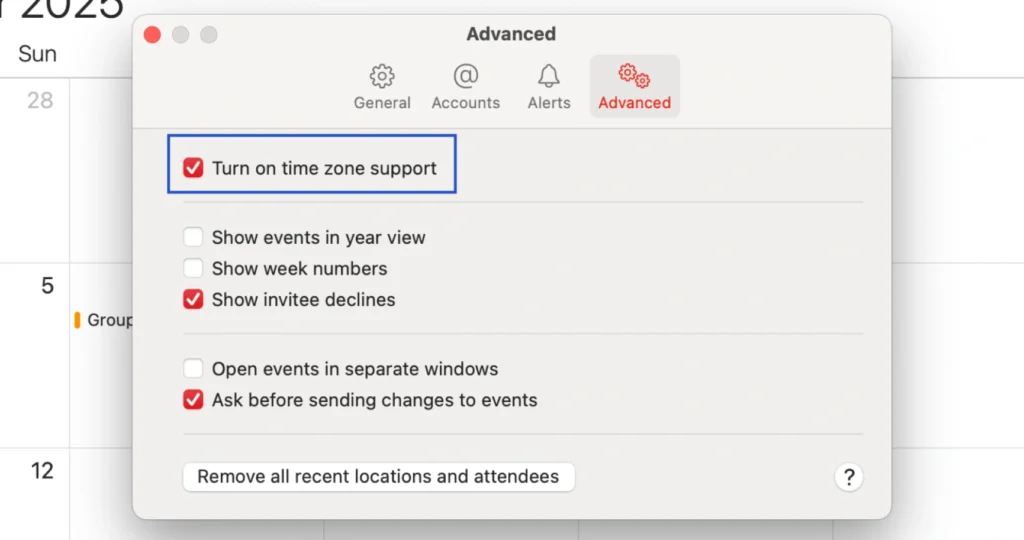
Once it’s on, you can pick a time zone for each event if you want.
This is a lifesaver if you fly often or schedule calls with international teams. You’ll always know exactly when an event starts — no more missed meetings because of time zone mix-ups.
Sync with Google or Outlook
Do you ever feel frustrated juggling multiple calendars? Maybe you’ve got your work schedule in Google Calendar and personal plans in Apple Calendar, and keeping track of everything can be messy. The good news is, Apple Calendar can pull all your events together, so you only need to check one place.
On iPhone or iPad:
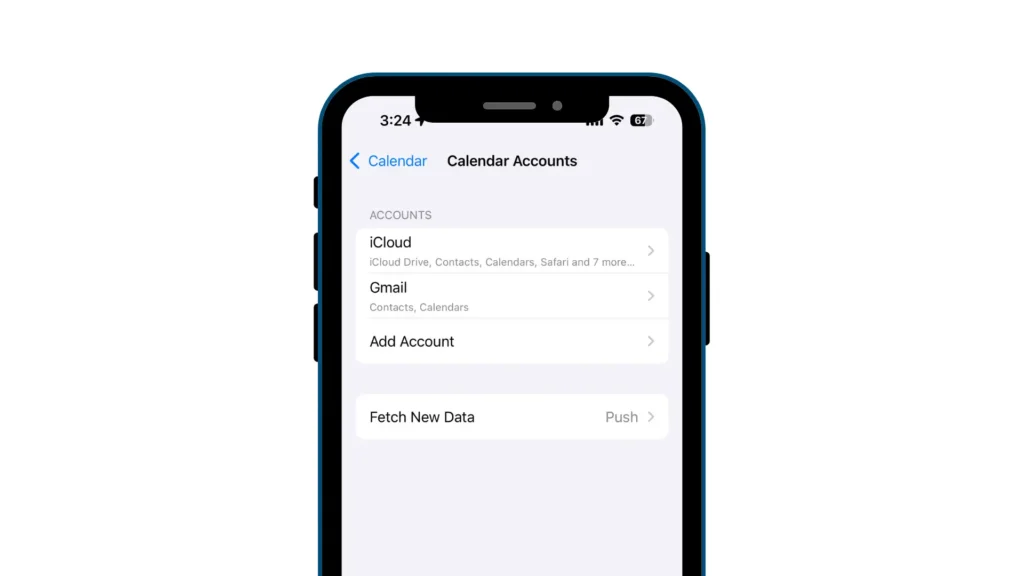
- Go to Settings → Calendar → Accounts → Add Account.
- Choose Google, Outlook, or another service.
- Sign in and make sure Calendars is turned on.
- Open the Calendar app, and you’ll see all your events in one place.
On MacOS:
- Open the Calendar app.
- Click Calendar → Accounts → Add Account.
- Select your service (Google, Exchange, or other).
- Sign in and make sure Calendars is checked.

So, no more switching between apps or worrying about double bookings. Everything shows up neatly in one calendar, making your life a lot simpler!
Drag and Drop to Reschedule
Plans change, and so do meetings. Instead of deleting and re-adding events, Apple Calendar makes it super easy for you to move things around with a simple drag and drop.
On iPhone or iPad:
- Open the Calendar app and switch to Day or Week view.
- Tap and hold the event you want to move.
- Drag it to the new time slot and let go.
On MacOS:
- Open the Calendar app in Day or Week view.
- Click and hold the event.
- Drag it to the new time or day, then release.
It’s the quickest way to shuffle your schedule without editing details. One simple move, and your calendar stays up to date.
Add Multiple Alerts and Automation
Sometimes you miss something important because the meeting reminder came too early or too late, right? Apple Calendar lets you set more than one alert for the same event, so you get reminded exactly when you need it.
Both on your iPhone/ iPad or macOS:
- Open the Calendar app and create (or edit) an event.
- Scroll down and tap Alert.
- Pick your first reminder (like “1 day before”).
- Tap Add Alert again to set another (like “30 minutes before”).

Advance Automation Triggers:
- Open your event in Calendar and edit the event → Add Alert.
- Choose Custom from the options.
- Pick an action like Open File or Send Email.
- If you select Open File, just attach the document you want handy during the meeting.

As a result, multiple alerts make sure nothing slips through the cracks. You’ll have plenty of time to prepare and won’t risk forgetting at the last minute. And this way, your calendar becomes more than a scheduling tool; it’s like a personal assistant making sure you’re always prepared.
Share Calendars with Family or Team
Keeping everyone on the same page can be tricky, especially when you’re juggling family events or team schedules. Apple Calendar makes it easier by letting you share your calendar with others.
You can create a shared calendar for family dinners, school activities, or work projects, and invite people to view or even edit it. That way, everyone knows what’s happening without endless back-and-forth messages.
On iPhone or iPad:
- Open the Calendar app and tap Calendars at the bottom.
- Tap the (i) info button next to the calendar you want to share.
- Tap Add Person and enter their email address.
- Choose permissions:
- View Only – They can see events but not change them.
- Edit – They can add or change events too.
- Tap Add, and you’re done! They’ll get an invite to join your calendar.
On MacOS:
- Open the Calendar app.
- Right-click (or Control + click) the calendar you want to share.
- Select Share Calendar.
- Type the email addresses of the people you want to invite.
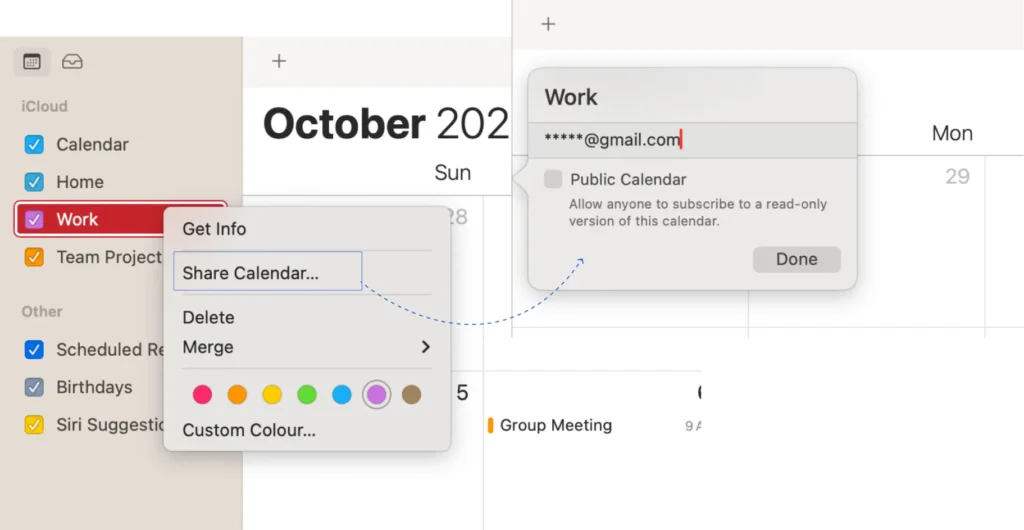
It’s a simple way to avoid confusion and keep plans running smoothly—whether at home or at work.
Bonus Tip: If you are also using Google Calendar, you can learn our effective guide to share your Google Calendar with your family and others.
Use Calendar Subscriptions
Did you know you can subscribe to public calendars in Apple Calendar? It’s a great way to keep track of holidays, sports schedules, school events, or even TV show releases, all automatically updated without you doing a thing.
On iPhone or iPad:
- Go to Settings → Calendar → Accounts → Add Account → Other.
- Tap Add Subscribed Calendar.
- Enter the URL of the calendar you want to subscribe to (many websites offer public calendar links).
- Tap Next and Save.
On MacOS:
- Open the Calendar app.
- Click File → New Calendar Subscription.
- Paste the calendar URL and click Subscribe.
- Choose your preferences, like how often it updates, then click OK.
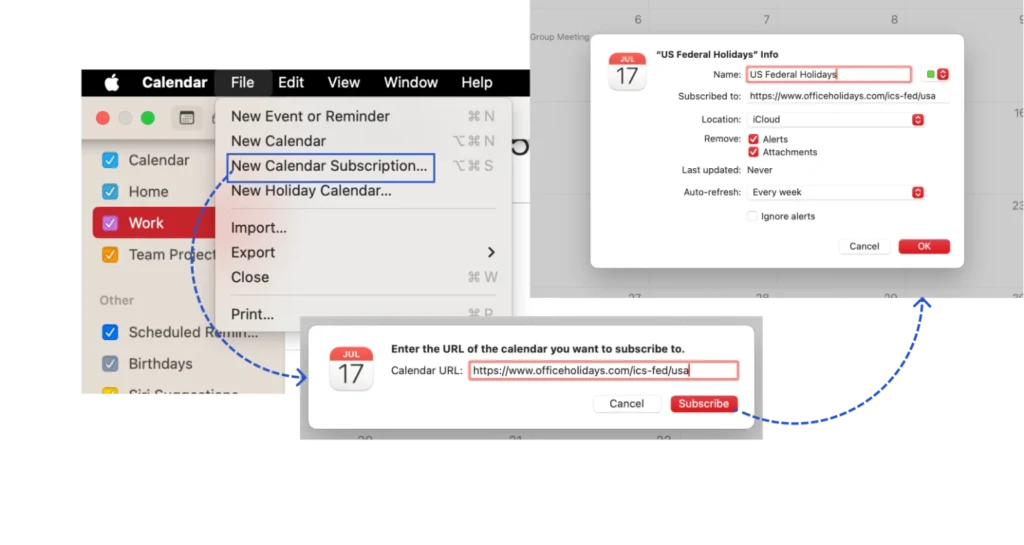
Subscribed calendars save you time and keep you organized. For example, if your favorite sports team posts its game schedule, it automatically appears in your calendar, no manual entry needed!
Attach Notes or Links to Events
Sometimes just knowing the time and place of an event isn’t enough. Maybe you have a Zoom meeting link, a checklist, or extra details you want handy. Luckily, Apple Calendar lets you attach notes, links, or documents directly to your events, so everything you need is in one place.
Same setup for iPhone/iPad or MacOS:
- Open the Calendar app and create (or edit) an event.
- Scroll down to Notes or URL.
- Type your notes or paste the link.
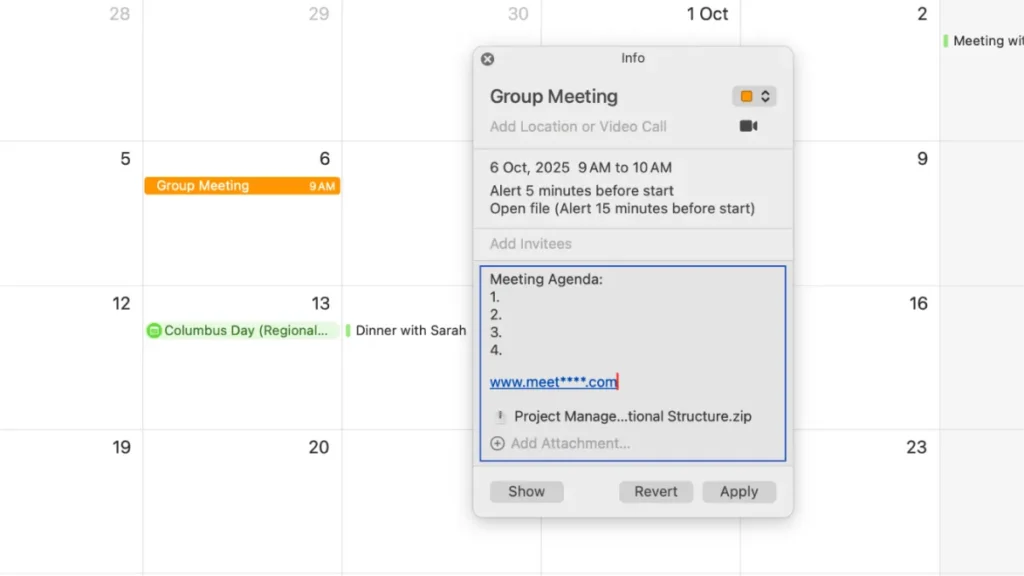
For example: Add the Zoom link for a meeting, or a shopping list for a grocery trip.
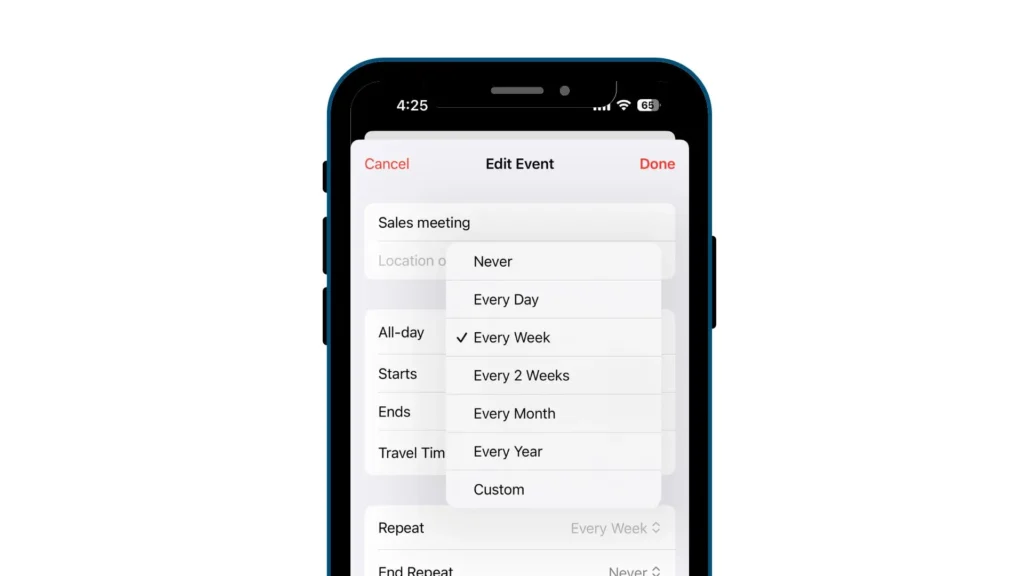
Duplicate Events for Recurring Plans
If you often have similar appointments or classes every week, manually adding them each time can be tedious. Apple Calendar makes it easy to duplicate events or set them to repeat automatically, saving you a lot of time.
On iPhone or iPad:
- Open the Calendar app and tap the event you want to duplicate or repeat.
- Scroll down to Repeat and choose how often it should recur (daily, weekly, monthly, or custom).
- Save the event — now it’ll appear automatically on all selected dates.
On MacOS:
- Open the Calendar app and double-click the event.
- Click Edit → Repeat, then select the repeat frequency.
- If you want, you can also duplicate an event: Right-click the event and select Duplicate, then move it to a new date or time.

Recurring events are perfect for regular meetings, classes, or personal routines. Duplicating events helps if you want a similar appointment but at a different time or with slight changes. Either way, it keeps your calendar organized and reduces repetitive work.
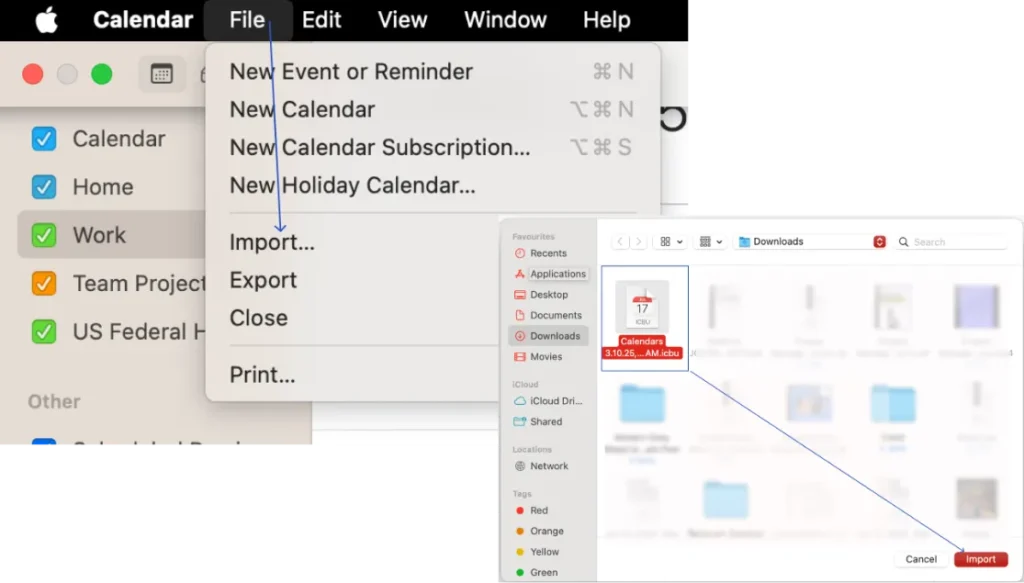
Import and Export Calendars on MacOS
Sometimes you might want to share your calendar, move it to another device, or back it up just in case. Apple Calendar makes this easy with import and export options on Mac. Don’t worry, even if it sounds technical, it’s actually straightforward.
Export All Calendars:
- Open the Calendar app on your macOS
- Click File → Export → Calendar Archive.
- Choose a location and click Save.
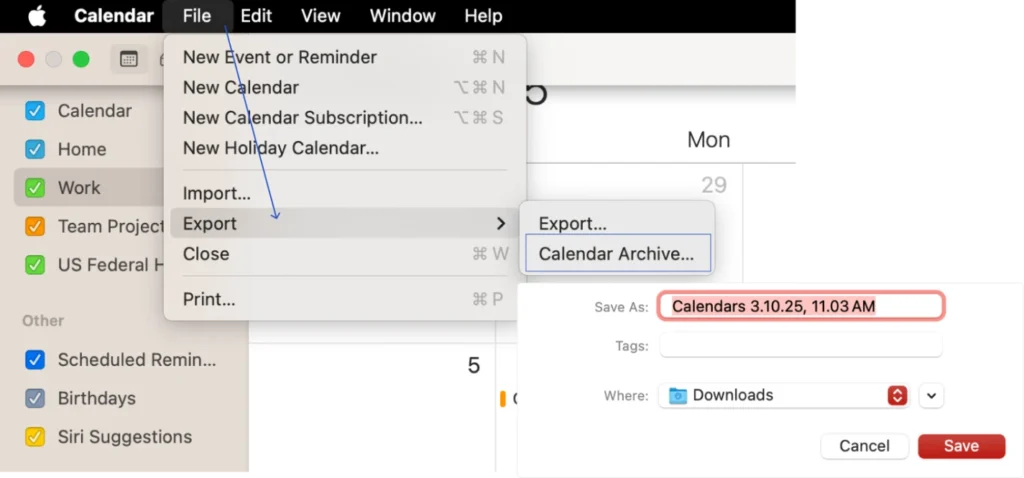
This creates a .icbu file with all your calendars in one place which is perfect for backup or transferring to another Mac.
Import Events from a Calendar File:
Have an .ics file you want to add to your calendar?
- Open the Calendar app.
- Create a new calendar if you want to keep events separate.
- Do one of these:
- Drag the .ics file into Calendar.
- Or click File → Import, select the file, then click Import.
- Pick which calendar to add the events to and click OK.
Note: Importing a calendar file will remove the events’ previous colors.
Import All Calendars from an Archive File:
If you have an .icbu calendar archive and want to restore or transfer all calendars:
- Open Calendar.
- Click File → Import, select the .icbu file, and click Import.
Warning: This will replace all your current calendars, and previous colors will be removed.
Importing and exporting lets you back up your important events, share calendars with others, or move everything to a new Mac. It’s a simple way to keep your schedules safe and organized.
Note: To keep Apple Calendar running smoothly, Mac performance monitoring tools can help spot process issues early.
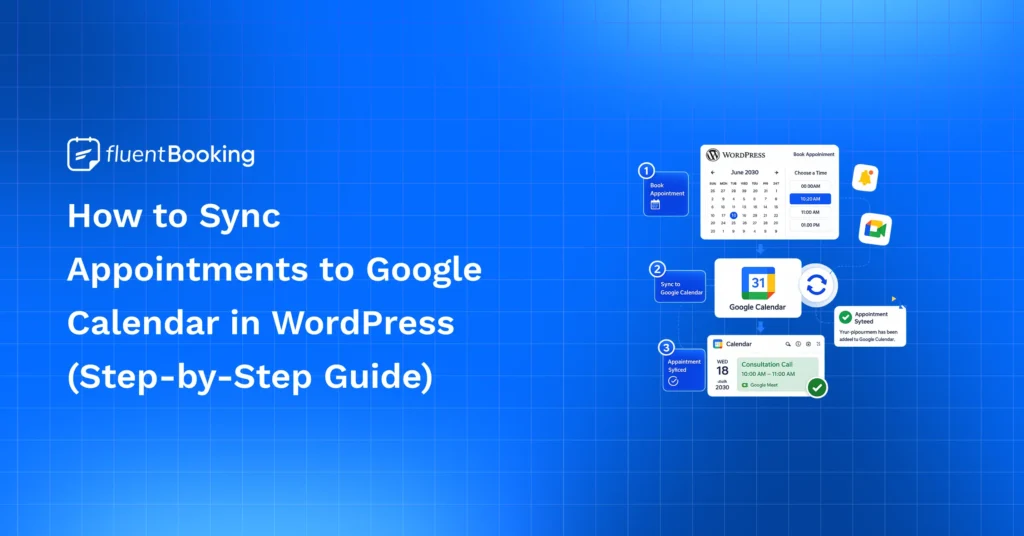
Connect Apple Calendar with FluentBooking for Professional Scheduling in WordPress
If you are a service provider and managing your appointments, bookings, and client schedules in your WordPress site, while also trying to maintain your personal calendar can get messy fast.
But Connecting Apple Calendar with FluentBooking. You get a seamless, real-time view of all your bookings, no double entries, no missed appointments, and everything stays organized in one place.
Benefits of Using FluentBooking with Apple Calendar
- Automatic Sync: Every new booking from your WordPress site appears instantly in your Apple Calendar.
- Stay Organized: Keep personal and professional schedules in one place for easy management.
- Save Time: No more manual updates or switching between apps, FluentBooking does it for you.
- Reduce Errors: Avoid double bookings and missed appointments with real-time updates.
- Professional Scheduling: Perfect for freelancers, coaches, consultants, and small businesses who want a smooth booking experience.
Using this integration turns Apple Calendar into a powerful professional tool, helping you manage your day efficiently while keeping your clients happy.
Keep your appointments organized, avoid double bookings, and manage your day effortlessly with FluentBooking + Apple Calendar.

Final Thoughts
Apple Calendar might look simple, but with these effective tips for iPhone and Mac, you’ll unlock its full potential. From smart scheduling with Siri to sharing calendars with your team, it’s a powerful tool that keeps your life organized and stress-free.
The best part? It’s already built into your Apple devices, free, and seamlessly syncs across your ecosystem.
Start applying these tips today, and you’ll spend less time managing your schedule and more time focusing on what really matters.
Ratul Hasan Ripon
I enjoy making complex ideas simple and engaging through my writing and designs. With a strong knowledge on content writing and SEO, I create technical content that’s both easy to understand and interesting.
Table of Content
Subscribe To Get
WordPress Guides, Tips, and Tutorials


Leave a Reply