How Doctors Can Automate Appointment Scheduling in WordPress?
Is your healthcare still dependent on traditional doctor appointments?
If yes, you should consider an upgrade!
One of the most frustrating issues with traditional doctor appointments is people have to make phone calls and wait for weeks to know if they’ll get an appointment. This is usually a time-consuming process and can be life-threatening for patients requiring emergency attention.
So, you should start automating your healthcare appointment booking system. By doing so, you’ll enable a more responsive, convenient, and accessible service for both your healthcare and patients.
Interested?
Let’s begin!
Benefits of an Automated Doctor Appointment Booking System
An automated doctor appointment scheduling system makes the appointment reservation process simple, convenient, and accessible for both healthcare service providers and patients.
Moreover, due to the dynamic and real-time broadcasting of availability & scheduling patients find the reservation process faster and more accessible for themselves.
Let’s look at some of the major benefits of using an automated doctor appointment scheduling system for both the healthcare industry & patients:
- Online appointment booking ensures patients don’t need to wait for an appointment with instant availability updates & 24/7 accessibility
- Real-time monitoring of scheduled meetings helps healthcare services improve their service & treatment efficiency
- Automatic handling of booking activities reduces manual administrative tasks like handling patients’ phone calls, replying to emails, sending SMS, etc., allowing staff to focus on other areas thus, boosting team productivity
- Sending automated booking confirmation and reminder emails/SMS to patients significantly reduces the chance of cancellations/no-shows
- Easy and convenient booking experience makes patients happy and improves customer satisfaction
- Data analytics from appointment software inform patient behavior, appointment trends, and booking outcomes, enabling data-driven decisions for future marketing, pricing, and promotions
These key benefits illustrate that it’s super important for you to implement an automated booking system and extract the advantages for you and your patients.
Implementing an Automated Doctor Appointment Scheduling System on WordPress
Implementing an automated appointment scheduling system will streamline the workflow, ensure a convenient & accessible booking experience, and improve the reputation of doctors or healthcare service providers.
If you are providing personal services or running a healthcare service on WordPress you might be wondering how to turn your website into a functional booking system for automated patient scheduling.
No more worries!
FluentBooking is the best plugin to set up your automated booking calendar & improve the workflow & booking experience of the patients.
Let’s discover how you can use FluentBooking to set up your availability and manage patients efficiently!
Setup Your Availability
The first thing you need to do is to set your availability with FluentBooking i.e. your service hours, and workdays within a week when you’ll be available to treat the patients.
You can easily set up your booking calendar with FluentBooking, thanks to the no requirements of any coding or technical skills.
How?
Go to Calendars and click on Add New Host to create your booking calendar.
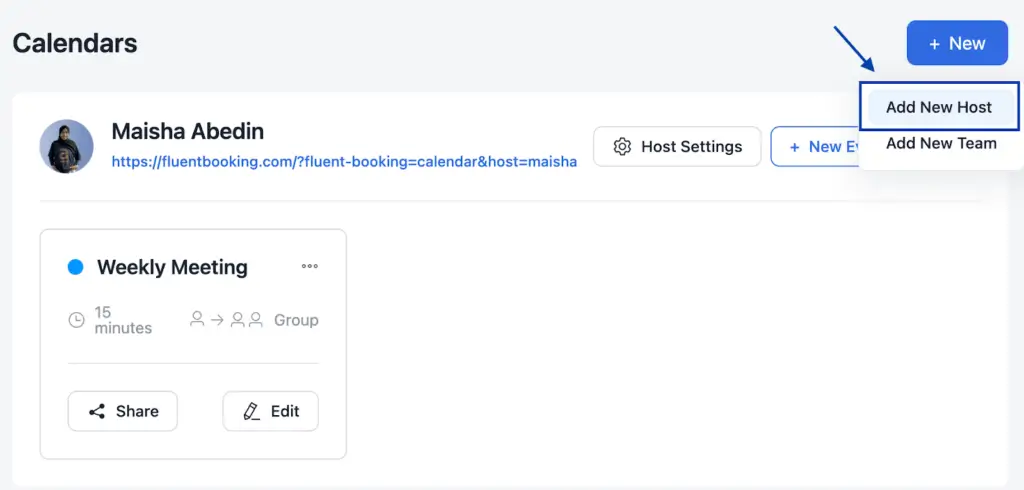
You’ll be asked to select the host of the meeting and the booking type. So, select the doctor who’ll be responsible for treating the patient and the booking type as One-to-One.

Next, you have to fill in some important information under the Event Details:

- Event name: Here you have to provide the name of the event
- Meeting duration: It’s the duration of the meeting with your patient. You can select some predefined duration or set your custom duration.
- Description: You can write a brief description of the meeting here
- Location: It’s the place where the scheduled meeting will take place. FluentBooking gives you the privilege to set up the appointment location both physically or in Google Meet/Zoom/MS Teams.
- Timezone: Finally select the timezone of the meeting and click on Continue
Then you need to select your availability based on your available hours within a day, and days within a week and click Continue.

After that, a new window will appear where you can review your preferences and modify the meeting settings if needed.
Next, click on Save Changes and you’ll find the booking calendar under Calerdars just like this-

However, if your availability changes then you can use Date Overrides to manage limited availability. Suppose, on 18th December you’ll be available from 9 AM – 11 AM & 3 PM – 5 PM. So, you need to change your availability for this specific date.
To do this, go to Availability>Add a date override then do your tweaking and hit Apply & Save Changes.

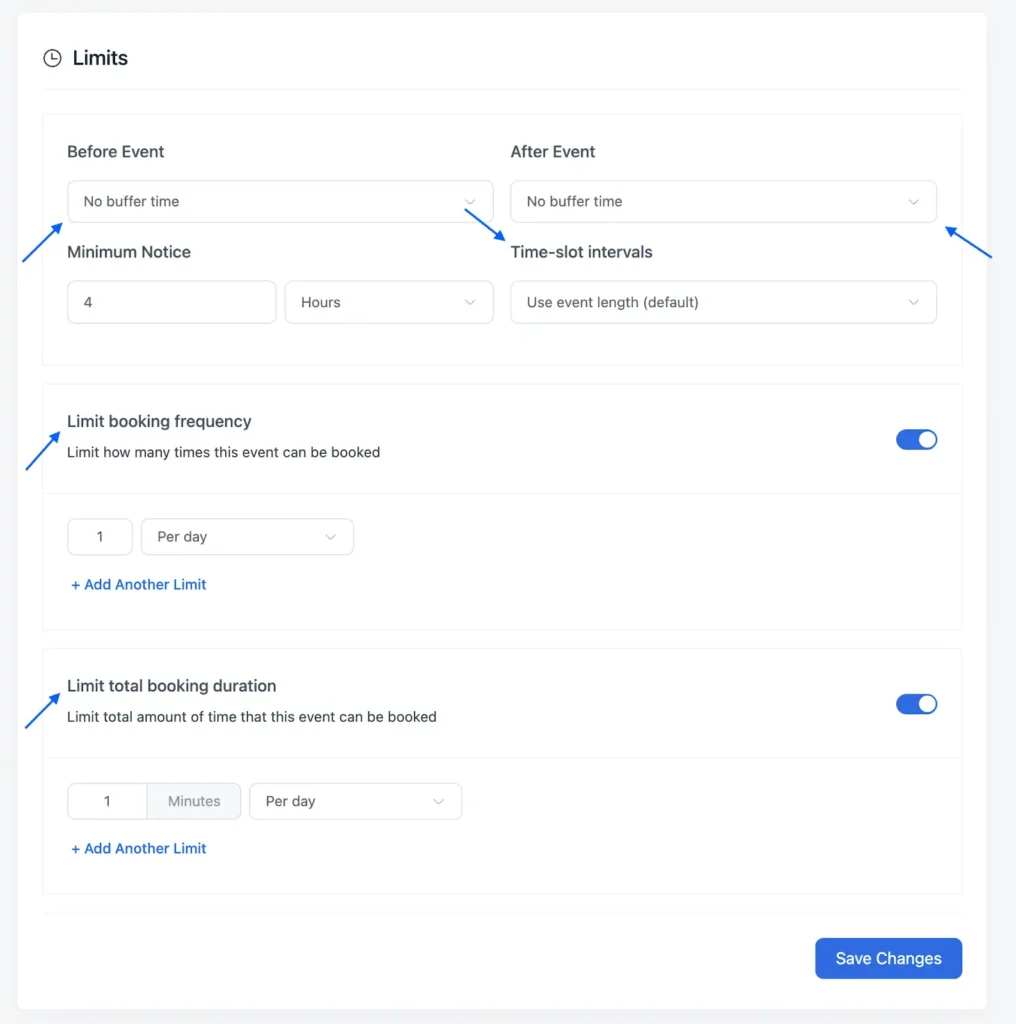
Also, if you want to add buffer time, limit booking frequency and duration, and enable time-slot intervals you can do that too.
Go to Calendars>Edit>Limits then set your preferred buffer time, booking frequency and duration, and time-slot intervals and finally click on Save Changes.
Finally, you can enable a landing page or use the shortcode to go live with your booking page. If you configured everything properly then your booking page will look like this to the visitors-
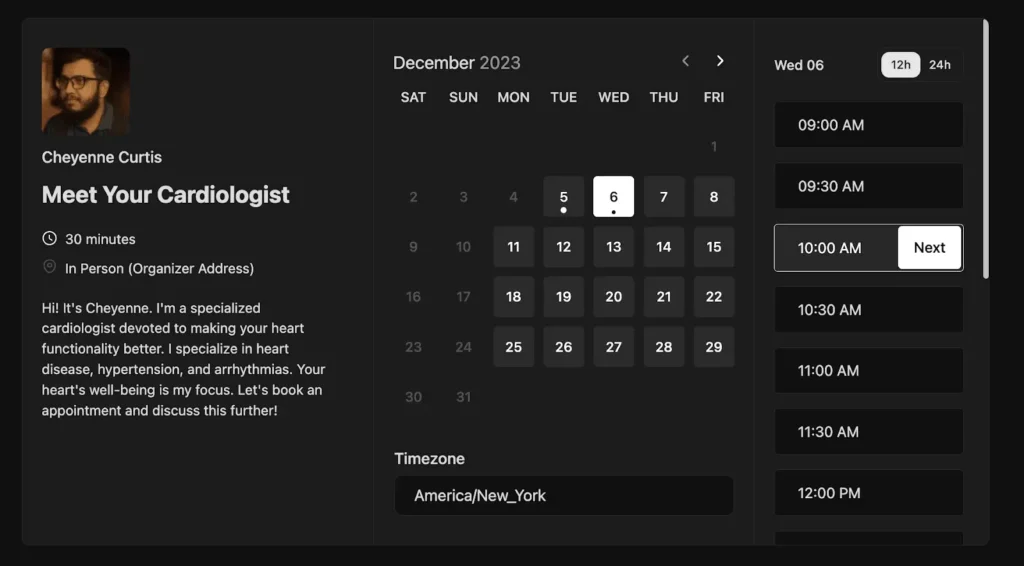
But if you want to customize the booking page then you can do that too.
Automated Booking Confirmation Email
It’s important to inform your patients about their booking confirmation. So, if any patient makes an appointment then FluentBooking will send an automatic confirmation email to both the meeting organizer and attendee.
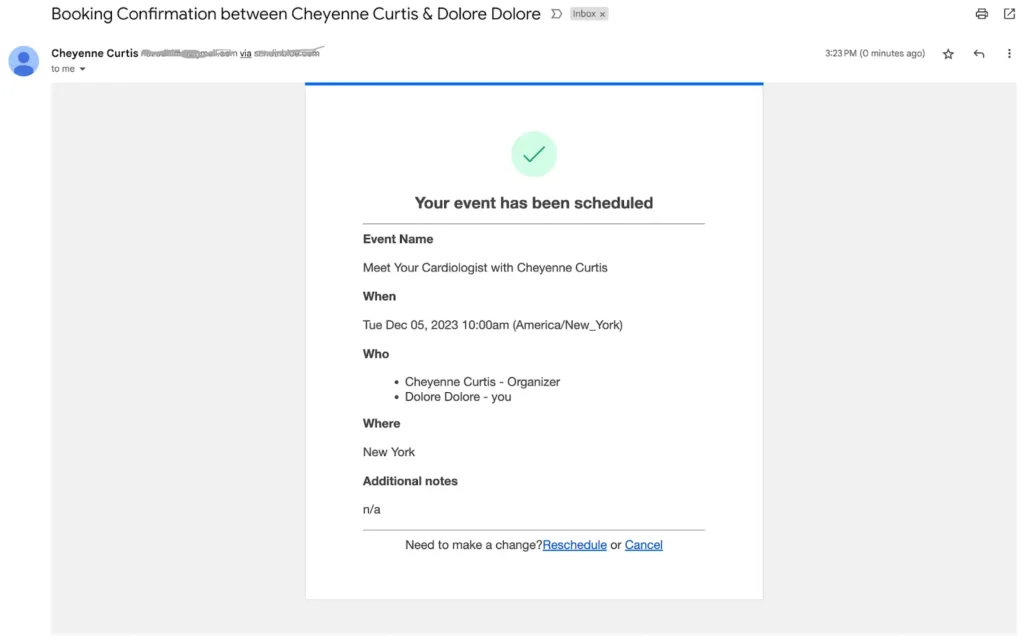
This will greatly reduce the manual admin work of sending confirmation emails to every patient after scheduling the appointment.
Also, this automated email will serve as an appointment verification for the patients and inform them about their appointment confirmation.
Check our complete guide to writing appointment confirmation emails!
Send a Reminder Email Before the Appointment Day
You don’t want a no-show or cancellation because it may turn into a financial loss & waste of resources. Luckily with FluentBooking, you don’t need to bother anymore.
Go to Calendar>Edit>Email Notification and make sure the reminder email to the event organizer and attendee is checked.

Then you don’t need to worry about missing appointments and no-shows anymore!
Check out these amazing appointment reminder emails to reduce no-shows!
Stay in Touch with Your Patients
Remember while booking the appointment the patients gave you their email addresses which can be used to develop a strong and long-lasting relationship with them.
Email marketing can be a great strategy to run promotional campaigns, retain patients, and generate revenue for your healthcare facility. The FluentBooking-FluentCRM combo makes it a breezy hike.
Like, after completing appointments with the patients you can ask them for feedback on the service, send health tips and reminders for routine check-ups & medicine, send promotional offers, etc.
Here’s an automation funnel from which you can take some inspiration:

Here’s documentation on how to integrate FluentBooking with FluentCRM
Turn Your Patients into Happy Souls!
Healthcare isn’t a privilege, it’s a fundamental human right that should be accessible to all. If you are providing healthcare services to people then you should aim to make their journey smooth and blissful.
Implementing an automated booking system in your healthcare facility will ensure your services are efficient, responsive, and convenient to the patients.
We hope this article will help you to implement an automated doctor appointment booking system with FluentBooking and your patients will receive a delightful booking experience.
Aminul Islam Tuhin
Hi! Nice to meet you. I’m a guy who loves to explore, learn, and share knowledge. I spend most of my time catching up with marketing tips & tricks. When I’m not busy with any of these, you’ll find me with a book, exploring the city, or playing my favorite games.
Table of Content
Subscribe To Get
WordPress Guides, Tips, and Tutorials






Leave a Reply