

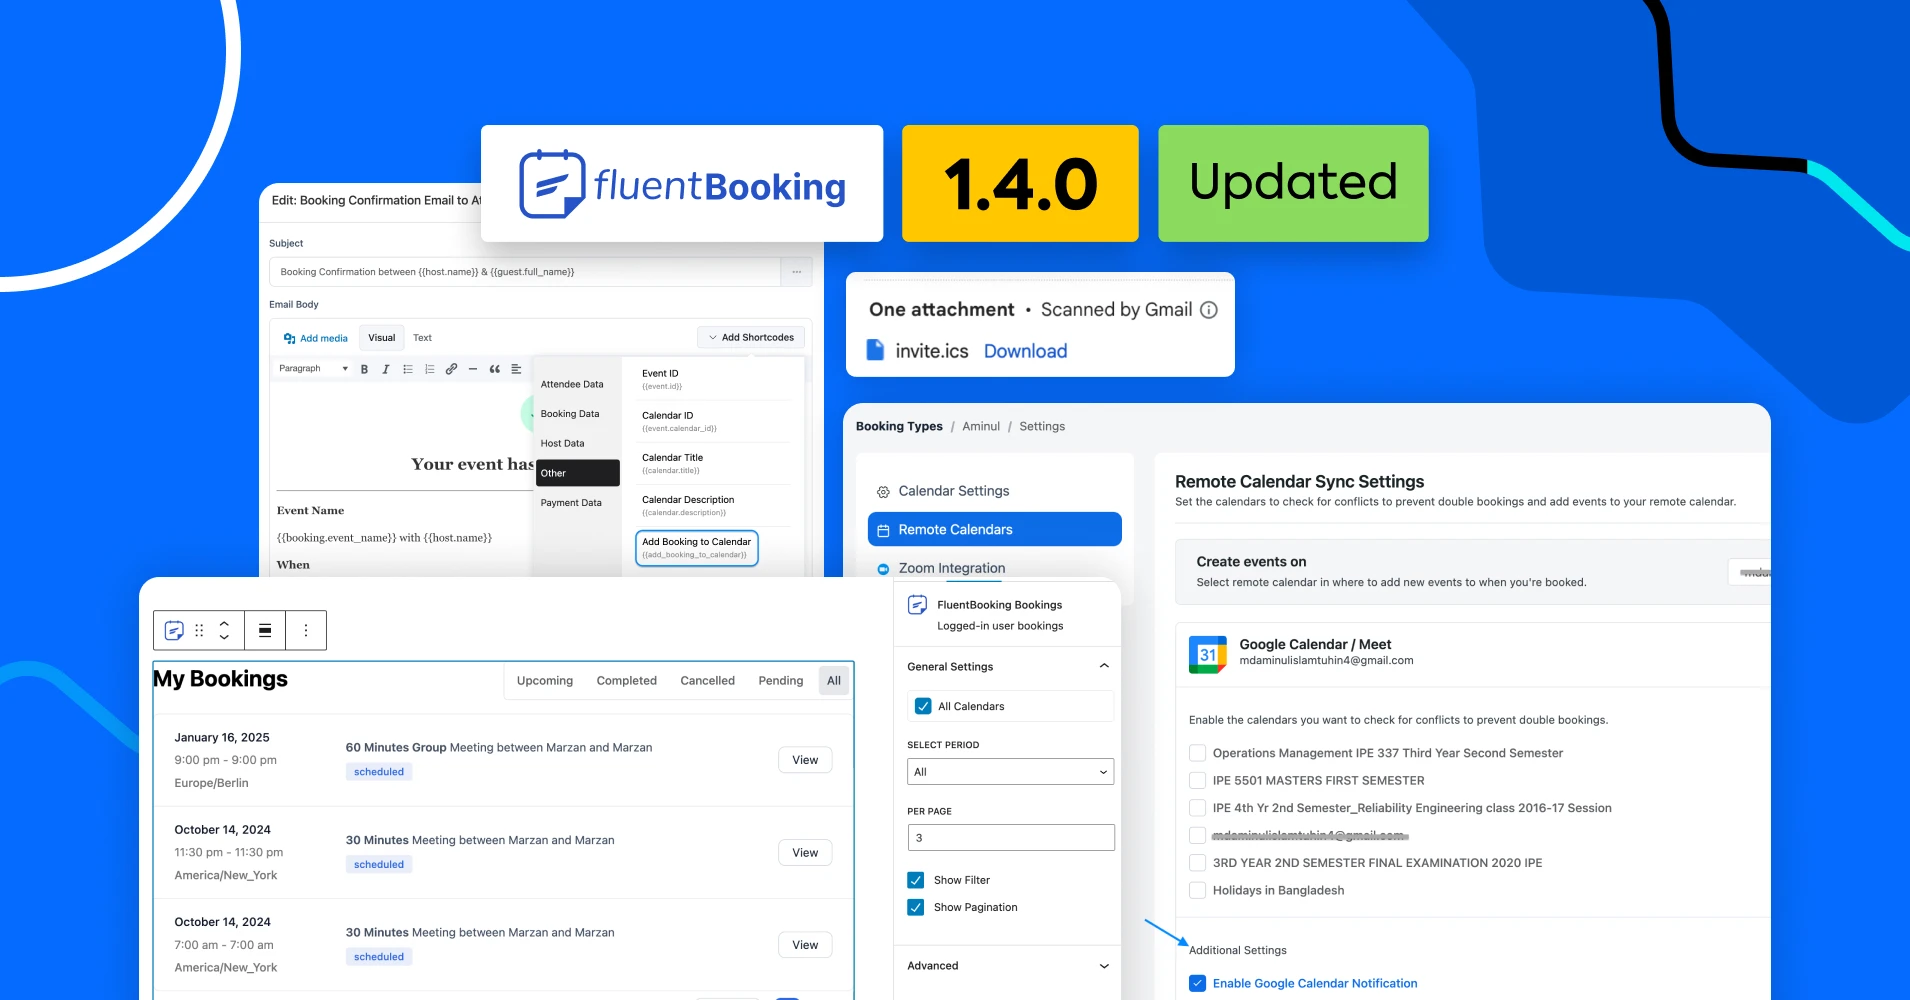
FluentBooking 1.4.0: User Bookings, Manual Booking Confirmation, ICS File Attachment, and More!


Hello, FluentBooking fans!
We hope you’re having a great day managing your appointments with FluentBooking. And the FluentBooking team has been up to some exciting stuff lately to make your appointment management experience even better.
Today we’re back again with another exciting product release and we can’t wait to share what’s waiting for you.
But before that, we are excited to announce the launch of an exclusive beta version of FluentBoards in the community, and we don’t want you to miss out on it!
Now let’s jump straight in and discover what’s new inside the box!
User Bookings in the Gutenberg Block
The first surprise inside the box is the user bookings option in the Gutenberg editor. Now you can add user bookings directly from the Gutenberg block, and your attendees can view and manage their FluentBooking appointments.
To enable this new block go to Posts > Add New Post then click the plus icon and search for FluentBooking Bookings. Alternatively, you can use this smartcode:
[fluent_booking_lists] 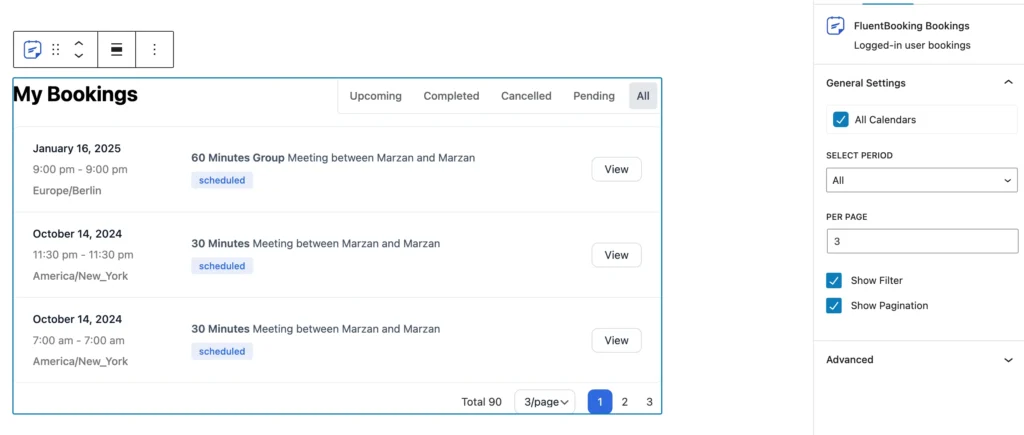
Next, you can configure the following settings for the events:
- Select the calendars that you want to display
- Choose the period of the events
- Set the number of events per page
- Show or hide the filter and pagination
Once you configure everything then click Publish and your page will look like this:
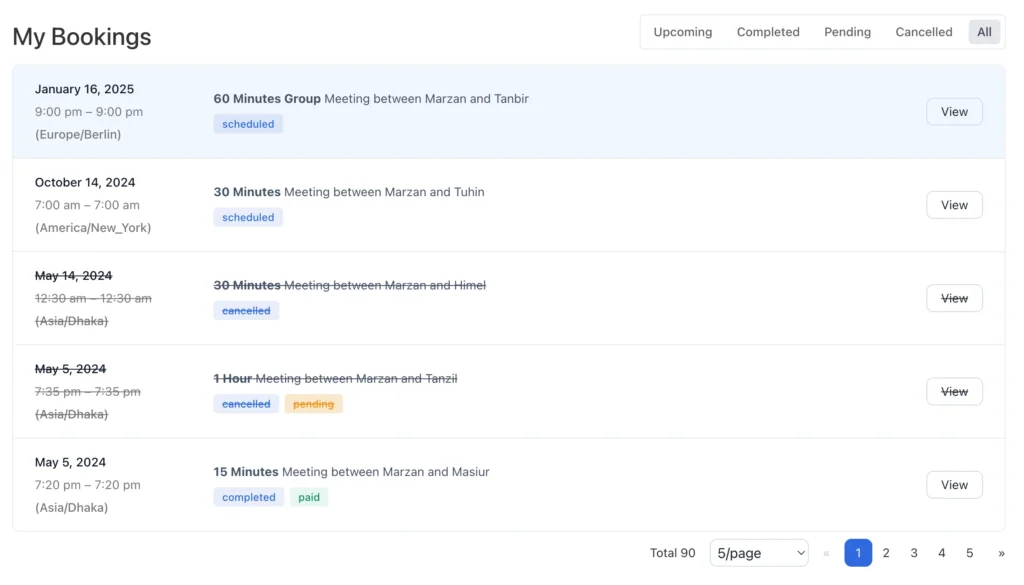
Looks amazing, isn’t it?
Manual Booking Confirmation
Next, we’ve added the manual booking confirmation option, giving you more control over your schedule. It lets you choose which meetings to accept or decline, making sure you prioritize the ones that really count. By doing so, you can manage your time better and make meetings more productive.
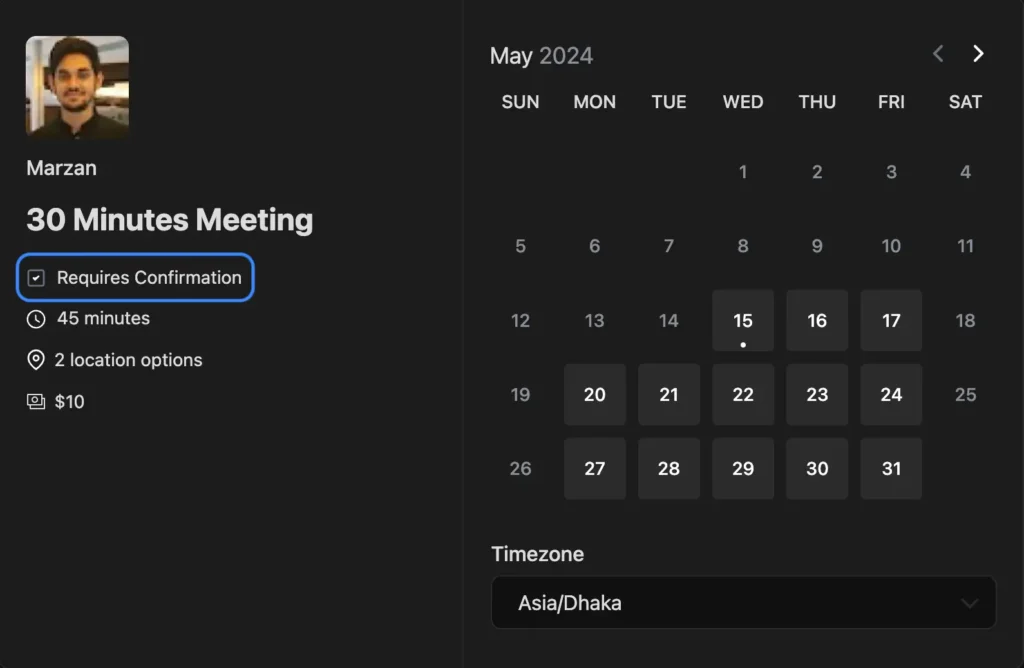
You can also set a notice time for urgent cases, so you can quickly accept or reject appointments when needed. To use this feature, head to Calendars > Edit > Advanced Settings and find Requires Confirmation. There, you’ll see two options:
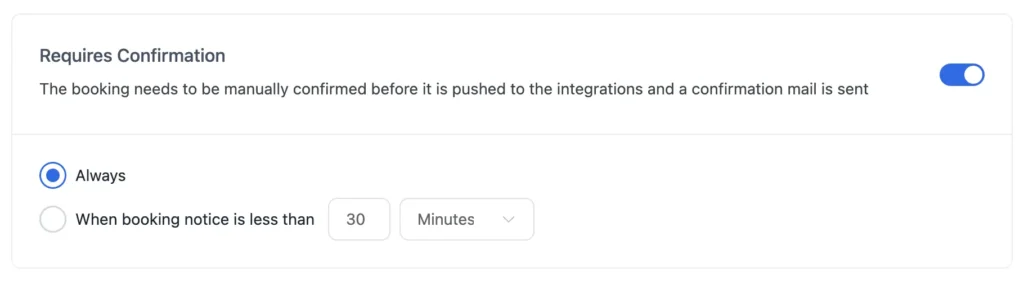
- Always: This option makes manual confirmation necessary for every appointment request
- Booking Notice: If you don’t always want to confirm appointments manually, but need to for emergencies, you can set a notice time. If the notice time is shorter than the booking notice, appointments will need manual confirmation
Once you’ve set your preferences, attendees will see a clear ‘Requires Confirmation‘ message on your booking calendar. This avoids any confusion about manual acceptance.
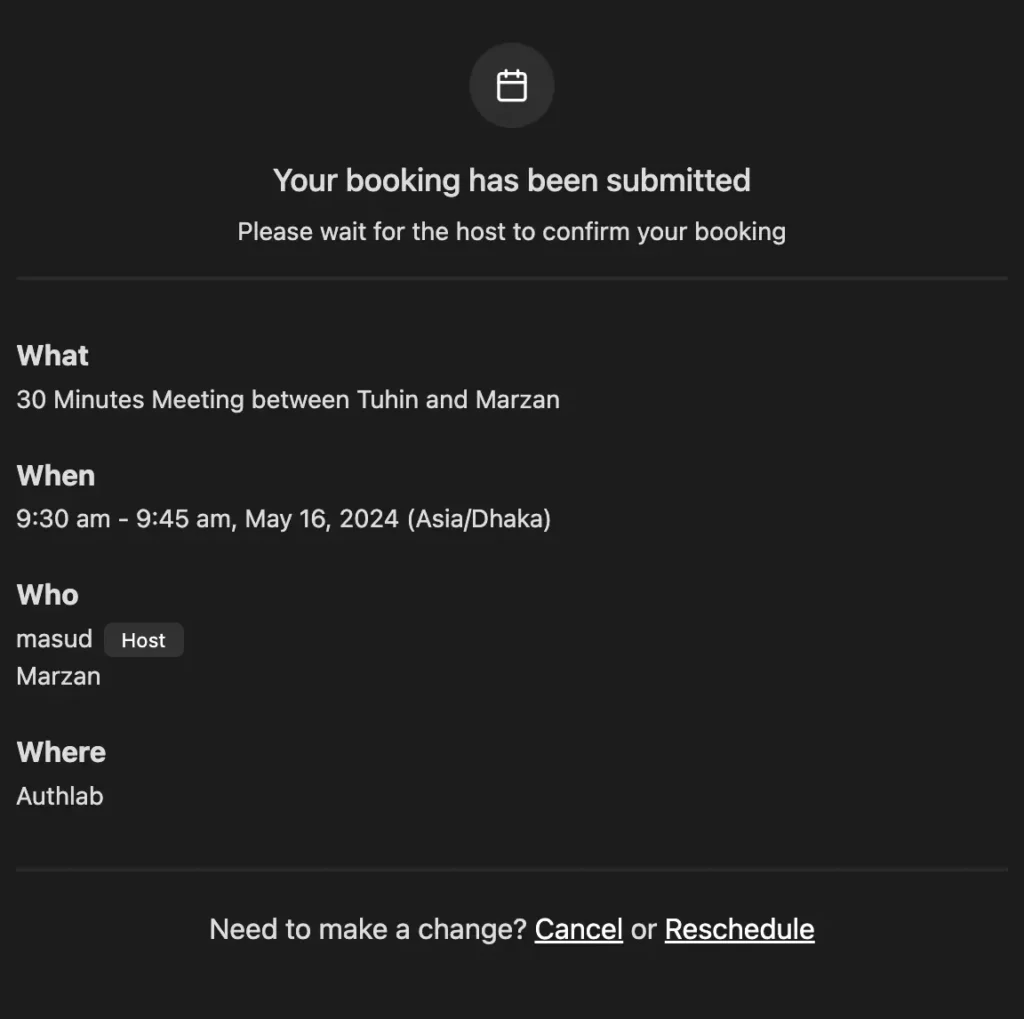
When someone schedules a meeting with you, they’ll get a message saying their request is being considered.
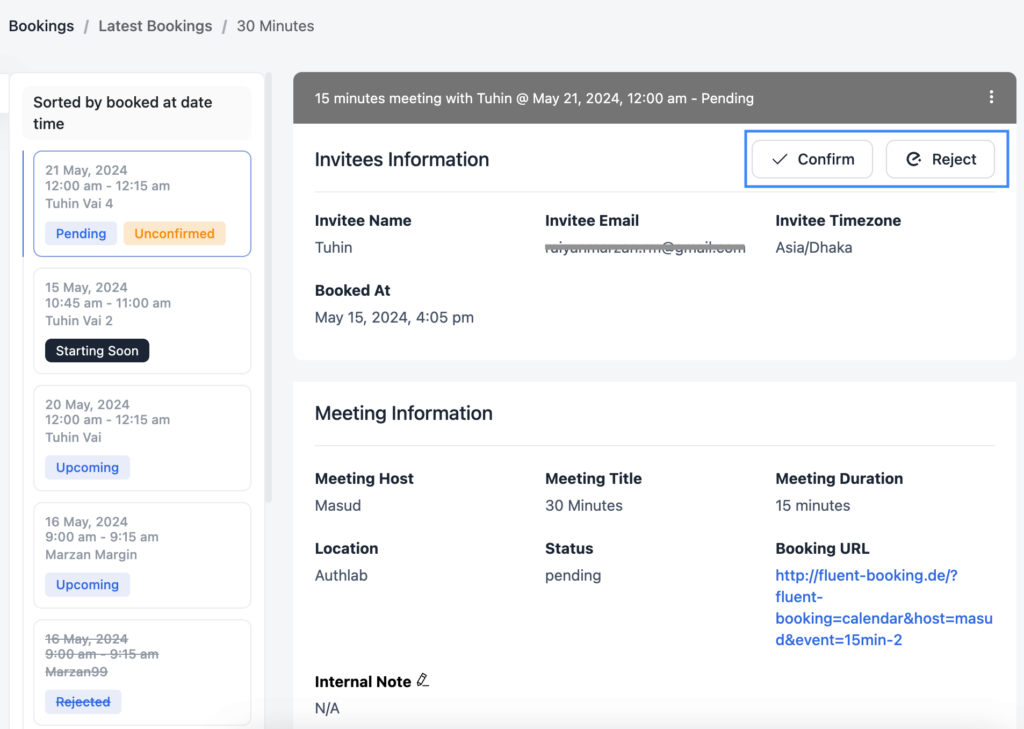
After they’ve submitted a request, you can accept or decline it within FluentBooking or from your email.
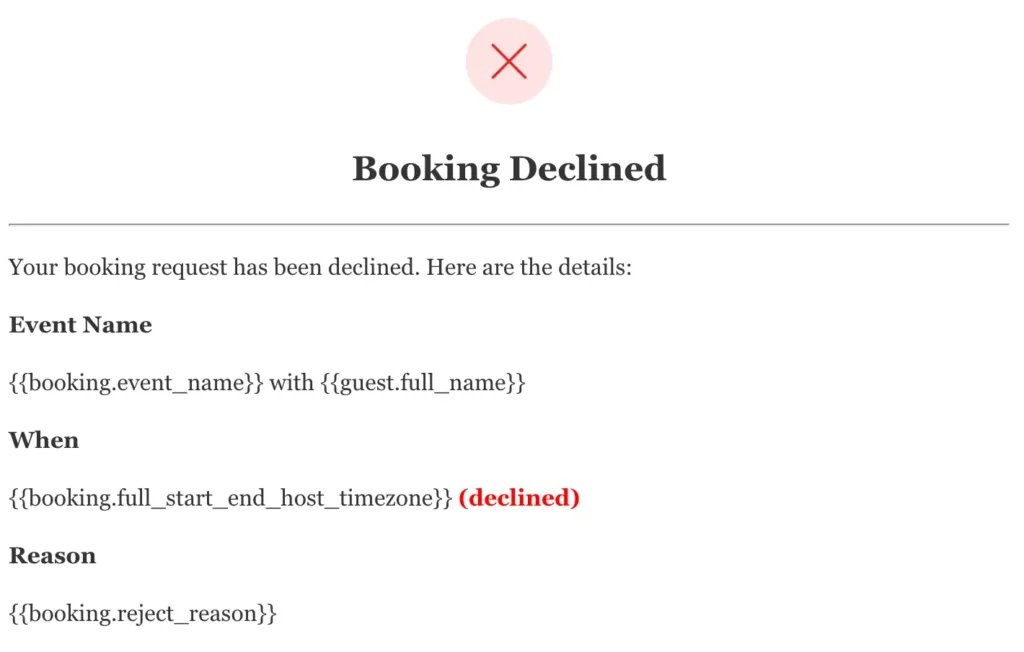
Depending on your decision, attendees will get an email saying whether their booking is approved or declined.
In short, this feature helps you keep track of your appointments and focus on what’s important.
Google Calendar Additional Settings
In this update, we have added two additional settings under Google Calendar:
- Enable Google Calendar Notification
- Guests can see other guests
This may seem confusing at first, so let us clear the air. Previously, when an appointment was made, both the meeting organizer and attendee received email notifications from FluentBooking and Google Calendar.
However, this double notification can be distracting and frustrating for users. That’s why we have added an option to control Google Calendar notifications.
Additionally, for appointment confirmation emails, you can now choose whether to share attendee information with other attendees in group meeting events.
To enable or disable these additional settings, go to Calendars > Host Settings > Remote Calendars. There, you’ll discover these two new options under Remote Calendar Sync Settings.
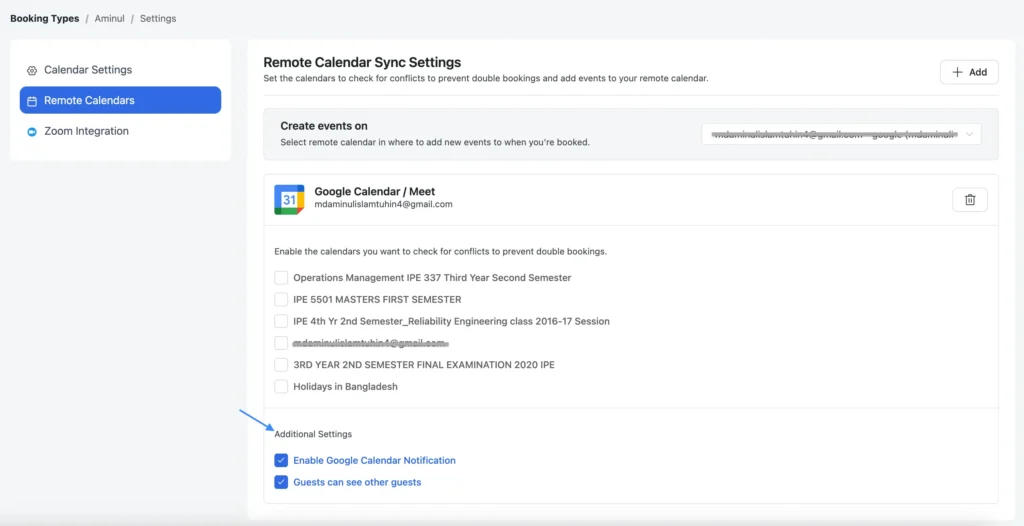
Then set your preference and your appointment experience will be smoother for sure.
Clone Meetings from Any Host
Previously, it was only possible to clone a meeting hosted by the same host in FluentBooking. However, with this update, you can now clone meetings hosted by any host. This feature reduces the need for manual input when setting up a meeting from scratch, provided the purpose is the same.
To clone meetings from any host, go to Calendars and select the host you wish to clone the meeting for. Next, click the three dots and you’ll find the option Select Calendar Event. Then select the calendar you want to clone then click Clone Event, and it will be successfully duplicated for the targeted host.
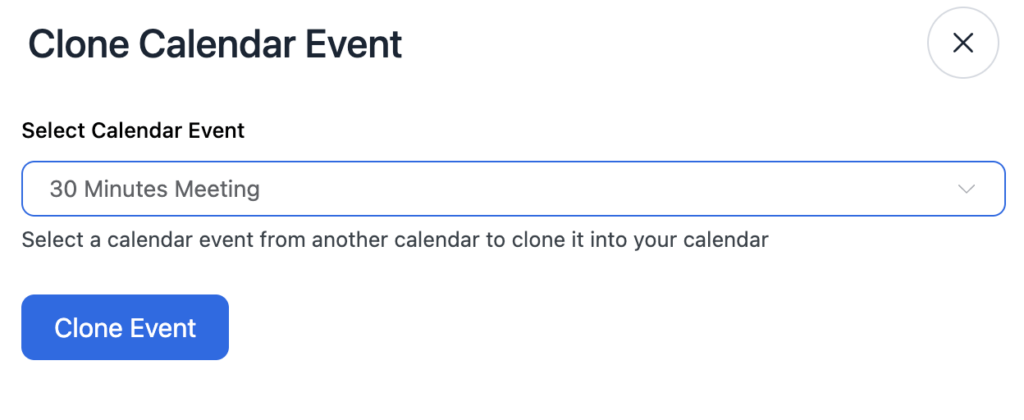
Ready to clone any calendar?
N.B. Individual hosts can clone events from other individual hosts, and teams can clone events from other teams.
New Smartcode – Add Booking to Calendar
We have added a pretty handy and useful smartcode called ‘Add Booking to Calendar’. This smartcode can be used to add bookings to the calendar. This will help your attendees to easily add appointments to their preferred calendars.
To use this smartcode in the email go to Calendars > Edit > Email Notification. Here, you’ll find the ‘Booking Confirmation Email to Attendee/Organizer’ option. Click Edit and proceed to Add Smartcodess > Other and access or use the smartcode.
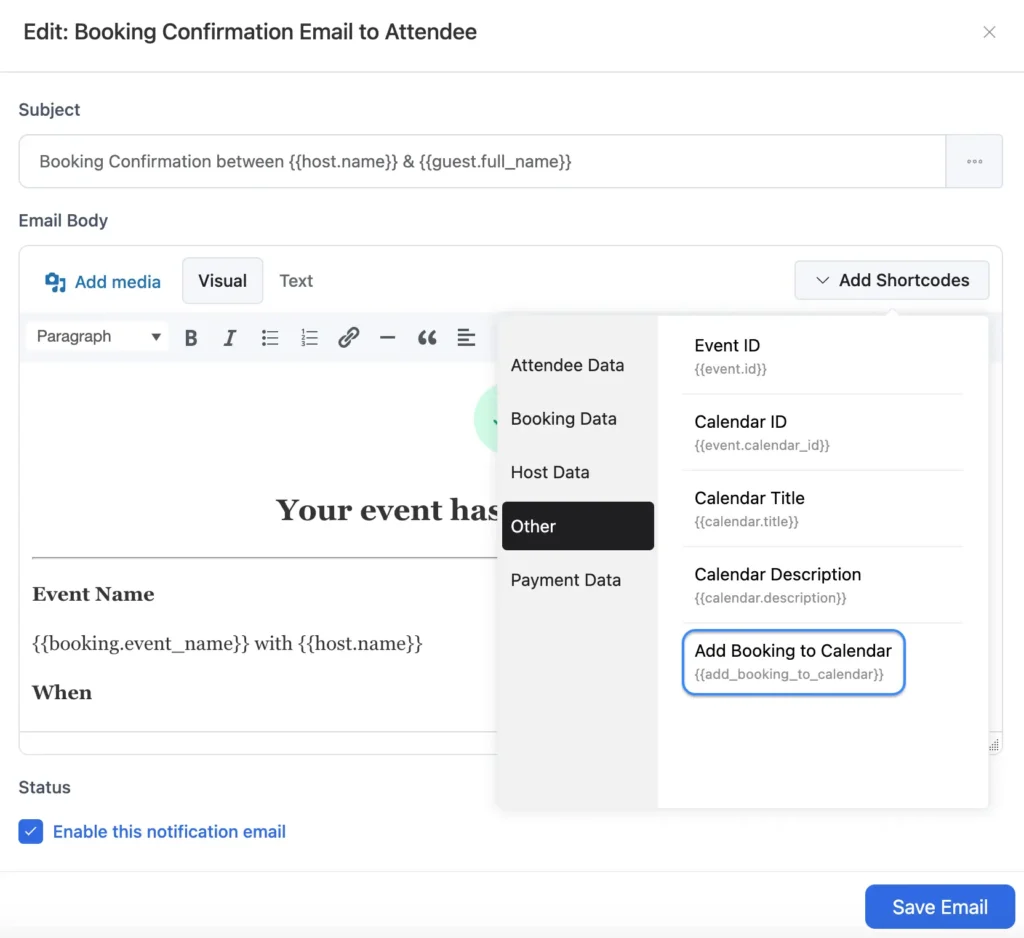
Now when your attendees receive the booking confirmation email they can easily add the event to their calendars.
New Smartcode – Ability to Format Date Field
Wait, there’s another smartcode waiting for you! The next smartcode can be used to map the date of birth data with FluentCRM. So, I believe you already know the functionality of the new smartcode.
To use this smartcode, go to Calendars > Edit > Email Notification, then select the email notification you want to configure. Next, go to Add Smartcodes > Booking Data, and you’ll find the new smartcode for mapping the data with FluentCRM.
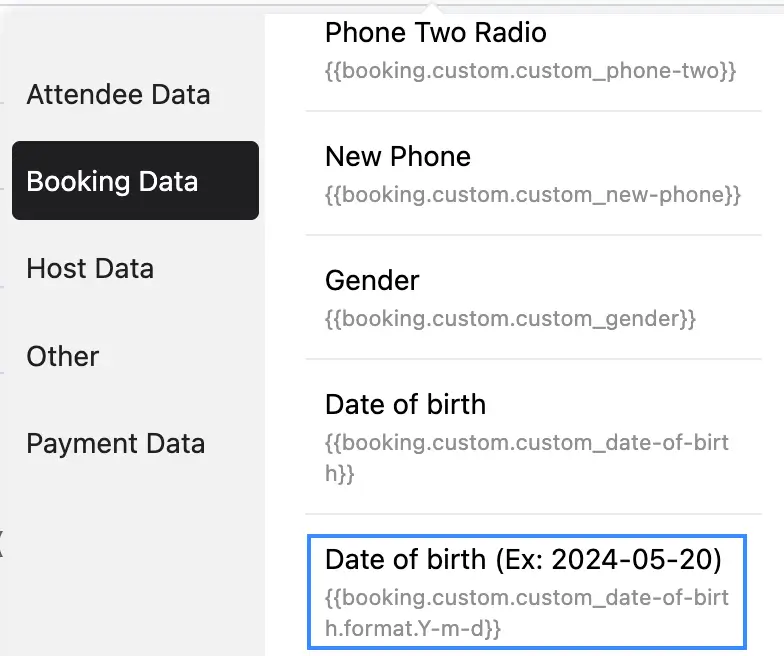
So why wait? Time to check out this new smartcode!
ICS File Attachment
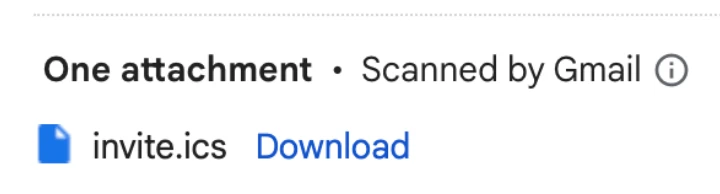
Moving forward, if you’d like, you can include an ICS file in the booking confirmation email. This will offer your recipients a convenient method to add the event to their calendar software (such as Google Calendar, Outlook, etc.).
By attaching an ICS file, recipients can effortlessly import the event details directly into their calendar application with just a few clicks.
To attach an ICS file to the confirmation email, navigate to Settings > General Settings > Emailing Settings and check the box for Include ICS file attachment in email confirmations.
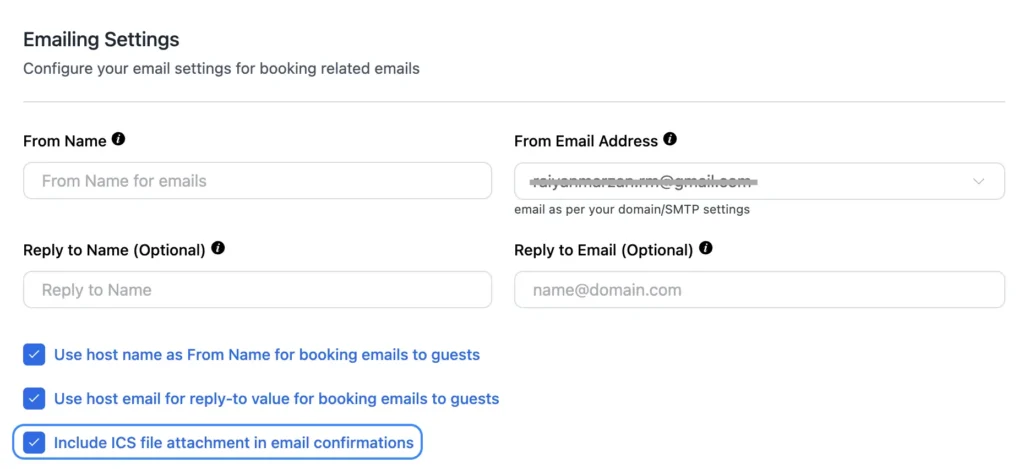
Now, the meeting confirmation email will be sent to the attendees’ inbox with an ICS file attached.
That’s a great addition! What do you think?
Invitee Email Update
As human beings, we are bound to make mistakes. During appointment booking, your invitees might provide the wrong email or make typing errors, leading to missed communication and potential scheduling conflicts.
This mistake could result in attendees not receiving crucial appointment details or confirmations, causing inconvenience for both parties and possibly resulting in missed appointments.
With this update, FluentBooking admins can now modify attendee email addresses in such cases. To edit a wrong or misspelled email address, go to Bookings and select the relevant booking.
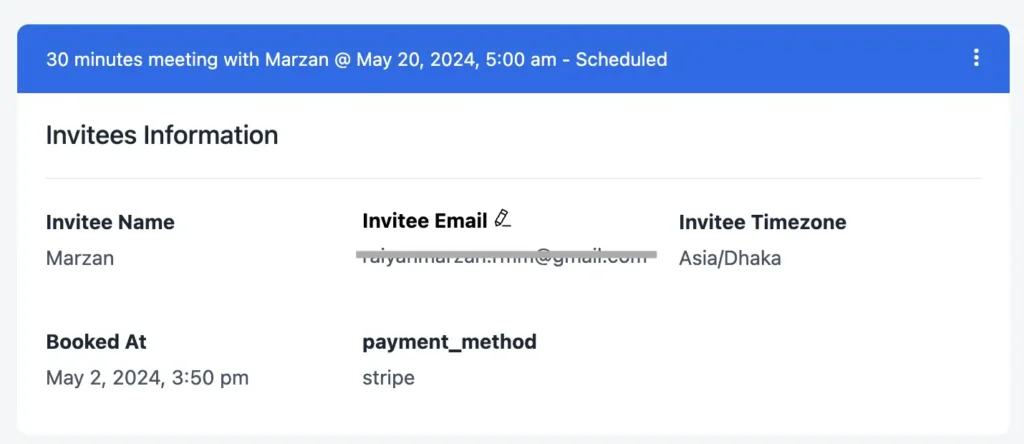
From there, you’ll have the option to update the email address. Once updated, it will also reflect in the Google Calendar, and your attendee will receive a meeting confirmation email instantly.
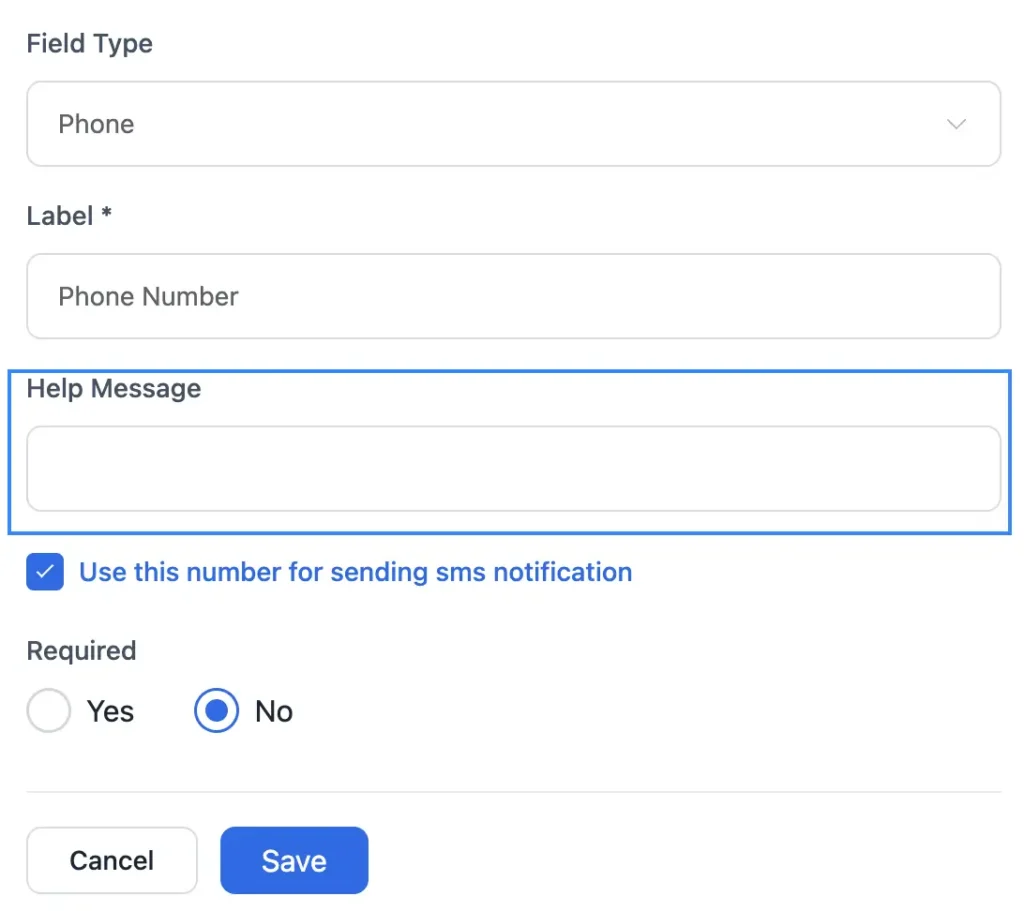
Use Phone Number for Sending Notification
From now on, you can use the phone number of the Phone field to send SMS notifications via Twilio.
To enable this new option for your existing calendar, go to Calendar > Edit > Question Settings, and then click Add more questions for invitees. Select the field type as Phone, and you’ll discover this new option to send SMS.
You can also use this new option when setting up your availability for new events.
Format Field for Date
Lastly, we have also added a new format field option for Date under the question settings. You can use this option to change the date format if you want. Also, we have added the help message option here which will work together with the SMS notification of the Phone field.
To use this new option, go to Calendar > Edit > Question Settings, and then click Add more questions for invitees. Here, you need to select the field type Date. Then, you can change the date format.
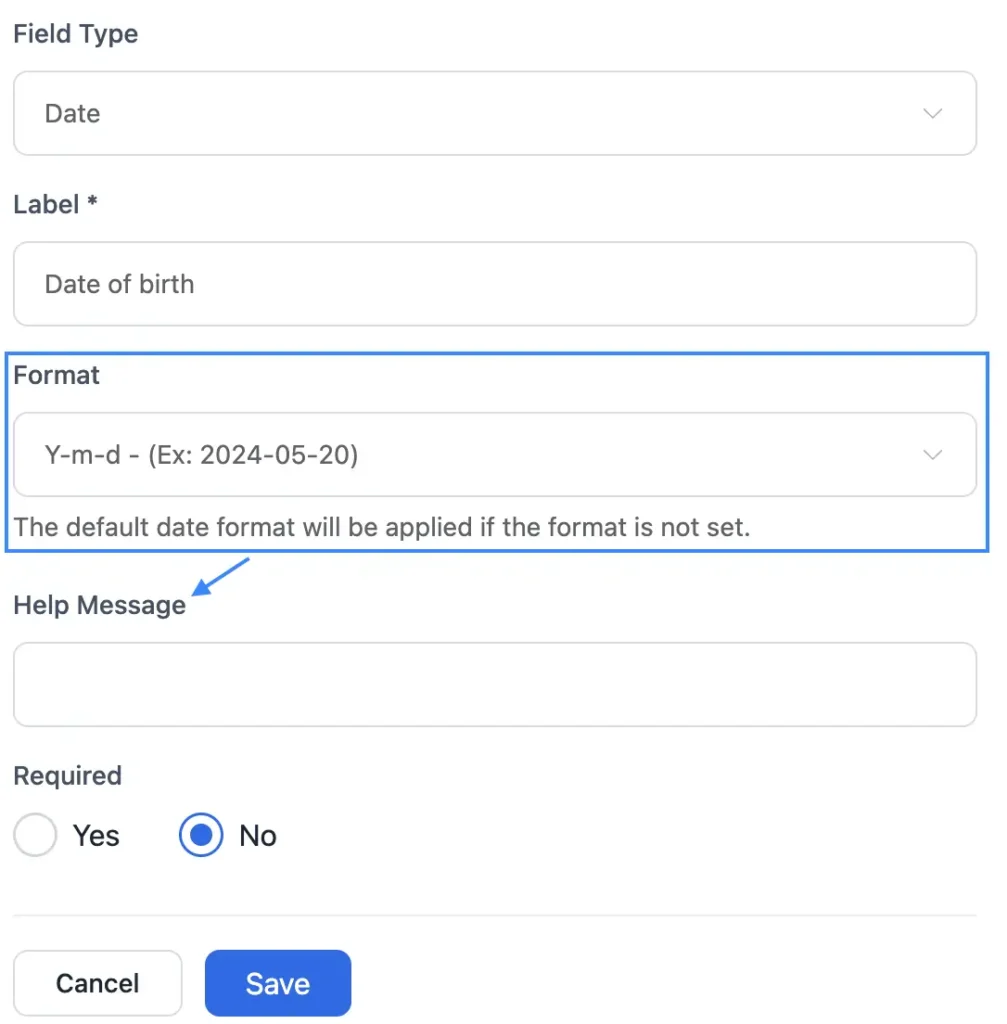
Note: The default date format will be applied if the format is not set.
Improvements and Bug Fix
The team at FluentBooking is continuously working to make scheduling easier for you, and this update brings more improvements to the product.
- We’ve enhanced the FluentBooking UI/UX for a smoother booking experience
- We have added hook in meeting title
- Added Back to Home link on meeting confirmation page
- Added meeting copy link in Calendars
- Updated group meeting attendee data export, and added location details, booking status, duration, and end-time column
- Additionally, we’ve added icons for Booking Rescheduled and Booking Cancellation in emails, with the option to disable them if preferred
We understand that bugs can be frustrating, which is why we’re committed to resolving any issues our users encounter. In this update, we’ve addressed several bugs reported by some users:
- Fixed Group Session Title for Google & Zoom, where the group event title was displaying the name of the first client
- Resolved Nextcloud Calendar sync and ICS issue, ensuring new events appear in the calendar and include an ICS file in confirmation emails
- Fixed an issue with event details for long descriptions, allowing users to access the full description directly from the calendar link
- Addressed the problem of emails being sent from the default address in FluentSMTP instead of the From email address in FluentBooking
- Fixed the meeting reschedule option for FluentBooking admins accessing the backend
- Corrected the display of available days for rescheduled group events syncing to Google Calendar
- Fixed Stripe payment issue when the event was set in other language
- Resolved availability issues for the booking calendar, particularly with custom durations and time-slot intervals
- Fixed the Gutenberg block’s primary color not reflecting across the booking calendar
- Added missing translation strings to improve localization at the backend of FluentBooking
Enjoy Hassle-free Booking!
The FluentBooking team is working relentlessly to ensure you enjoy convenient appointment management. Keeping this in mind we work every day to make sure you enjoy an error-free availability management and appointment journey.
We hope the new features, improvements, and bug fixes will improve your appointment scheduling experience and your clients enjoy great booking service.
That’s a wrap for today and see you again with another product update. Till then enjoy booking with FluentBooking!
Shahjahan Jewel
Hello, this is Jewel, CEO & Head of Ideas at WPManageNinja. I am obsessed with WordPress since 2009. My aim is to be a user-centric developer first, and a serial entrepreneur second. You will find me discussing various tech issues and trying to come up with scalable solutions on different forums when I am not busy coding.
Table of Content
Subscribe To Get
WordPress Guides, Tips, and Tutorials


Leave a Reply