

How to Set Up Group Bookings and Multi-Person Events in WordPress


When you run a workshop, training session, group coaching program, or online class, scheduling everyone individually can quickly become a hassle. You may need to coordinate the same time slot for several people, keep track of who has registered, and make sure attendees receive the right booking details.
That’s where group bookings and multi-person events come in. Instead of creating separate appointments for every participant, you can organize a shared session and let multiple people book or join it through a single booking workflow.
If you’re using WordPress, a scheduling plugin can make this process much easier. FluentBooking provides several options for handling group and multi-person scheduling, including Group Meetings for shared sessions, Group One-off Events for single-occurrence events, and options for adding additional guests to a booking.
In this guide, we’ll explain the different approaches and show you how to set up group bookings and multi-person events in WordPress with FluentBooking.
Which FluentBooking Feature Should You Use?
Before setting up your event, it helps to identify which FluentBooking feature matches your scheduling needs. Group bookings can work in different ways, and choosing the right event type can make the booking process much easier for both you and your attendees.
Here’s a quick overview:
| What you want to do | FluentBooking feature |
| Let multiple people book the same recurring session | Group Meeting |
| Organize a one-time event for multiple attendees | Group One-off Event |
| Let someone include additional people in their booking | Additional Guests |
| Let someone reserve multiple time slots in one transaction | Allow Multiple Booking |
| Have multiple hosts participate in the same meeting | Collective Booking |
How to Create a Group Meeting in FluentBooking
A Group Meeting is a good choice when you want multiple people to schedule the same session, especially when the session is available on a recurring schedule. For example, you could use it for weekly classes, group coaching, fitness sessions, or recurring training.
Here’s how to set one up in FluentBooking.
Step 1: Create a New Group Meeting
From your WordPress dashboard, open FluentBooking → Calendars and create a new event type. Select Group Meeting from the available event options.
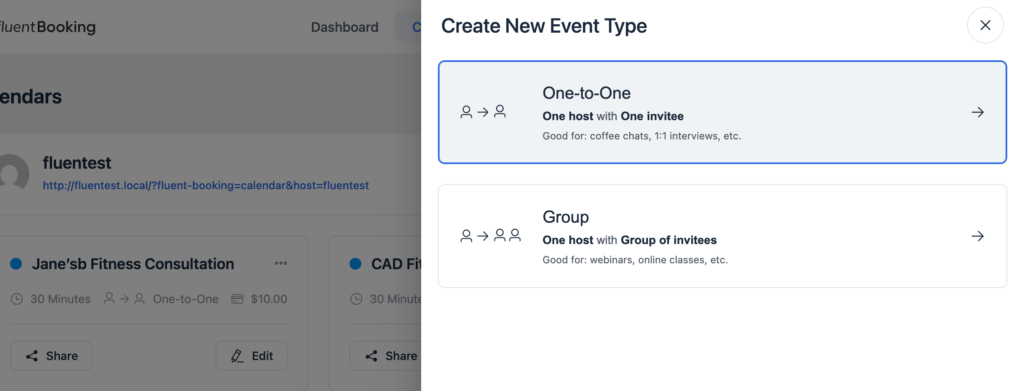
Start by giving your event a clear name that tells attendees what the session is about.
For example:
Weekly WordPress Coaching Session
Then continue to the event configuration.
Step 2: Add the Event Details
Add the basic information attendees will see on the booking page, including:
- Event name
- Description
- Meeting duration
- Meeting location
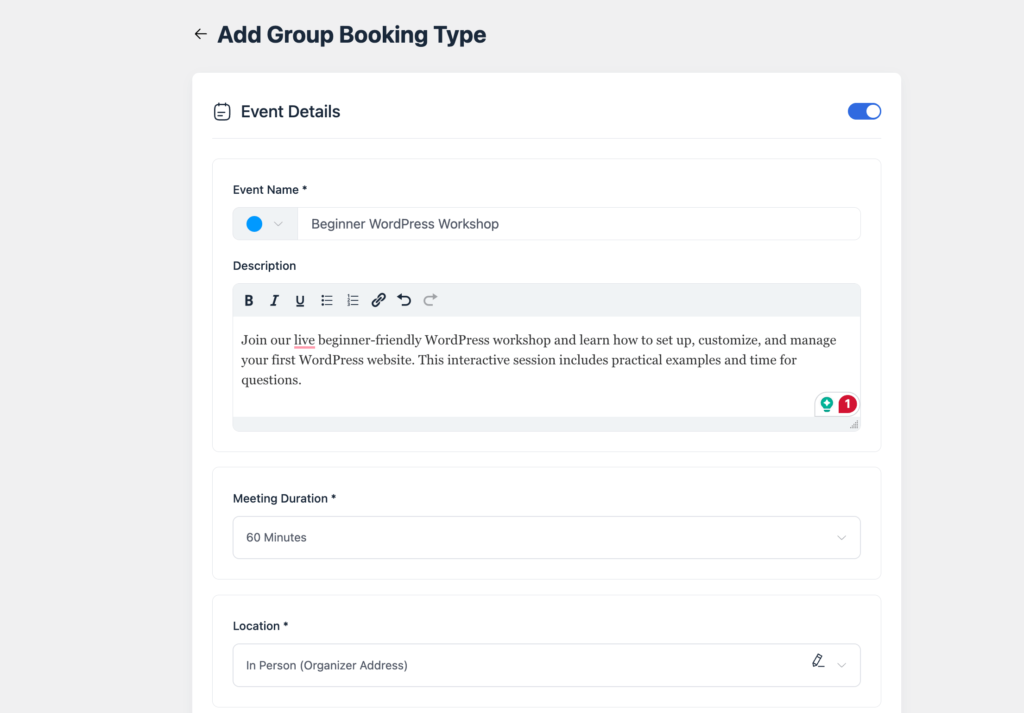
Keep the description concise but useful. Explain what attendees can expect from the session and include any information they should know before booking.
Step 3: Configure the Availability
Next, configure availability when the group session can be booked.
Set the days and times when the event should be available. For a recurring class, for example, you might make the session available every Tuesday at 7:00 PM.
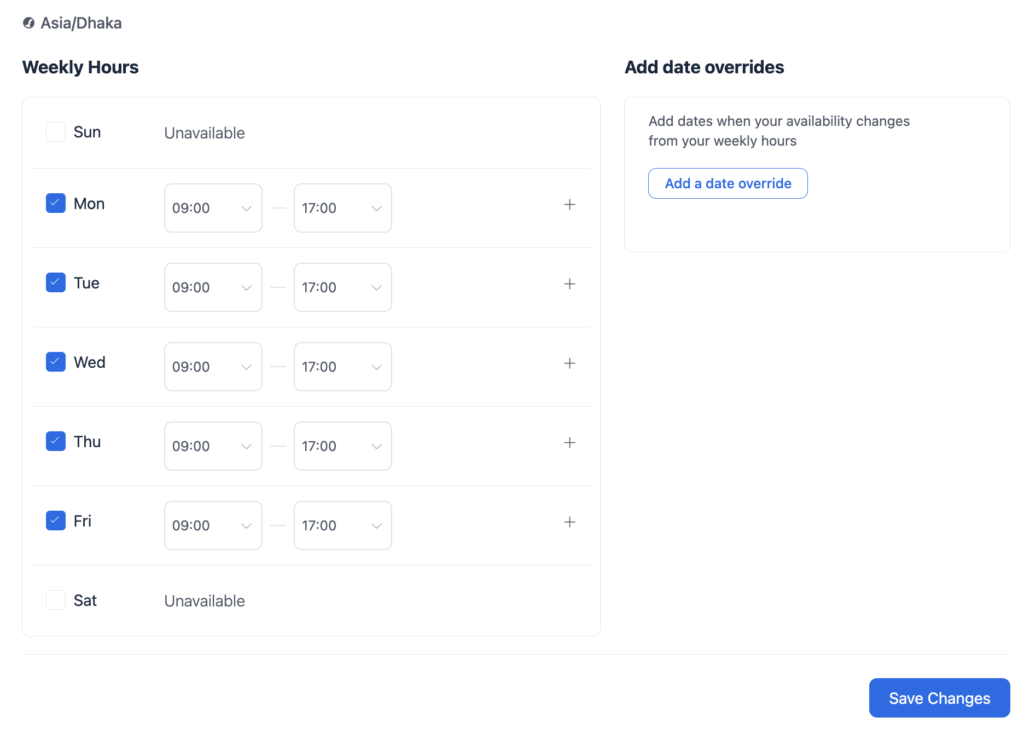
Make sure the availability matches the schedule you actually plan to maintain. This prevents attendees from booking sessions that you cannot host.
Step 4: Set the Number of Attendees
One of the main benefits of a Group Meeting is that multiple attendees can book the same time slot.
Set the number of people who can attend each available session based on your capacity. For example, if you’re running a small workshop, you might allow 15 participants per session.
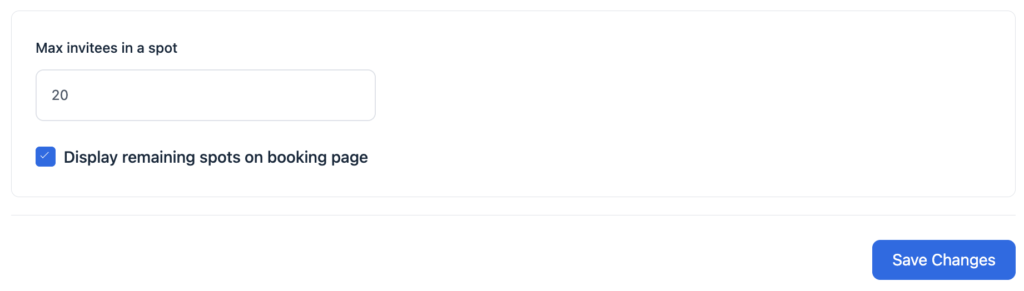
This lets the same time slot accommodate multiple bookings instead of treating each booking as a separate one-to-one appointment.
Step 5: Configure the Booking Form
Use the booking form to collect the information you need from participants.
Depending on your event, you might ask for:
- Name
- Email address
- Company or organization
- Experience level
- Questions or special requirements
Avoid asking for information you don’t actually need. A shorter booking form usually makes registration easier.
Step 6: Configure Notifications and Confirmation
Set up the relevant confirmation and notification emails so both you and your attendees receive the necessary booking information.
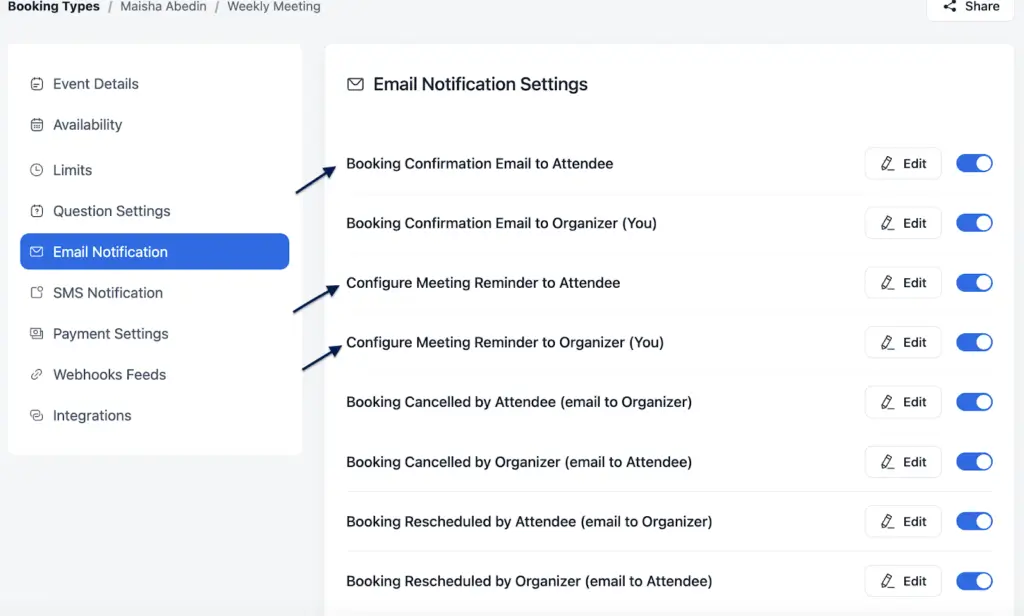
Your confirmation can include details such as the event time, meeting location, and other instructions attendees need before joining.
Step 7: Publish and Share the Booking Page
Once you’ve reviewed your settings, save the event and publish the booking page.
You can then share the booking link with your audience through your website, email, social media, or other channels.
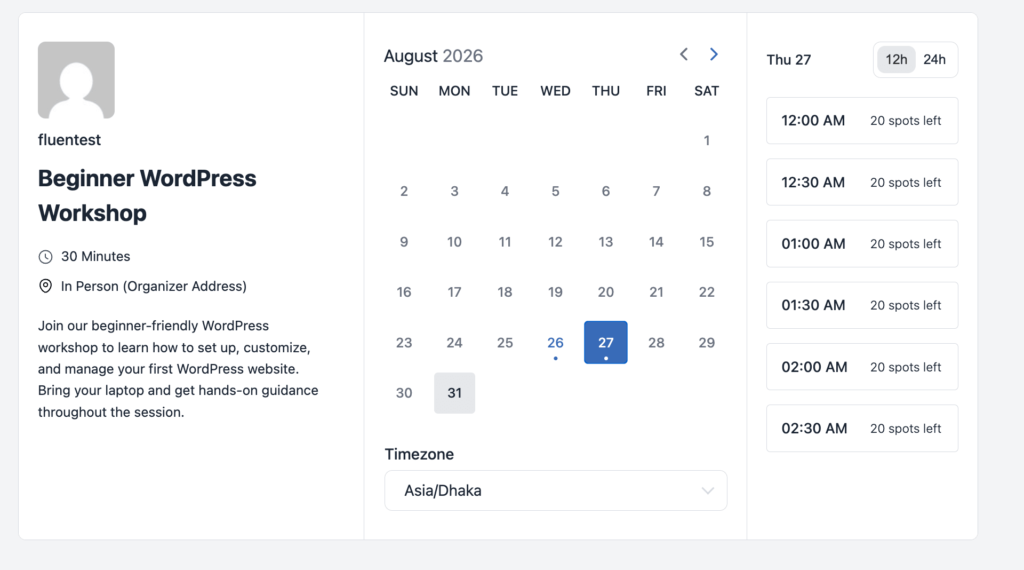
Now, whenever someone visits the booking page, they can select an available session and register for the group event, while FluentBooking keeps the bookings organized in one place.
How to Create a Group One-off Event in FluentBooking
Not every group event happens on a recurring schedule. If you’re organizing a workshop, seminar, training session, or other event that will take place only once, Group One-off Event is a better fit.
FluentBooking lets you create a one-time group event and configure its hosts, availability, and booking settings from the same workflow.
Step 1: Create a One-off Event
From your WordPress dashboard, go to FluentBooking → Calendars.
Click New in the top-right corner and select One-off Event from the dropdown menu.
A panel will appear where you can enter the event name and choose the hosts for the meeting. Select Group One-off Event and continue to the event details page.
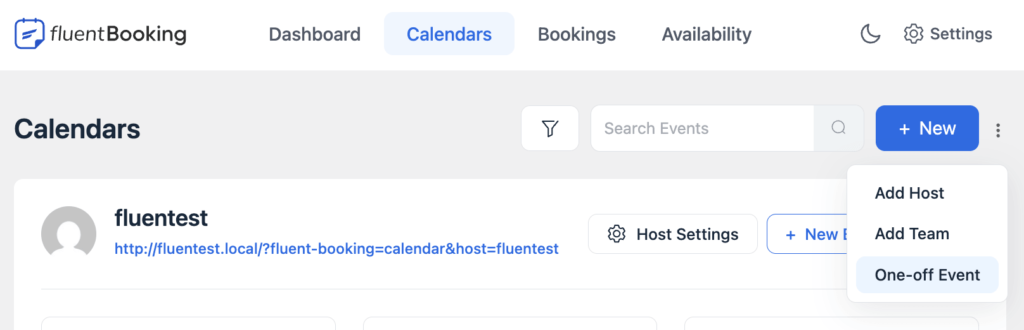
Step 2: Add Your Event Details
On the event details page, enter the necessary information about your event.
Depending on your event, this might include:
- Event name
- Event description
- Duration
- Meeting location
- Other relevant booking information
Once you’ve entered the details, click Continue to move to the next stage.
Screenshot suggestion: Group One-off Event details page.
Step 3: Manage the Hosts
Next, open the Assignment section to manage the hosts for your event.
If you need more hosts, click Add Hosts and select the people you want to include.
You’ll see the selected hosts under the Event Hosts section. If one host should be responsible for organizing the event, click Make Organizer next to their name.
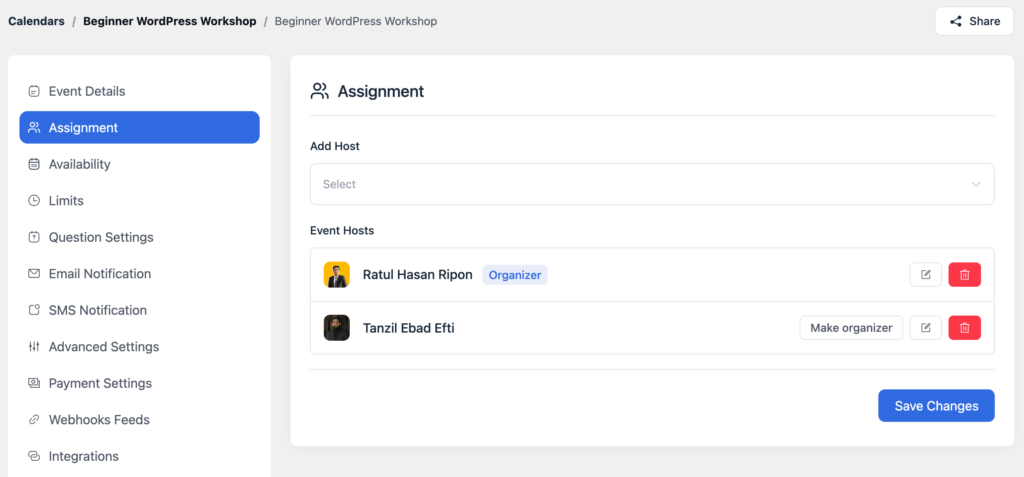
Once you’ve made the necessary changes, click Save changes.
Step 4: Set the Event Availability
Now go to the Availability section.
For a Group One-off Event, you can define the specific time when the event will be available. Click Add Available Times to configure the event’s time slot.
A popup will appear where you can select the availability for the event. Unlike a recurring group meeting, a Group One-off Event uses a single time slot for the event.
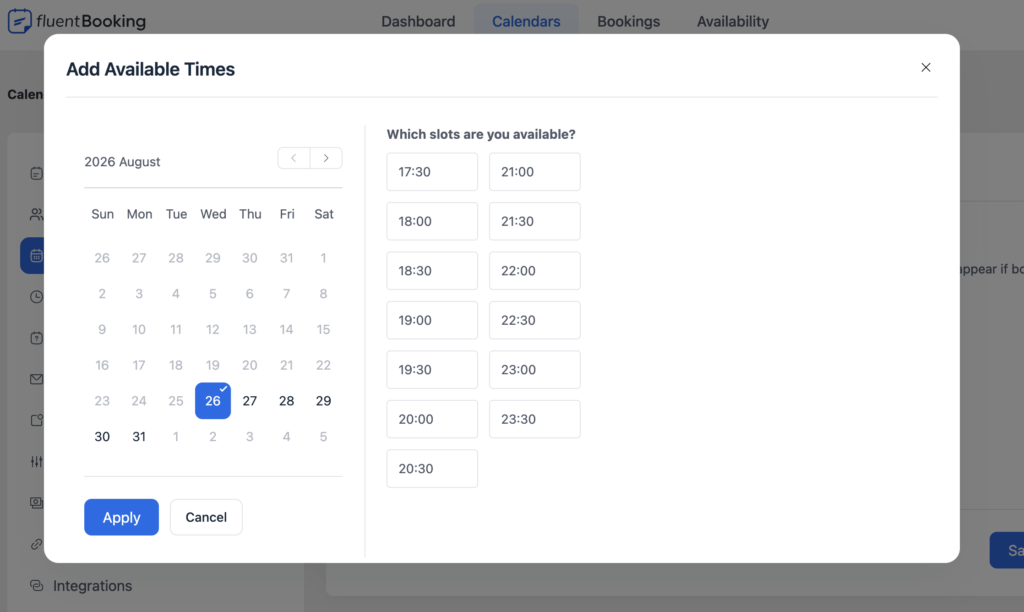
After selecting the date and time, click Apply to save it.
Step 5: Reserve the Host’s Time
FluentBooking also provides a Reserve Time option for Group One-off Events.
When enabled, the host’s availability is reserved for the event. Once an attendee selects the event’s time, that period is blocked so the host can’t be booked for another event at the same time.
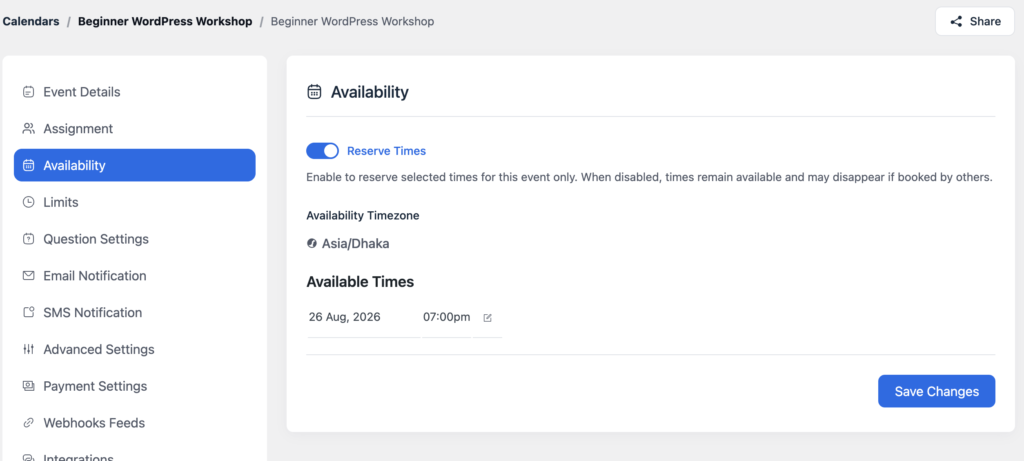
For example, if your group event runs from 9:00 AM to 9:30 AM, reserving the time prevents another booking from using that same period.
This can be particularly useful when the group event requires the host’s full attention.
Step 6: Configure the Remaining Settings
The remaining settings work similarly to other FluentBooking events. Review the available booking options and configure the ones relevant to your event.
Before publishing, check the event details, host assignment, availability, and booking form to make sure everything is correct.
Step 7: Share the Event
Once the Group One-off Event is ready, return to the Calendars section.
Find your event and click Share.
A popup will appear with different ways to share the booking event with attendees. Choose the sharing method that works best for your audience.
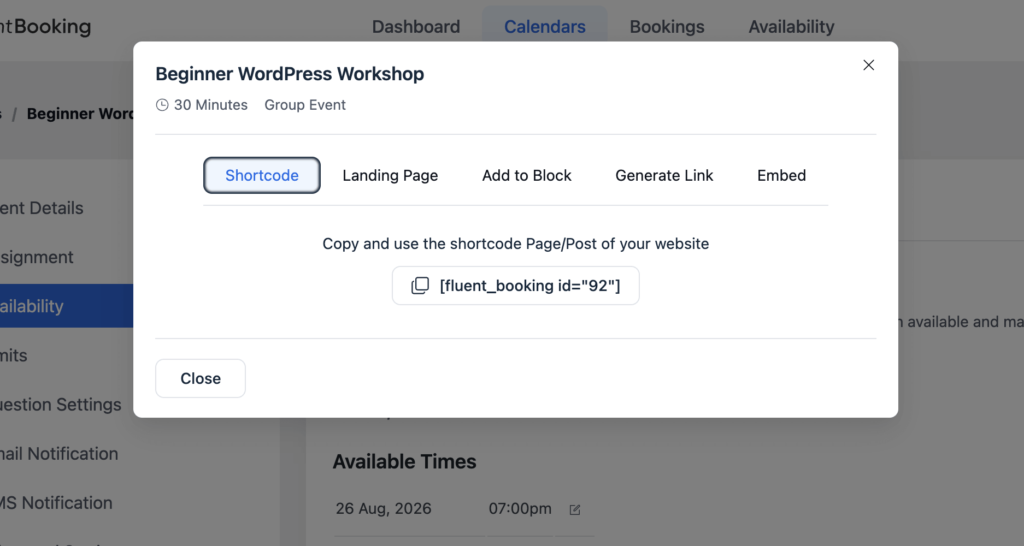
That’s it. You now have a dedicated booking page for your one-time group event that you can share with your attendees.
How to Let Attendees Add Additional Guests
Sometimes the person making a booking isn’t the only person who will attend. For example, a client may want to bring a colleague to a consultation, or an employee may register themselves and another team member for a session.
In these cases, you can use FluentBooking’s Additional Guests option to let the person making the booking include other attendees.
Step 1: Open the Event Settings
From your WordPress dashboard, go to FluentBooking → Calendars and open the event where you want to allow additional guests.
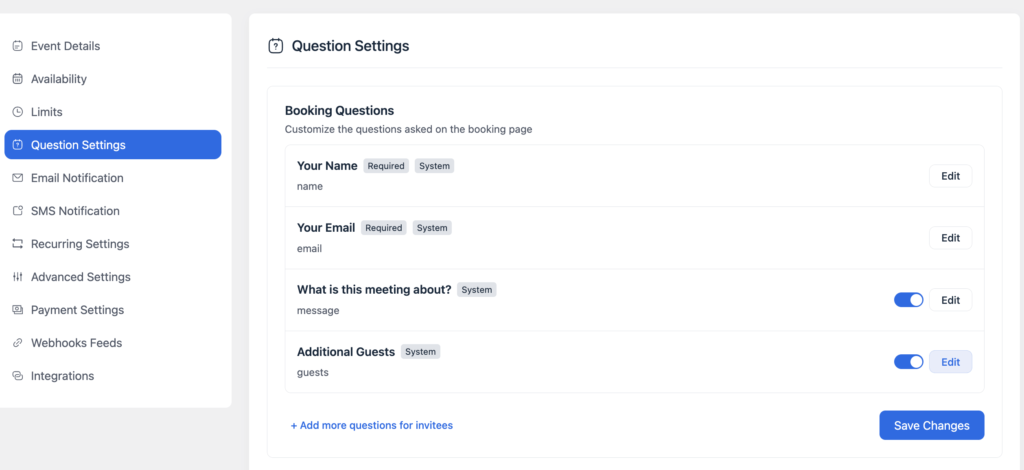
Then go to the Question Settings section.
Step 2: Enable Additional Guests
Look for the Additional Guest option and enable it.
FluentBooking allows you to configure the guest field based on how you want to collect additional attendee information.
You can customize details such as:
- The field label
- Maximum number of additional guests
- Field type
- Whether the field is required
- set the guest limit
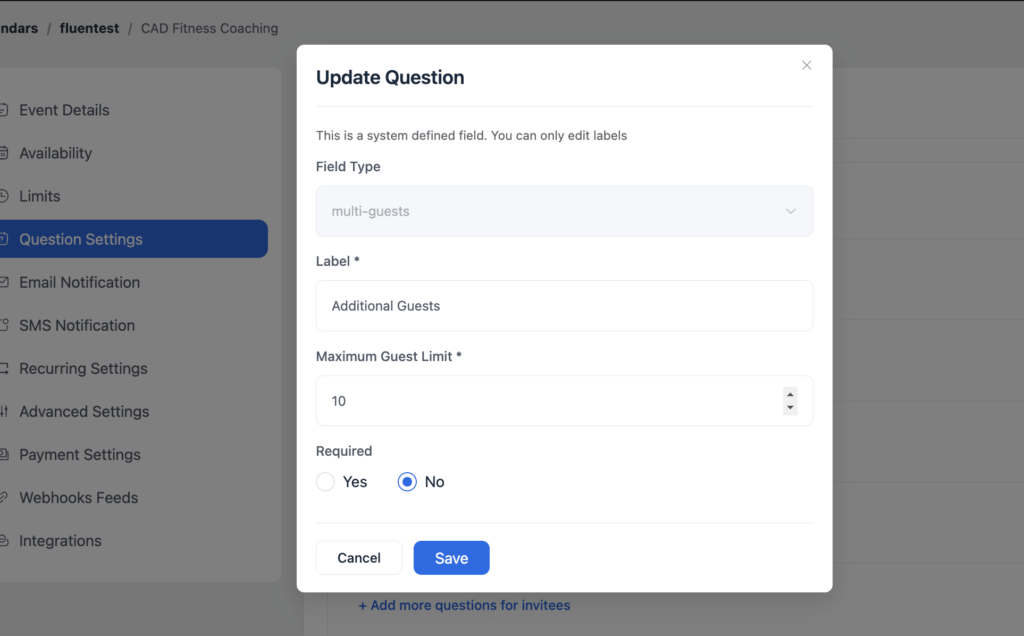
For example, you could set the field label to Additional Guests and allow a specific number of people to be added to the booking.
Step 3: Make the Field Required When Necessary
If every booking needs information about additional participants, you can make the field required.
If bringing additional guests is optional, leave it as an optional field so attendees can complete the booking without adding anyone else.
Step 4: Test the Booking Form
After configuring the setting, preview the booking page and test the registration process.
Check that:
- The additional guest field appears correctly
- The guest limit works as expected
- The form collects the information you need
- The booking can be completed successfully
This is especially important when you’re using additional guests for an event with a limited number of participants.
When Should You Use Additional Guests?
Additional Guests is useful when one person is responsible for making the booking but other people will participate in the same appointment.
For example:
- A client brings colleagues to a consultation
- A manager registers a small team for a meeting
- A parent books an appointment and includes a family member
- A participant registers another person for a session
If you want many independent attendees to book the same recurring session, however, a Group Meeting is generally a better fit. Additional Guests is more appropriate when the extra participants are being added as part of one person’s booking.
How to Allow Multiple Bookings in FluentBooking
Allow Multiple Booking is another useful option in FluentBooking, but it serves a different purpose from Group Meetings and Additional Guests.
Instead of allowing several people to join one booking, this feature lets an attendee select multiple available time slots and book them in a single transaction.
Step 1: Open the Event Settings
From your WordPress dashboard, go to FluentBooking → Calendars.
Open the event where you want to allow multiple bookings and go to its settings.
Find the Advanced Settings section. Look for the Allow Multiple Booking option and enable it.
Screenshot suggestion: Advanced Settings showing Allow Multiple Booking.
Step 3: Set the Maximum Number of Bookings
Once multiple booking is enabled, you can set a limit on how many bookings an attendee can make in a single transaction.
Choose a limit that makes sense for your event or service.
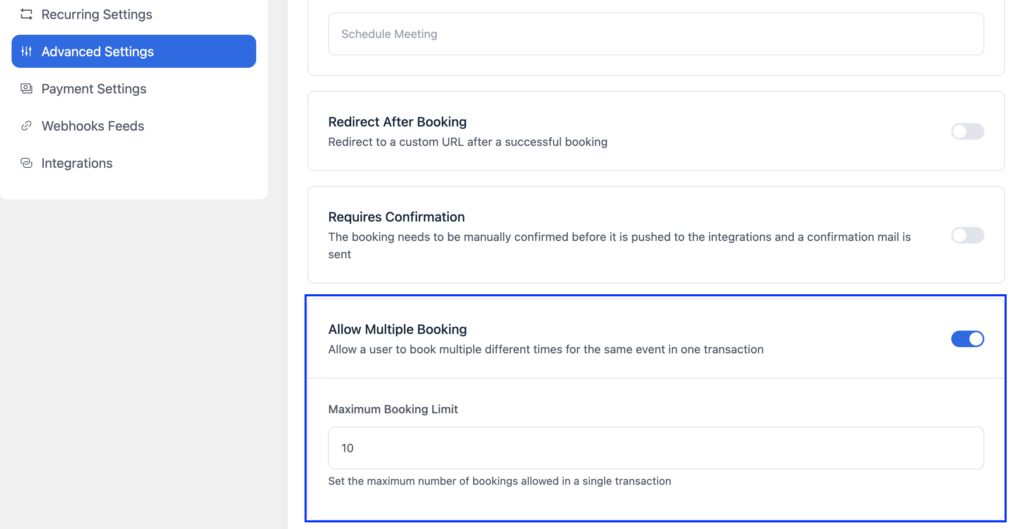
For example, if you offer individual sessions throughout a program, you might allow a participant to reserve up to five sessions at once.
Step 4: Save and Test the Setting
Save your changes and open the booking page as an attendee.
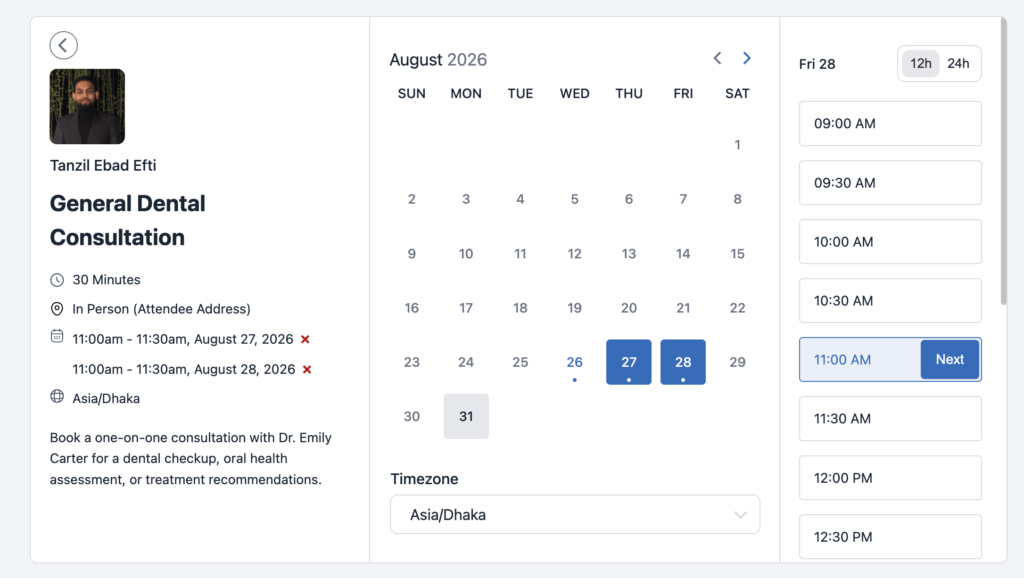
Check that the booking flow allows multiple available time slots to be selected and that the configured limit is being respected.
Which Group Booking Setup Should You Use?
By now, you’ve seen that FluentBooking offers several ways to handle group and multi-person scheduling. The right option depends on what you’re trying to accomplish, not simply how many people will attend.
Here’s a quick way to choose:
| Your requirement | Best option |
| Multiple people need to book the same recurring session | Group Meeting |
| Multiple people need to attend a specific one-time event | Group One-off Event |
| One person needs to include other people in their booking | Additional Guests |
| One person needs to reserve several available time slots | Allow Multiple Booking |
| Multiple hosts need to participate in the same meeting | Collective Booking |
Best Practices for Managing Group Bookings
Setting up a group booking is only part of the process. A well-organized booking experience should also make it easy for attendees to understand the event, register, and receive the information they need.
Here are a few practices that can help.
Choose the Right Event Type
Start by identifying how your event works.
If multiple people need to attend the same recurring session, use a Group Meeting. For a single event, use a Group One-off Event. If someone needs to add other participants to their booking, consider Additional Guests.
Choosing the right setup from the beginning makes the rest of the booking process much simpler.
Set a Realistic Attendee Limit
Think about how many people your host, venue, or online session can realistically accommodate.
For a small workshop, for example, you may want to keep the number of participants low enough to allow meaningful interaction. For a larger online event, you may be able to accommodate many more attendees.
Keep the Booking Form Simple
Only ask for information you actually need.
A shorter form reduces friction and makes it easier for people to complete their registration. If you need information from additional participants, configure your additional guest fields accordingly.
Make the Event Details Clear
Your booking page should clearly communicate:
- What the event is about
- Date and time
- Duration
- Meeting location
- Who should attend
- Any preparation required
Clear information helps attendees know what to expect before they book.
Reserve the Host’s Time When Necessary
For one-off group events, consider using Reserve Time when the host needs to be fully dedicated to that event.
This prevents the selected period from being used for another booking and reduces the risk of scheduling conflicts.
Test the Booking Experience
Before sharing your booking page, complete a test booking yourself.
Check the event details, available time, booking questions, confirmation messages, and any additional attendee fields. It’s much easier to fix an issue before participants start registering.
Keep Your Cancellation and Rescheduling Policies Clear
If your group event has specific cancellation or rescheduling rules, make them clear before attendees complete their booking.
This can help avoid confusion later, especially when you’re organizing events with several participants.
Share the Right Booking Link
Once everything is configured, share the booking page through the channels your audience uses most.
You might add it to your website, send it through email, share it with a private group, or include it in your event promotion.
A simple and accessible booking link makes it easier for people to register without unnecessary steps.
Bring Everyone Together Without the Scheduling Hassle
Group bookings make it easier to manage classes, workshops, training sessions, and other events with multiple attendees.
With FluentBooking, you can choose the setup that fits your needs, whether that’s a recurring Group Meeting, a one-time Group One-off Event, or Additional Guests for including other participants in a booking.
Choose the right event type, configure your availability and booking settings, then share the booking page with your attendees. FluentBooking handles the rest of the booking workflow, helping you keep group events organized without managing registrations manually.
Ratul Hasan Ripon
I enjoy making complex ideas simple and engaging through my writing and designs. With a strong knowledge on content writing and SEO, I create technical content that’s both easy to understand and interesting.
Table of Content
Subscribe To Get
WordPress Guides, Tips, and Tutorials
Add your first comment to this post