

How to Customize Your Booking Confirmation Email (+ Best Practices)


A booking confirmation email is more than just a booking receipt. It reassures attendees that their appointment is confirmed, shares essential meeting details, and helps reduce confusion before the event. A well-crafted confirmation email can also improve the overall booking experience and reduce no-shows.
Instead of sending a generic message, you can customize your confirmation email to match your brand, personalize it with attendee details, and include useful information like meeting links, payment summaries, or rescheduling options. In this guide, you’ll learn the key steps to create a clear, professional, and personalized booking confirmation email that keeps attendees informed and prepared.
Key Takeaways
Customizing your booking confirmation email helps create a more professional and seamless booking experience. Here’s a quick summary of the process:
- Include essential booking details like the date, time, location, and host information.
- Personalize your emails with dynamic fields for each attendee.
- Customize the subject line and content to reflect your brand.
- Keep the layout clean and easy to scan.
- Add rescheduling and cancellation options for flexibility.
- Test your email before publishing to ensure everything works as expected.
What Should a Booking Confirmation Email Include?
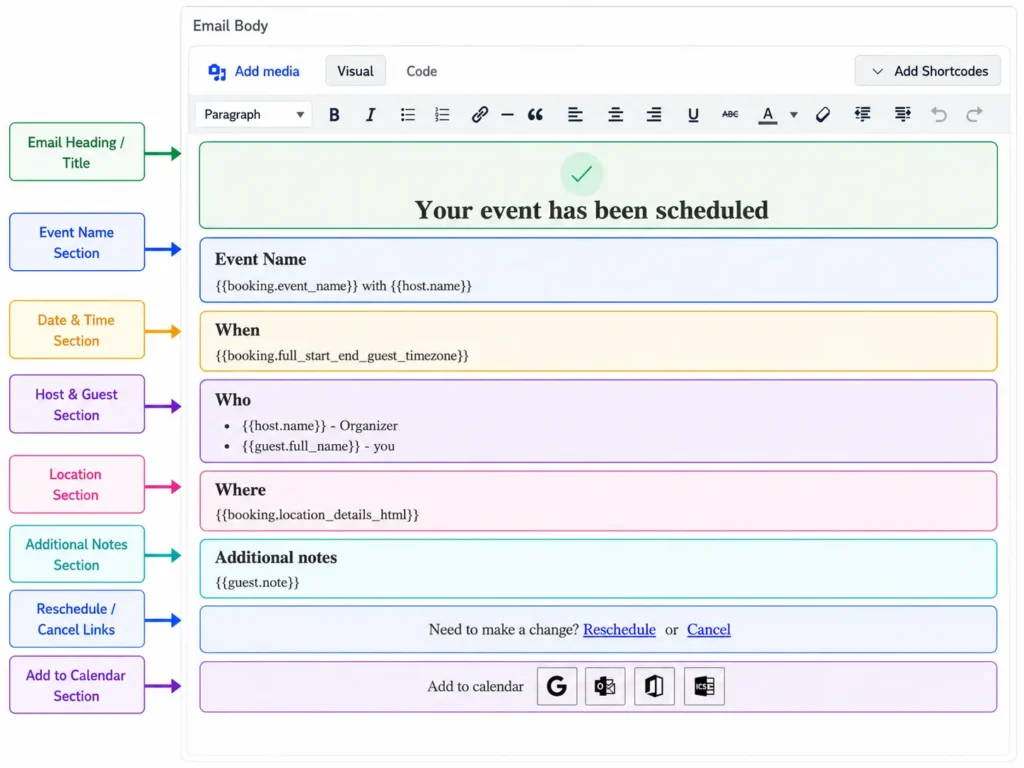
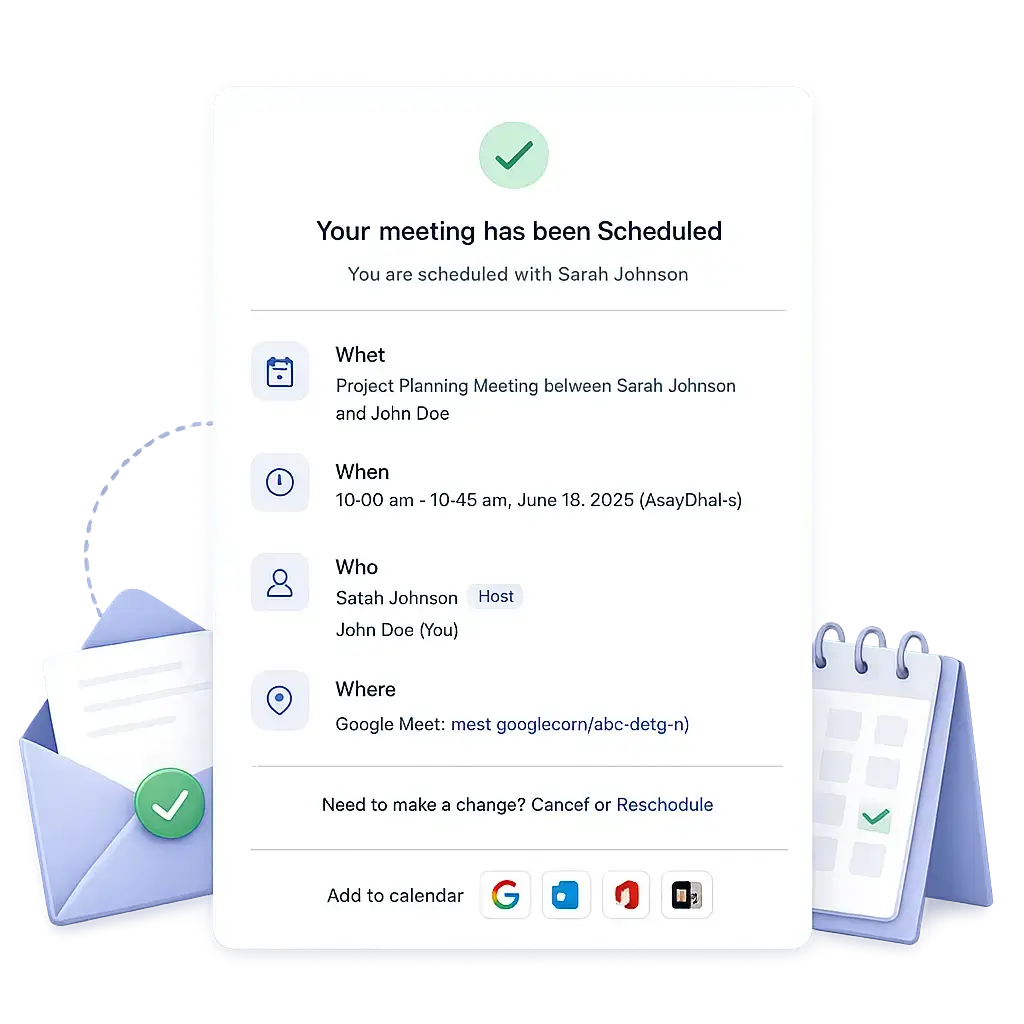
A booking confirmation email should provide attendees with all the essential information they need before the appointment. Here are the key elements every confirmation email should include:
- Personalized greeting: Address attendees by name to make the email feel more welcoming and create a positive first impression.
- Event or appointment details: Clearly mention the event or appointment name so attendees know exactly what the booking is for.
- Date and time: Include the scheduled date, time, and, if applicable, the time zone to avoid confusion for attendees in different locations.
- Meeting location or joining link: Whether it’s an office address or a virtual meeting link (such as Zoom or Google Meet), make it easy for attendees to access the meeting.
- Host information: Include the organizer’s name and contact details so attendees know who they’re meeting with and how to reach them if they have questions.
- Payment details (if applicable): For paid bookings, include information such as the payment amount, payment method, or receipt to provide a clear record of the transaction.
- Reschedule and cancellation options: Add links or instructions for rescheduling or canceling the booking, giving attendees flexibility while reducing unnecessary back-and-forth communication.
Bonus: Looking for inspiration? Explore these appointment confirmation email templates to see how different businesses structure their confirmation emails.
How to Customize a Booking Confirmation Email [Step-by-Step]
While the exact steps may vary depending on your scheduling platform, most appointment scheduling tools let you customize confirmation emails through their notification settings. If your website runs on WordPress, you can use FluentBooking to customize your booking confirmation emails. The following steps demonstrate how the process works using FluentBooking as an example.
Step 1: Open the Email Notification Settings
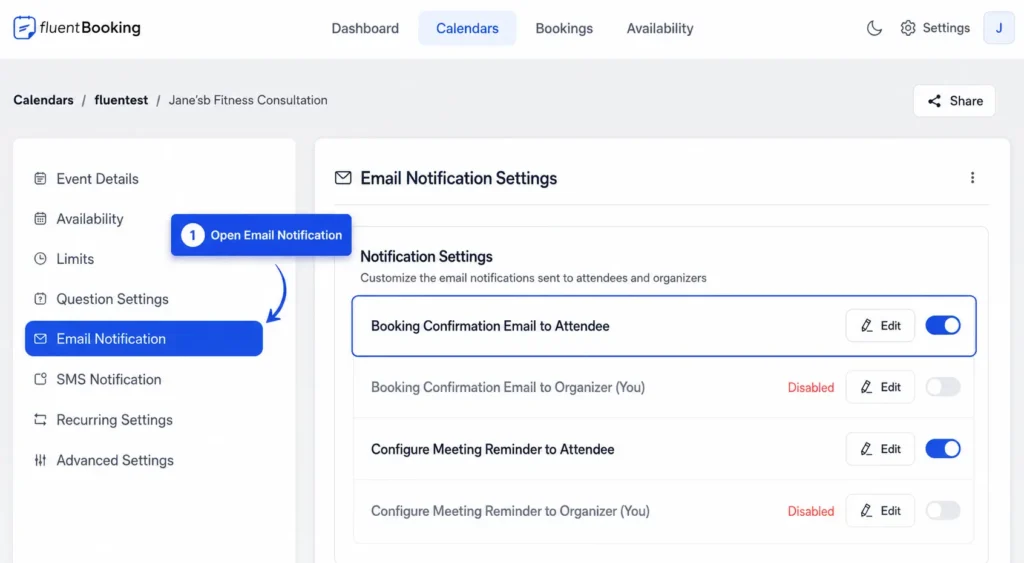
To get started, navigate to Calendars, select the event you want to customize, and open the Email Notification tab. This section lets you manage all email notifications for that specific event, including confirmation emails and reminders.
Step 2: Edit the Booking Confirmation Email
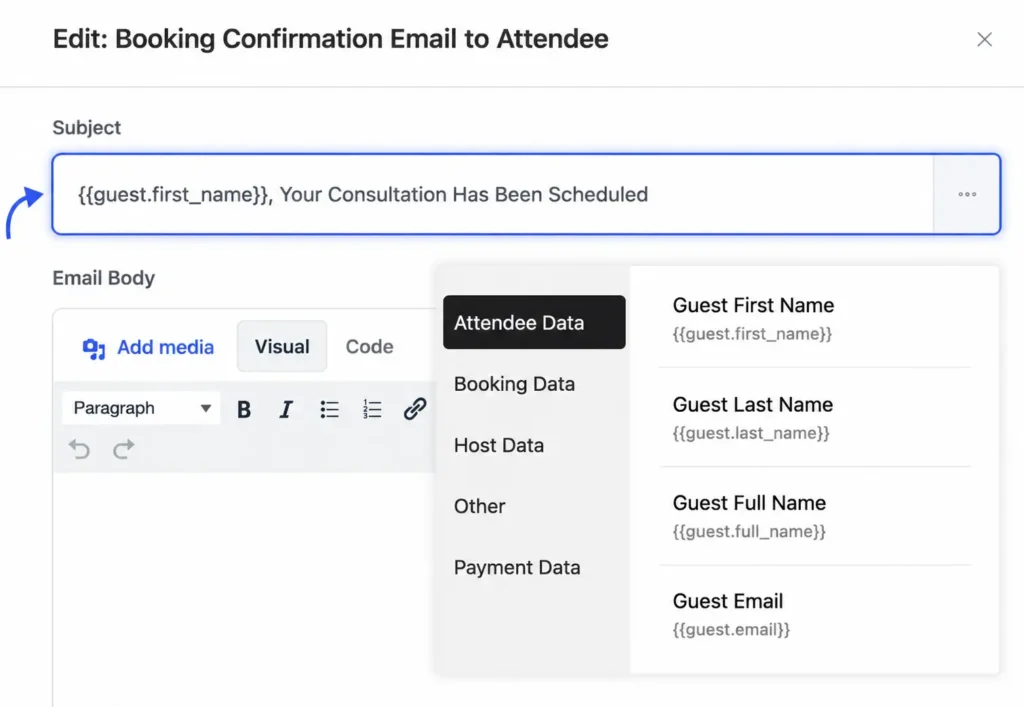
In the Email Notification section, find Booking Confirmation Email to Attendee and click Edit. This opens the email editor, where you can customize both the subject line and the email content.
Start by updating the email subject with a clear and descriptive message, such as Your Appointment is Confirmed or Your Consultation Has Been Scheduled. A concise subject line helps attendees immediately understand the purpose of the email.
Next, review the email body. This is where you’ll include all the important booking details, instructions, and any additional information attendees need before the meeting.
If you’re unsure how to write, these appointment confirmation email guides can help you create a clear and professional message.
Step 3: Customize the Email Content
Most scheduling tools provide a rich text editor that lets you customize your email without writing code. In FluentBooking, you can use the Visual editor to format headings, paragraphs, lists, links, and images, making your email more readable and professional. If you prefer working with HTML, you can switch to the Code editor for additional customization.
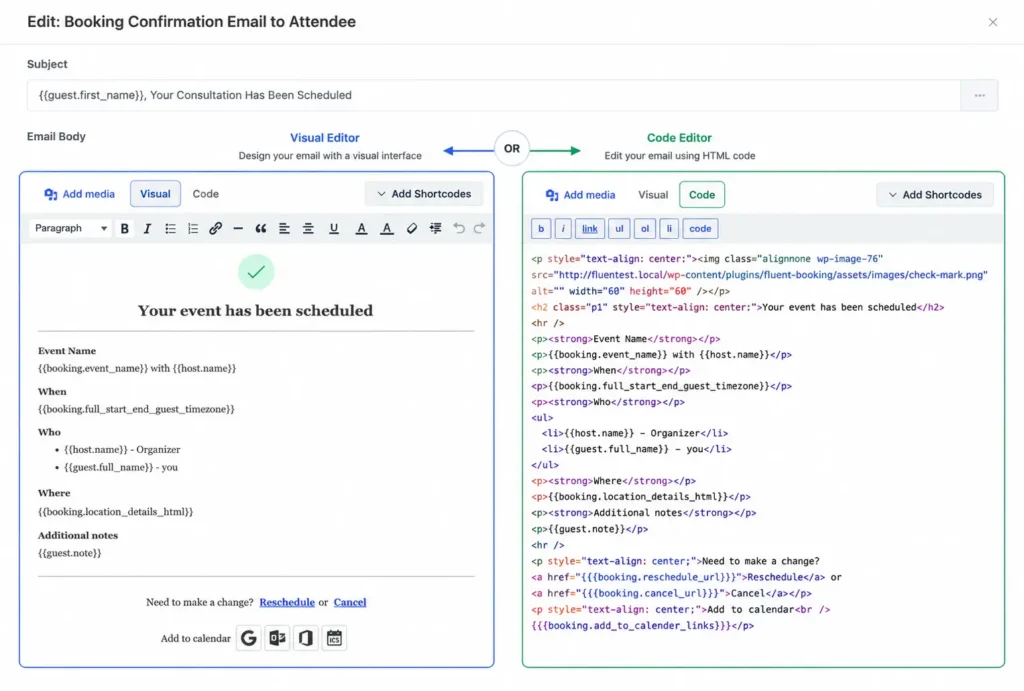
When editing the content, keep your message concise and easy to scan. Highlight important information, maintain a consistent tone of voice, and make sure the design reflects your brand. A well-formatted email not only looks more professional but also helps attendees quickly find the details they need.
Step 4: Personalize the Email with Dynamic Shortcodes
Personalization makes confirmation emails more useful and engaging. Instead of manually entering information for every booking, you can use dynamic shortcodes (also known as merge tags or dynamic fields). These placeholders automatically pull booking information when the email is sent.
For example, you can insert the attendee’s name, appointment date, or meeting link, and the system will replace those placeholders with the correct information for each booking.
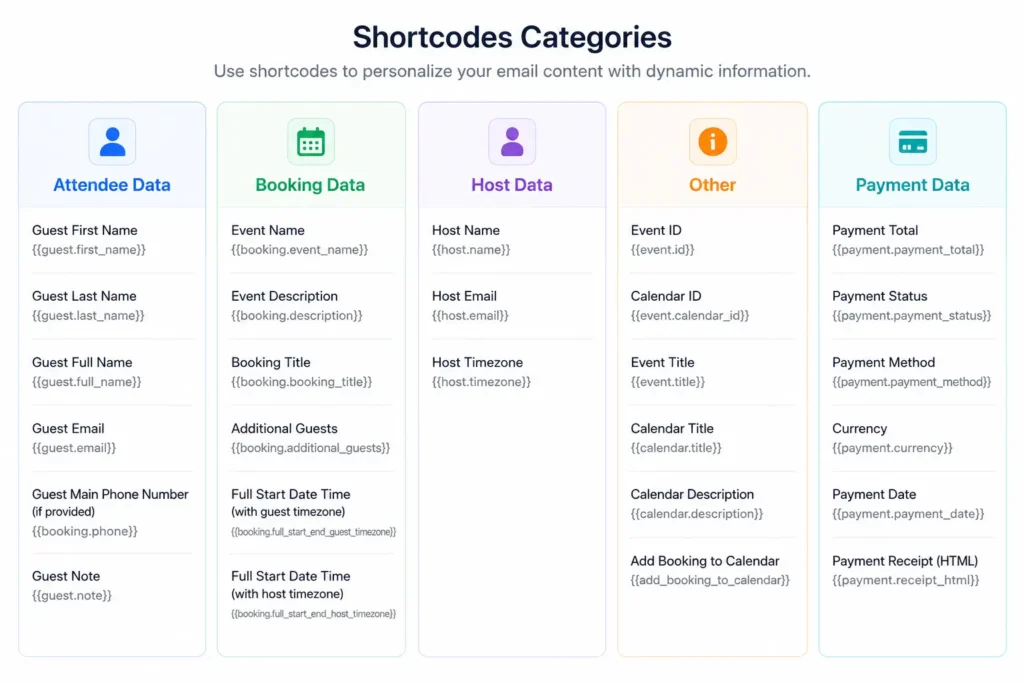
FluentBooking organizes its shortcodes into easy-to-browse categories, including:
- Attendee Data: Display the attendee’s name, email address, phone number, or notes.
- Booking Data: Insert appointment details such as the event name, booking title, date, and time.
- Host Data: Show the organizer’s name, email address, or time zone.
- Event & Calendar Information: Add details like the calendar title, event title, or an “Add to Calendar” link.
- Payment Data: For paid appointments, include payment status, payment method, total amount, or receipt details.
Using these dynamic fields ensures every confirmation email is personalized without requiring manual updates for each booking.
Step 5: Save Your Changes and Test the Email
Once you’ve finished customizing the subject line and email content, click Save Settings to apply your changes. Saving the template ensures that all future booking confirmation emails for that event use your updated design and content.
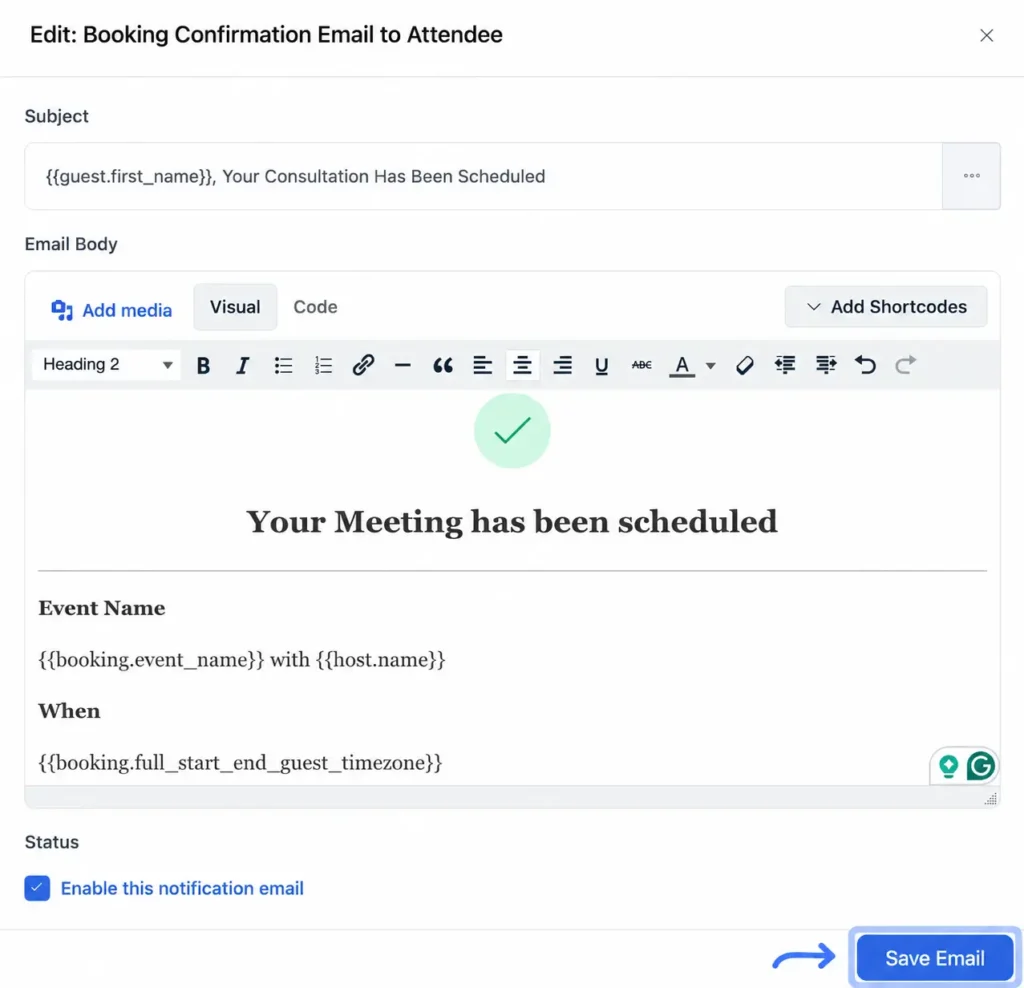
Before using the template with real attendees, it’s a good idea to test the email. Create a test booking or send a preview email to yourself to verify that everything works as expected. Check that:
- The subject line displays correctly.
- All dynamic fields are replaced with the correct booking information.
- Meeting links, reschedule links, and cancellation links are working.
- Images, formatting, and spacing look good on both desktop and mobile devices.
- There are no spelling or formatting errors.
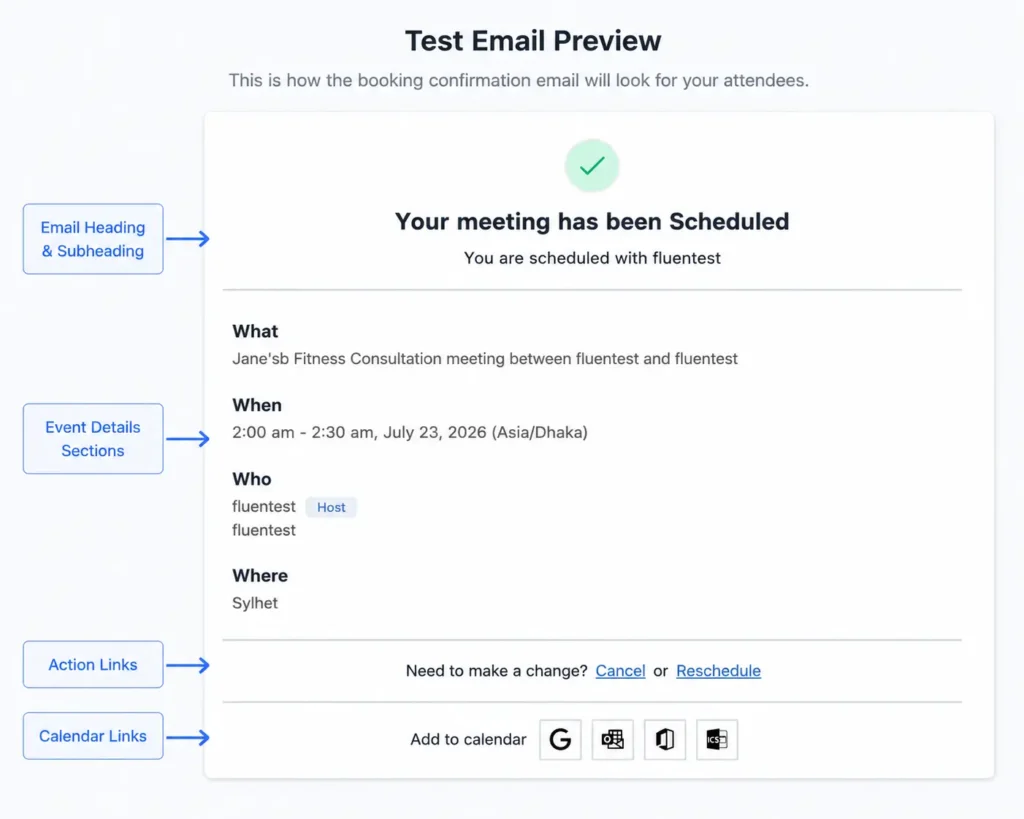
Taking a few minutes to test your confirmation email helps you catch any issues before your attendees receive it. A well-tested confirmation email helps prevent confusion and is one of the simplest ways to reduce appointment no-shows.
Best Practices for Writing Booking Confirmation Emails
A well-written booking confirmation email should reassure attendees, provide all the necessary information, and make the next steps clear. Here are some best practices to help you create professional and effective confirmation emails.
- Write a clear and descriptive subject line: Use a subject that immediately tells attendees their booking has been confirmed, such as Your Appointment is Confirmed.
- Personalize the message: Include the attendee’s name and other booking-specific details to make the email feel more relevant and engaging.
- Highlight key booking details: Clearly display the event name, date, time, duration, and meeting location or joining link so attendees can find them at a glance.
- Keep the content concise: Avoid unnecessary information and focus on the details attendees need before their appointment.
- Use a clean, scannable layout: Break up the content with headings, bullet points, or spacing to improve readability on both desktop and mobile devices.
- Include clear next steps: If attendees need to prepare anything before the meeting, mention it in the email to help them arrive ready.
- Provide reschedule and cancellation options: Make it easy for attendees to update or cancel their booking if their plans change.
- Maintain consistent branding: Use your brand’s tone, logo, and formatting to create a professional and recognizable experience.
- Include contact information: Add your email address or phone number so attendees can easily reach you if they have questions.
- Test your email before publishing: Send a test email to ensure the formatting looks right, links work properly, and all dynamic fields display the correct information.
Turn Every Confirmation Email into a Better Customer Experience
A well-crafted booking confirmation email does more than confirm an appointment. It keeps attendees informed, builds trust, and sets the right expectations before the meeting. By personalizing your emails, highlighting key booking details, and keeping the content clear and concise, you can create a smoother booking experience while reducing confusion and no-shows.
Take the time to review and test your email template regularly to ensure every confirmation leaves a professional and lasting impression.
Create personalized emails, automate reminders, sync calendars, and manage bookings, all from your WordPress website with FluentBooking
Ratul Hasan Ripon
I enjoy making complex ideas simple and engaging through my writing and designs. With a strong knowledge on content writing and SEO, I create technical content that’s both easy to understand and interesting.
Table of Content
Subscribe To Get
WordPress Guides, Tips, and Tutorials
Add your first comment to this post