

How to Require Payment Before Confirming Appointments (Complete Guide)


What happens when a customer books an appointment but never shows up? You lose valuable time, miss potential revenue, and may struggle to fill the empty slot at the last minute. While no-shows can’t be eliminated completely, requiring payment before confirming appointments can significantly reduce them and encourage customers to honor their bookings.
In this guide, you’ll learn why collecting payment upfront is beneficial and how to set up a booking workflow that confirms appointments only after a successful payment.
Key Takeaways
- Learn why appointment deposits reduce cancellations and no-shows.
- Understand the difference between deposits and full upfront payments.
- Discover when businesses should require booking deposits.
- Learn how to automate deposit collection with WordPress.
- Explore best practices for creating a smooth customer experience.
Why Require Payment Before Confirming Appointments?
Requiring payment before confirming appointments isn’t just about getting paid sooner. It helps protect your business, improves scheduling, and creates a more reliable booking experience for both you and your customers. Here are some of the key benefits:
- Reduce No-Shows: Customers are more likely to keep appointments they’ve already paid for, helping you minimize missed bookings and empty time slots.
- Protect Your Revenue: Collecting payment upfront ensures you’re compensated for your time, even if a customer cancels at the last minute or doesn’t show up.
- Save Administrative Time: Automate payment collection during the booking process instead of sending invoices, chasing payments, or following up manually.
- Improve Cash Flow: Receiving payments before providing your service creates a more predictable cash flow and makes it easier to manage your business finances.
- Create a Professional Booking Experience: A streamlined booking and payment process gives customers clear expectations and a more convenient, trustworthy experience.
How to Require Payment Before Confirming Appointments
There are plenty of appointment scheduling tools available today. But if you’re looking for a self-hosted, WordPress-based solution that gives you full control over your booking process, FluentBooking makes it easy to accept secure online payments and confirm appointments only after payment is completed.
In this guide, you’ll learn how to configure FluentBooking to require payment before confirming appointments.
Step 1: Connect Your Payment Gateway
If you haven’t created an event yet, check out our guide on how to create a booking event before continuing.
Before enabling paid appointments, make sure a payment gateway is connected to your website.
Navigate to: FluentBooking → Global Settings → Payment → Payment Methods
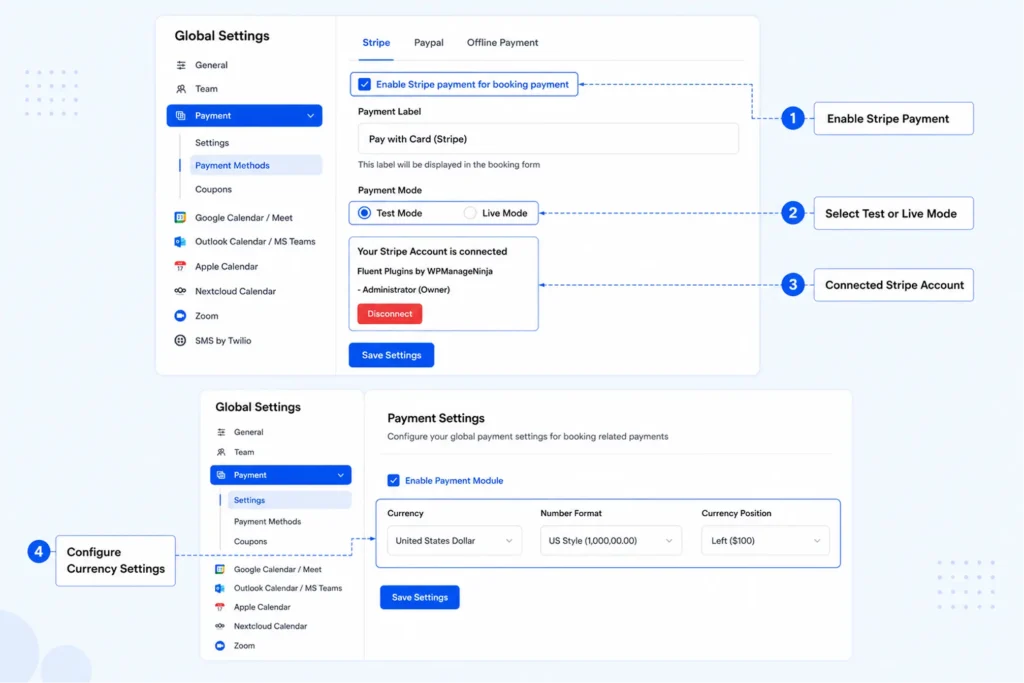
Here, you can choose your preferred payment provider, such as Stripe or PayPal. For Stripe, simply enable the payment method, choose Test Mode or Live Mode, connect your Stripe account, and save your settings.
If you haven’t configured Stripe yet, follow our complete guide on creating a paid booking system with Stripe in WordPress. It walks you through connecting your Stripe account and preparing your website to accept secure online payments.
Step 2: Enable Payment for Your Booking Event
Next, open the booking event that you want to make a paid appointment.
Navigate to Payment Settings within the event editor and enable this event as Paid and collect payment on booking
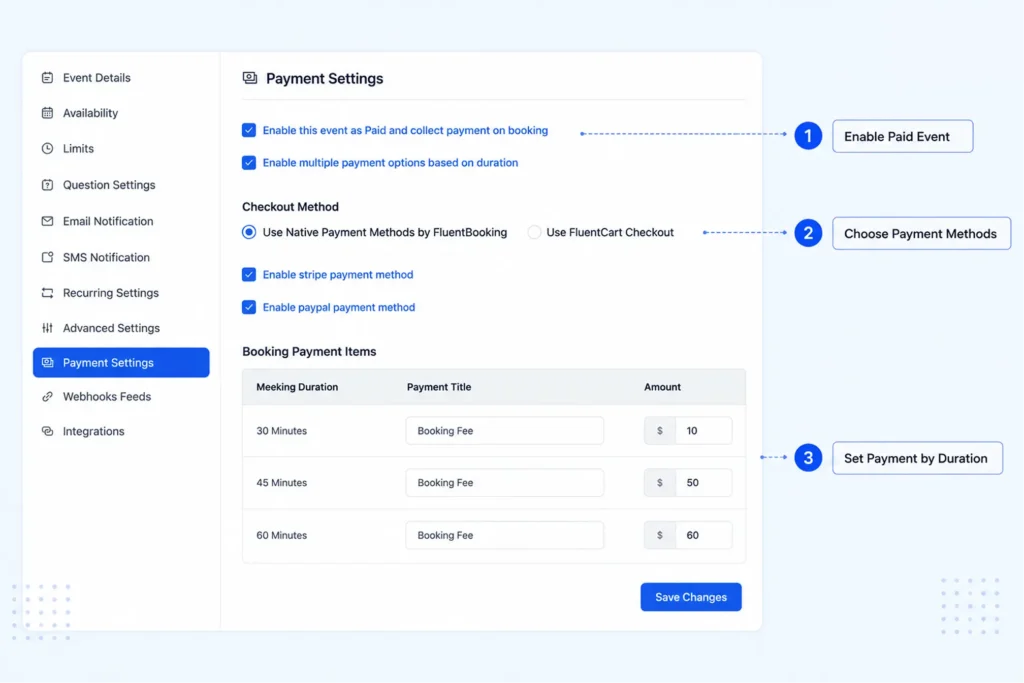
This ensures customers must complete payment before their appointment is confirmed.
If your event offers multiple meeting durations, you can also enable Multiple payment options based on duration and assign different prices for each appointment length.
Then choose your preferred checkout method, enable the payment methods you want to accept, and enter the booking price for each meeting duration.
Finally, click Save Changes.
Step 3: Select a Meeting Time
After publishing your booking page, customers can start scheduling appointments.
They simply choose their preferred meeting duration, select an available date from the calendar, and pick a suitable time slot. FluentBooking displays the meeting duration, location, timezone, and booking price before they continue.
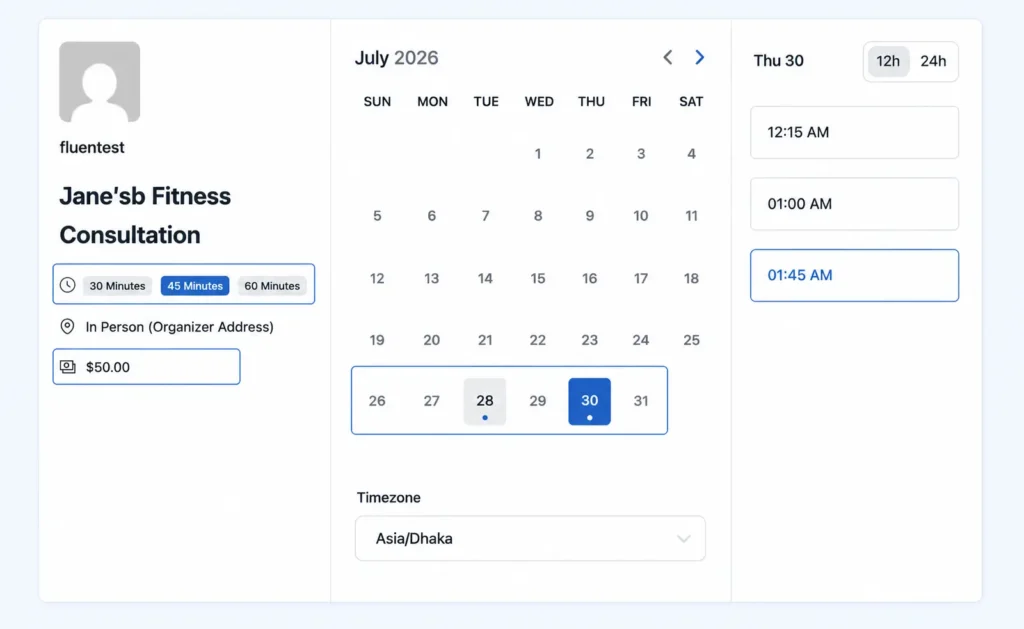
This gives customers all the information they need before moving to the payment step.
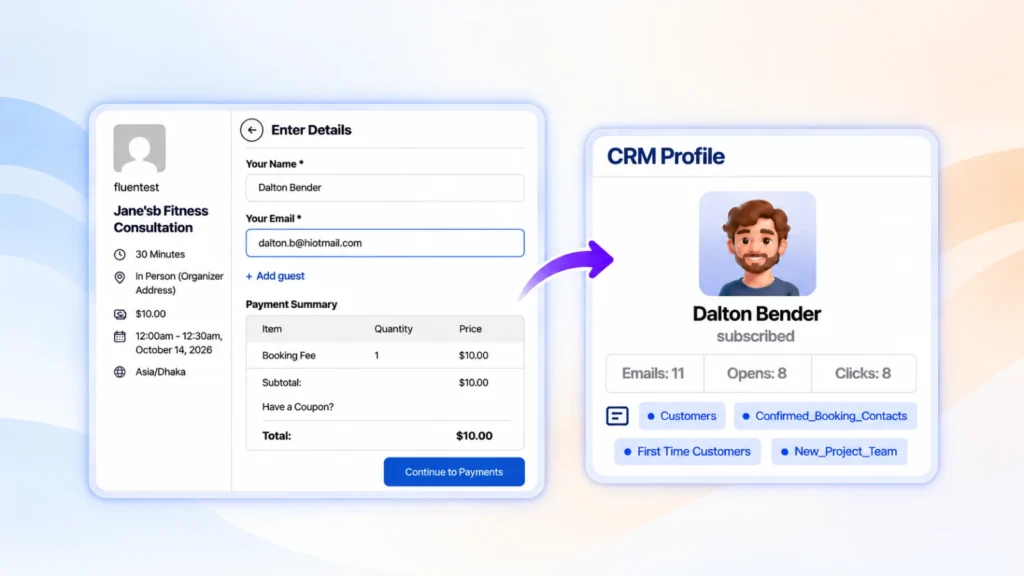
Step 4: Review the Appointment Details
Once a customer selects a time slot, they’ll be asked to enter their contact information.
Before proceeding to checkout, FluentBooking displays a complete payment summary, including the selected service, booking fee, quantity, subtotal, and total amount due. Customers can review everything to ensure the booking details are correct.
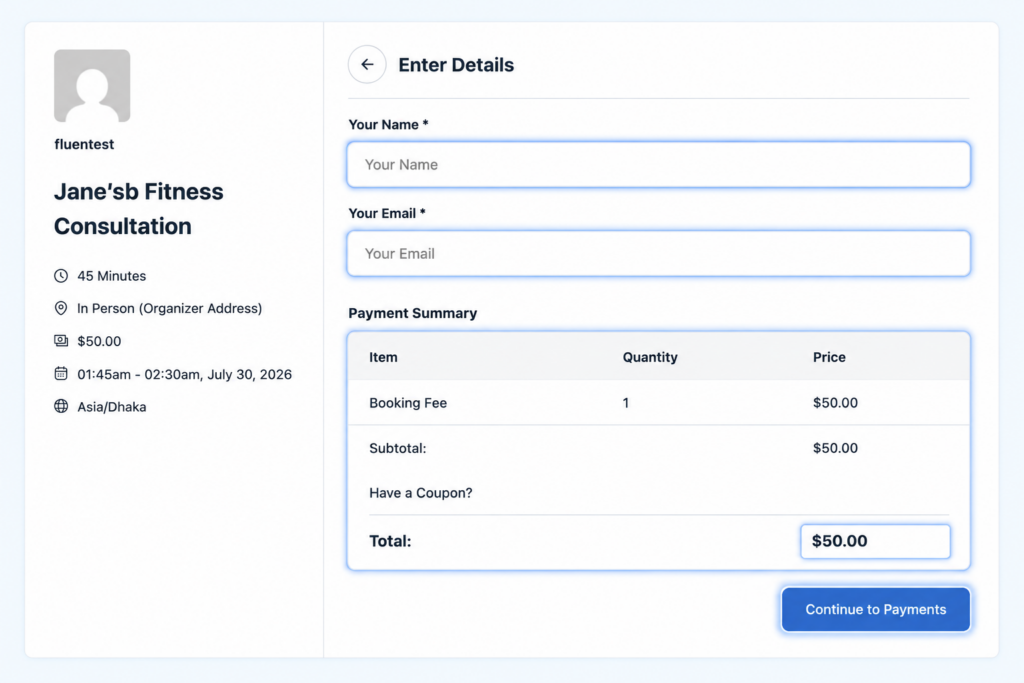
After confirming the information, they can click Continue to Payments.
Step 5: Complete the Payment
On the checkout page, customers enter their payment information using the payment gateway you’ve enabled.
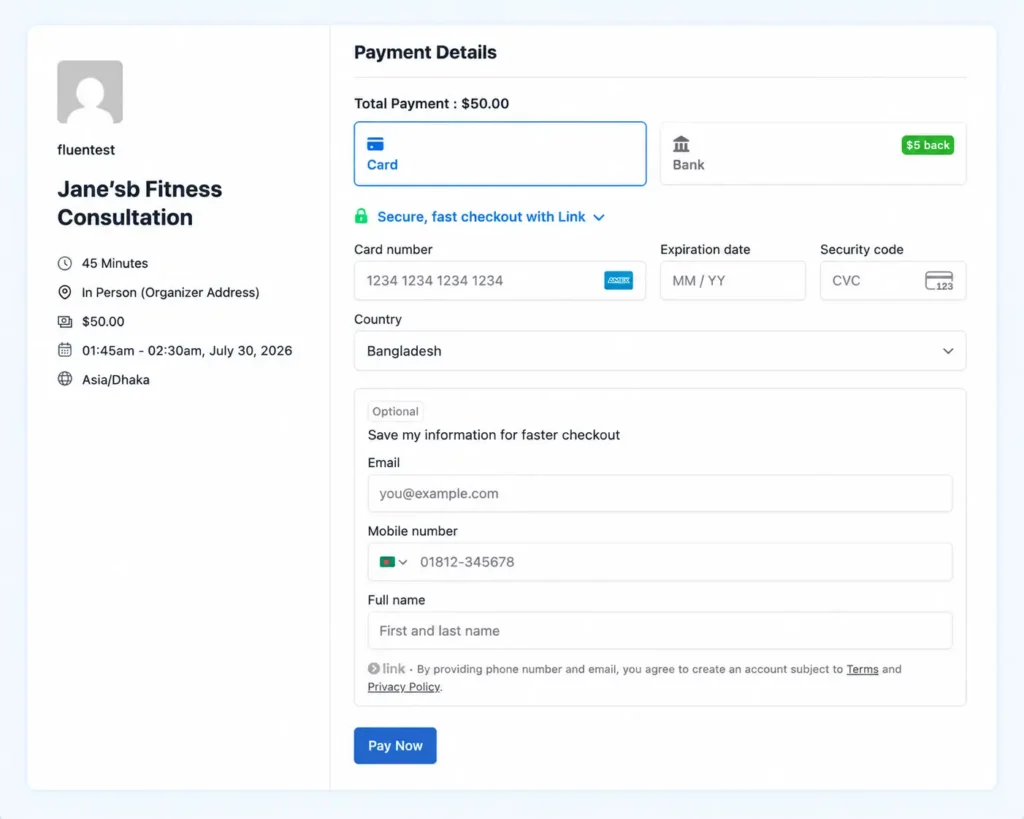
After clicking Pay Now, FluentBooking securely processes the payment. Once the transaction is successful, the appointment is automatically confirmed, and both you and your customer receive confirmation notifications.
This workflow eliminates manual payment collection and ensures appointments are only confirmed after payment has been received.
Screenshot Suggestion: Payment Details page with Stripe checkout and Pay Now button.
Step 6: Verify the Booking
Before sharing your booking page publicly, complete a test booking to make sure everything works as expected.
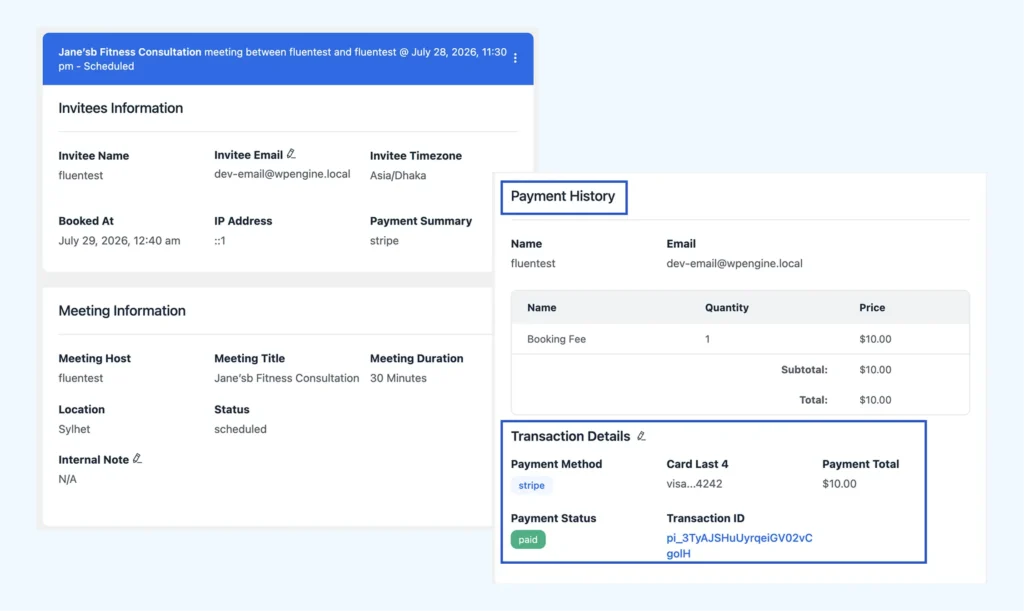
Check that:
- The correct booking price appears.
- Payment is processed successfully.
- The appointment is confirmed after payment.
- Confirmation emails are sent automatically.
- The booking appears in your FluentBooking dashboard.
- The event syncs with your connected calendar.
Running a quick test helps you identify any issues before accepting real customer bookings.
Best Practices for Requiring Payment Before Confirming Appointments
Collecting payment before confirming appointments can improve your booking process, but the experience should remain simple and customer-friendly. Follow these best practices to build trust and encourage customers to complete their bookings.
- Keep Your Pricing Transparent: Display the appointment fee upfront so customers know exactly what they’ll pay before reaching the checkout page.
- Offer Multiple Payment Methods: Accept popular payment options like Stripe and PayPal to give customers the flexibility to pay using their preferred method.
- Simplify the Booking Form: Only ask for essential information. A shorter booking process reduces friction and helps more customers complete their appointments.
- Display a Clear Cancellation and Refund Policy: Let customers know whether payments are refundable and explain your cancellation terms before they complete their booking.
- Use Secure Payment Gateways: Collect payments through trusted providers to give customers confidence that their payment information is protected.
- Send Automated Confirmation and Reminder Emails: Confirm bookings immediately after payment and send reminder emails before the appointment to reduce no-shows and keep customers informed.
These small improvements can make a big difference in creating a smooth booking experience while increasing customer confidence in your appointment process.
Secure Every Appointment Before It Begins
Requiring payment before confirming appointments helps you reduce no-shows, protect your revenue, and create a more reliable booking experience. By collecting payments during the booking process, you can automate confirmations, eliminate manual follow-ups, and give customers a smooth scheduling journey from start to finish.
If you’re running your booking system on WordPress, setting up online payments is easier than ever. With the right appointment booking plugin and payment gateway, you can streamline your workflow, save time, and ensure every confirmed appointment is backed by a successful payment.
Ratul Hasan Ripon
I enjoy making complex ideas simple and engaging through my writing and designs. With a strong knowledge on content writing and SEO, I create technical content that’s both easy to understand and interesting.
Table of Content
Subscribe To Get
WordPress Guides, Tips, and Tutorials


Add your first comment to this post