

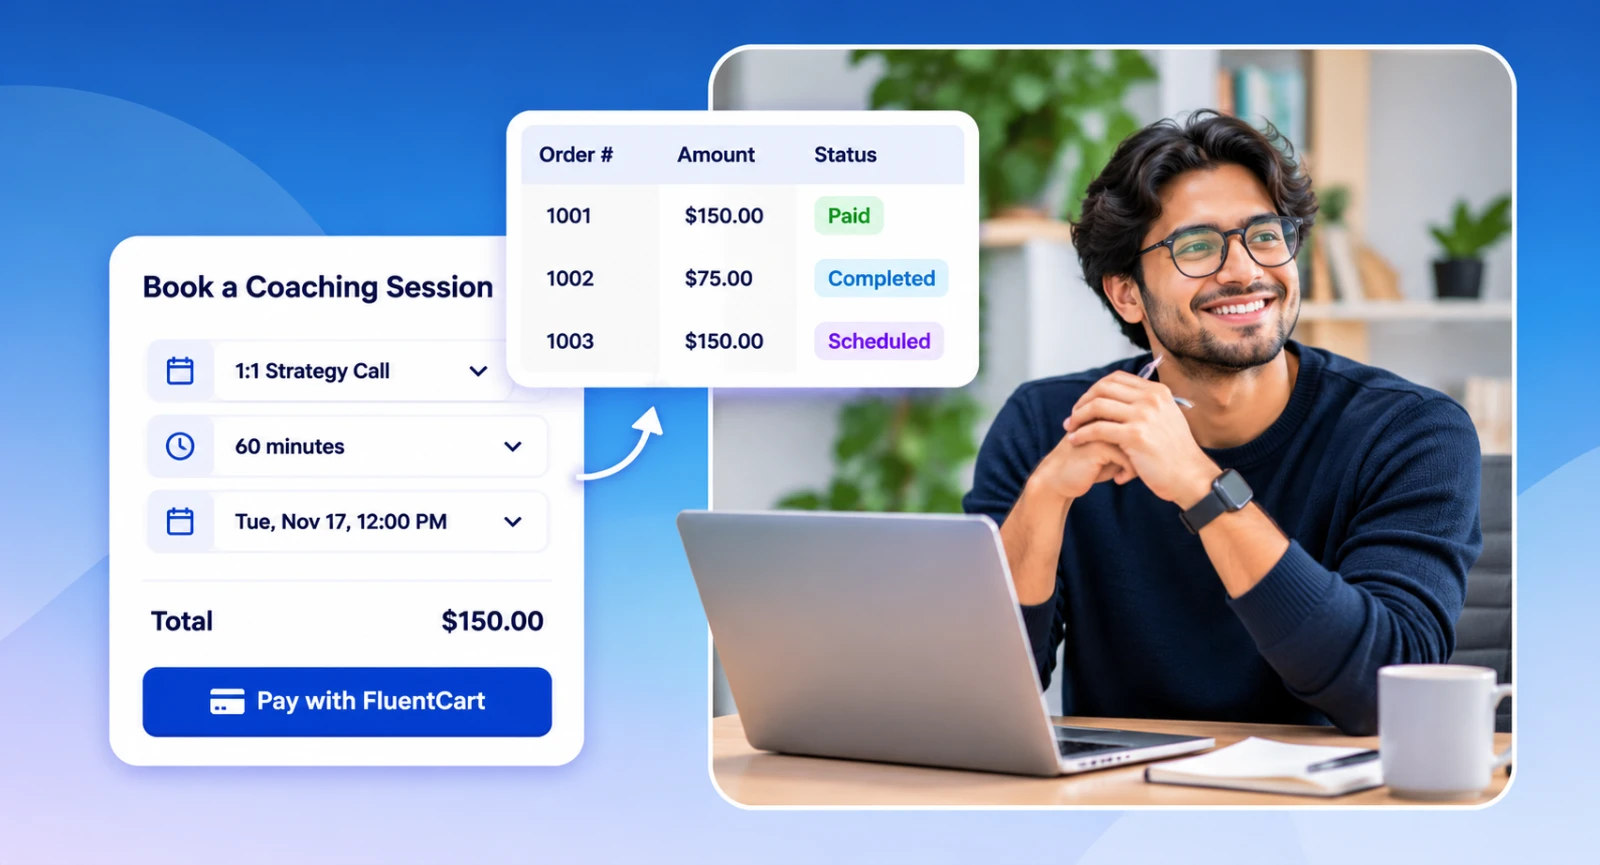
How to Sell Coaching Sessions and Consultations on WordPress (and Get Paid Before the Call)


Last Updated:
Someone books your 60-minute strategy call for next Tuesday. Good news. Then you send an invoice, wait, send a polite reminder, and wait again. Tuesday arrives, but the invoice is still unpaid. Do you take the call?
Most coaches have experienced something similar. Getting the booking was only the beginning. The real challenge is managing everything that comes next, starting with payment.
This guide shows you how to sell coaching sessions on WordPress using FluentBooking and FluentCart. You’ll learn how to set session prices, send clients to your store checkout after they book, confirm appointments automatically once payment is received, and keep every order connected to its booking.
Why Time Is Harder to Sell Than a Product
A course or an ebook can sell a thousand times. A Tuesday 10:00 AM slot can sell only once. That one fact changes how you should sell coaching sessions.
- An unpaid slot still blocks your calendar. While an invoice sits unpaid, nobody else can book that time. If the client never pays, you’ve lost the chance to fill that hour.
- Time has no stock count. A product page shows a price and a Buy button. A session also needs a date, time, time zone, and duration. All of these details must match what the client pays for.
- The order matters. With a regular product, the process is simple: pay, then receive. With a session, clients often book first and pay later. That leaves you chasing payments for time you’ve already reserved.
So the goal isn’t just to create a better booking page. You need a workflow where choosing a time and paying for it happen together, and the session is confirmed only after payment is received.
What Should Happen After Someone Books a Paid Session
Every booking has a next step. For a paid session, that step is payment, followed by confirmation and everything that comes after.
A good setup handles all four steps automatically:
- Book. The client chooses a session and available time, with the price clearly displayed before they commit.
- Pay. They complete payment as part of the booking process instead of waiting for an invoice or payment link.
- Confirm. The session is confirmed only after payment is received. The confirmation emails go out, and the event is added to your calendar.
- Follow through. The payment and session remain connected, so you can check what the client has purchased and plan the next step.
If any part of this process depends on you remembering to do it manually, something can eventually slip. The rest of this guide shows you how to automate the entire workflow.
Three Ways to Take Payment for a Coaching Session
There are three common ways to get paid for one-to-one coaching sessions. The right option depends on whether you already sell other products online.
| Method | How it works | Best for | Watch out for |
| Invoice after booking | The client books a session, then you manually send an invoice or payment link. | Coaches who handle a handful of sessions each month or work with clients on retainer. | Chasing unpaid invoices and holding slots for clients who never pay. |
| Payment inside the booking tool | The client pays through Stripe or PayPal as part of the booking process, before the booking is confirmed. | Coaches who only sell sessions. | Requires FluentBooking Pro, and session payments remain separate from other store sales. |
| Your store checkout | The session is a product in your store. After choosing a time, the client pays through your regular checkout. | Coaches who also sell courses, programs, or digital products. | Requires a store plugin on your website. |
If you only sell coaching sessions, taking payment inside your booking tool is the simplest option. FluentBooking Pro supports Stripe and PayPal payments, so you don’t need a separate store.
But if you already sell courses, templates, or programs through an online store, using your store checkout may make more sense. Your coaching sessions go through the same checkout as your other products, and each purchase is recorded alongside your regular sales.
In this guide, we’ll use FluentCart to set up that workflow.
Running coaching sessions as part of an online course? See how to add coaching calls to your online course.
How to Sell Coaching Sessions with FluentBooking and FluentCart
FluentBooking handles the scheduling side of your business, including availability, booking pages, confirmations, and appointment reminders.
FluentCart handles your store, including products, checkout, and orders.
Together, they connect the entire process through the FluentCart integration, taking a coaching session from booked to paid in four steps.
Before You Start
Before setting up the integration, make sure you have:
- FluentBooking installed and activated on your WordPress website.
- FluentCart installed and activated on the same website.
- A checkout page configured in FluentCart.
- At least one payment method enabled in FluentCart.
FluentBooking automatically enables its FluentCart module when it detects the plugin. You can then connect your booking events to FluentCart products.
You can complete the setup below using the free FluentBooking plugin. You don’t need FluentBooking Pro for the FluentCart checkout workflow.
Step 1: Give the Session Its Price
First, open the booking event you want to sell, such as a 1:1 Strategy Call, and go to its Payment Settings.
Follow these steps:
- Turn on payments for the event.
- Under Checkout Method, select Use FluentCart Checkout.
- Under Select FluentCart Product, choose the product you want to sell.
- Don’t have a product yet? Click + New, enter a product title and price, and click Create.
- Save your changes.
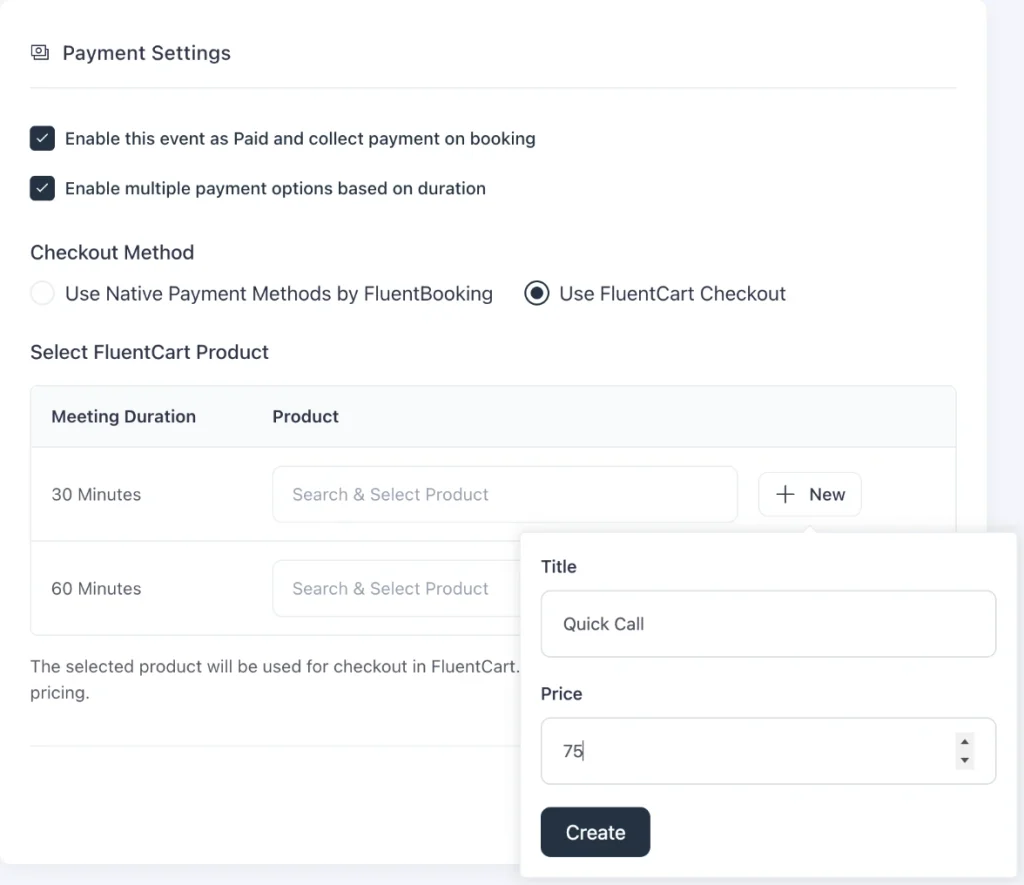
The booking price comes directly from the selected FluentCart product. Clients can see the price on your booking page before choosing a time.
Step 2: Pay at Your Own Checkout
Once a client selects an available time, FluentBooking sends them to your FluentCart checkout to complete the payment.
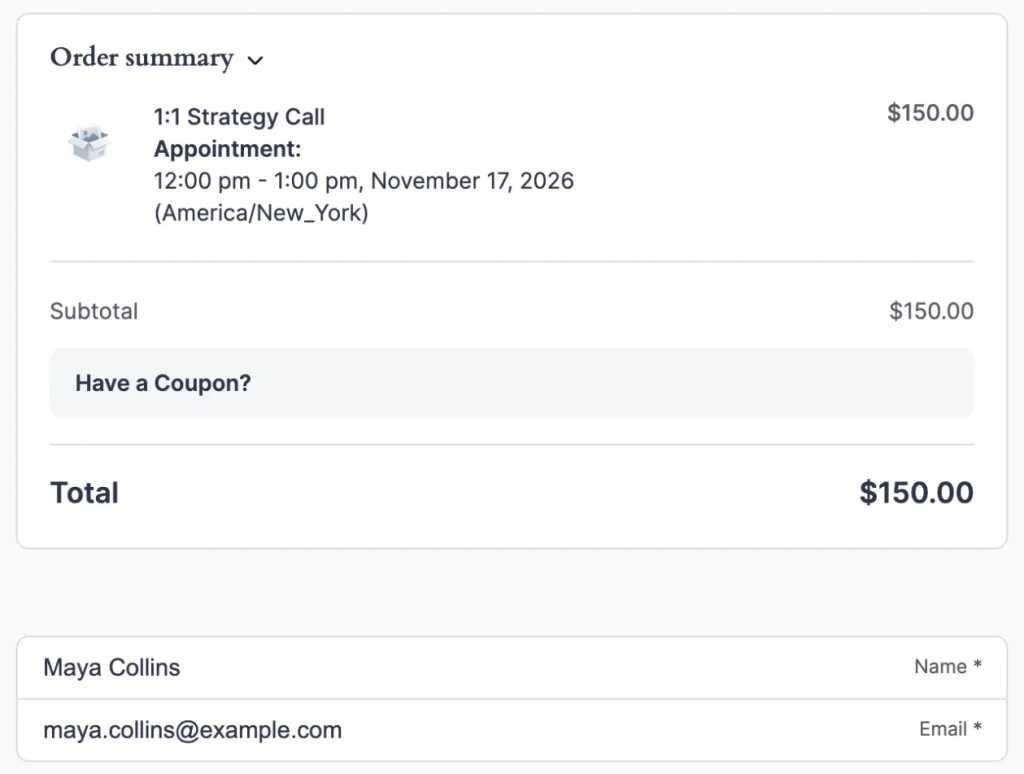
The order summary includes the session details and appointment time, so clients can review what they’re purchasing before paying.
For example:
1:1 Strategy Call
Appointment: 12:00 PM–1:00 PM, November 17, 2026
Time zone: America/New_York
Price: $150.00
Clients can pay using any payment method you’ve configured in FluentCart. The experience is the same checkout they’d use to purchase any other product from your store.
Step 3: Confirm the Session When It’s Paid
What happens after the client completes checkout?
Until the order is paid, the booking remains Pending. Once FluentCart marks the order as paid, FluentBooking automatically updates the booking status to Scheduled and its payment status to Paid.


That’s when the booking confirmation emails are sent to you and the client. The event is also added to your connected calendar.
No more scheduling a call and hoping the invoice gets paid later.
What if someone books a time but never pays?
You don’t have to manage unpaid bookings manually. FluentBooking can automatically cancel unpaid bookings and release the reserved time slot.
By default, this happens after 10 minutes. You can adjust the timing under Settings → General → Mark booking as cancelled automatically after, with options ranging from 5 minutes to 2 days.
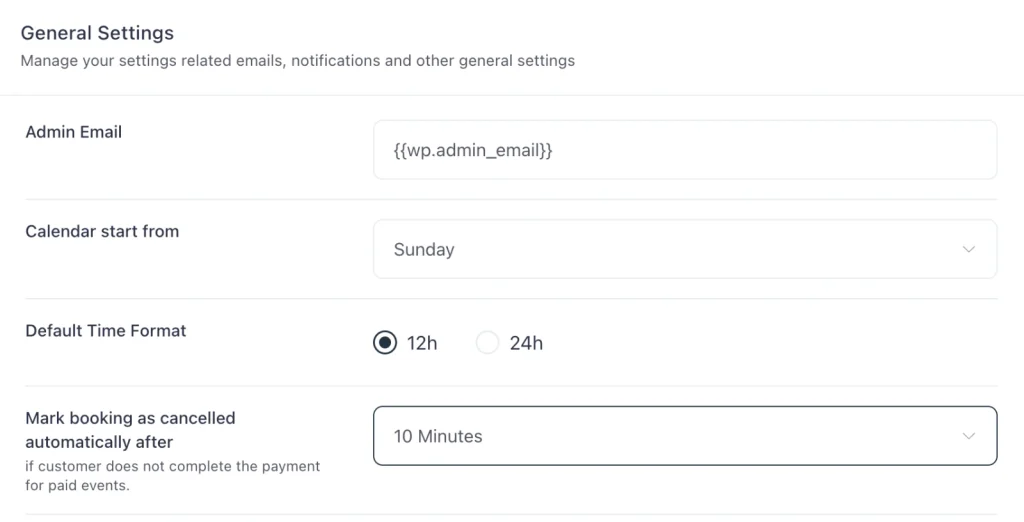
If the client still wants the session, they can make a new booking and choose from the available time slots. Once the original booking is cancelled, its checkout no longer holds the reserved time.
Step 4: Follow Through with the Order on the Booking
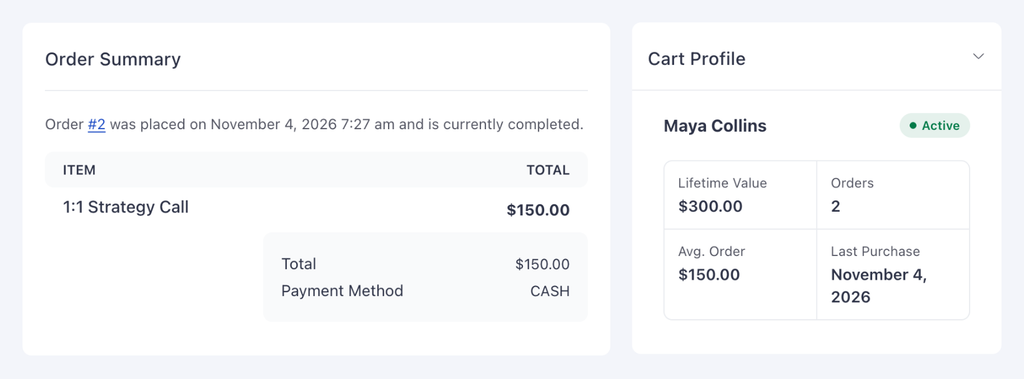
Every paid session becomes a FluentCart order linked to its FluentBooking appointment.
Open the booking in FluentBooking to view its order summary. If the client is already a FluentCart customer, you’ll also see a Cart Profile card with details such as:
- Lifetime value
- Number of orders
- Average order value
- Last purchase
Site administrators can view this card. Other team members need FluentCart Pro to access it.
This information helps you understand who you’re meeting before a call. You can quickly see whether someone is a first-time client or has already purchased a course, program, or another service from your store.
If you also use FluentCRM, you can build follow-up automations around the client’s paid order and continue the relationship after the session.
Price Each Session Length Differently, on the Free Plugin
Many coaches offer the same service in different session lengths. For example, you might offer a short check-in call and a longer strategy session.
You don’t need to create separate booking events for each option.
Instead, open the event’s Payment Settings and enable Enable multiple payment options based on duration.
You can then connect a different FluentCart product to each session length.
For example:
| Meeting duration | FluentCart product | Price |
| 30 minutes | Quick Call | $75 |
| 60 minutes | 1:1 Strategy Call | $150 |
When clients switch between the available durations on your booking page, the corresponding product and price change automatically.
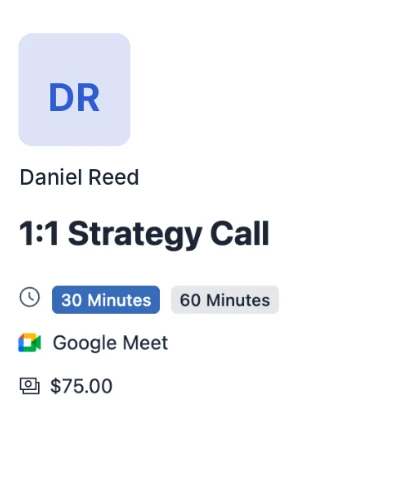
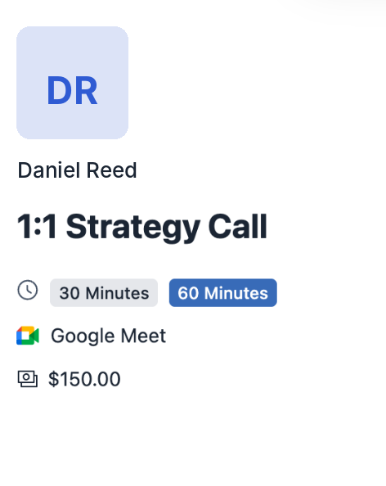
All of this works with the free FluentBooking plugin. You can use FluentCart checkout and assign a separate product to each meeting length without needing FluentBooking Pro.
The Next Step After the Call: Follow Up with FluentCRM
A paid, confirmed session doesn’t have to be the end of the relationship. It can be the beginning of the next sale: another session, a coaching package, or one of your courses.
If you use FluentCRM, you can create automated follow-ups based on booking activity or FluentCart purchases.
Start an Automation When an Order Is Paid
FluentCRM supports the Order Paid (Payment/Subscription) trigger for FluentCart purchases.
You can create an automation that starts when a customer pays for a specific coaching session. From there, add actions that match the next step in your customer journey.
For example:
| When this happens | FluentCRM trigger | A follow-up that fits |
| A client pays for a coaching session | Order Paid | Send a welcome email with details about preparing for the call. |
| A client completes a purchase for a specific product | Order Paid, with the product selected | Recommend a related coaching package or course. |
| A returning client makes another purchase | Order Paid | Send a thank-you email with a special offer for their next session. |
You can also use FluentCRM automation actions to apply tags, send emails, and create follow-up steps.
Follow Up Based on Booking Activity
If you use FluentBooking Pro, you can also connect its direct FluentCRM integration and trigger automations based on booking events.
For example:
| Booking activity | FluentBooking trigger | A follow-up that fits |
| A booking is confirmed | New Booking | Send a welcome email with preparation details. |
| A session is completed | Booking Completed | Send a thank-you email, a short recap, and a link to book the next session. |
Choose the trigger that matches the action you want. For a purchase-based follow-up, use Order Paid. For a booking-status follow-up, use the relevant FluentBooking trigger.
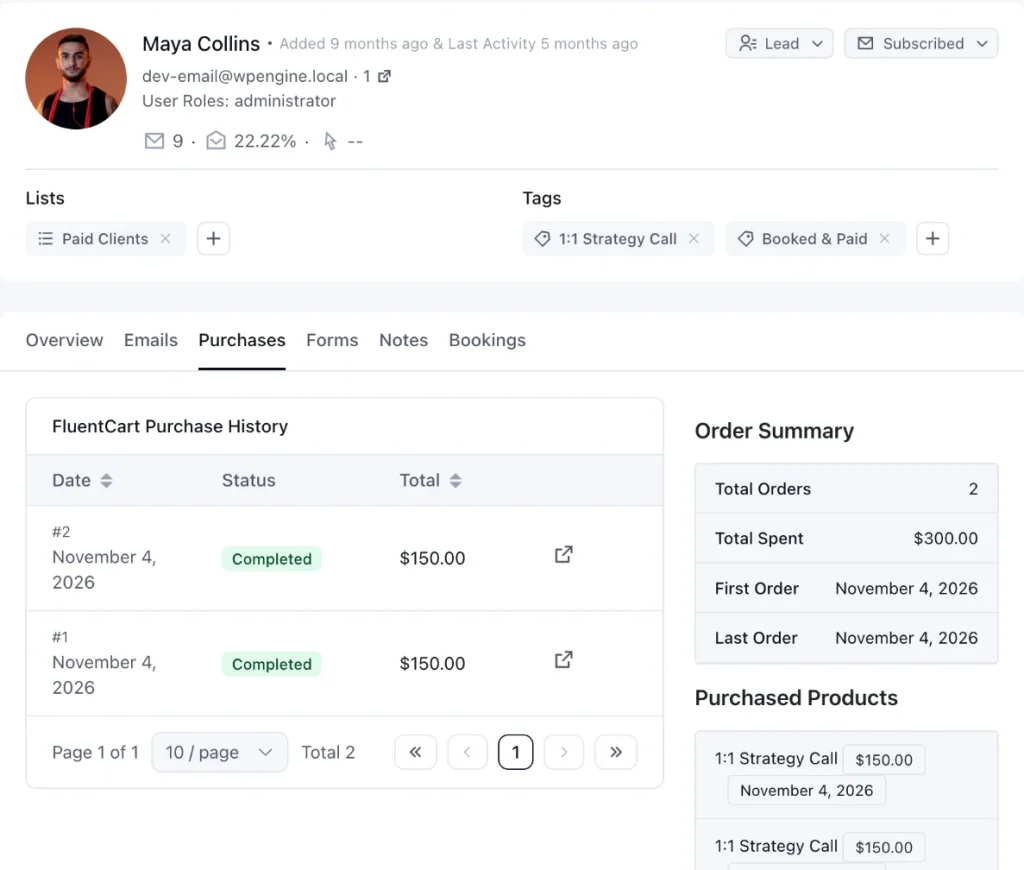
Avoid using both triggers for the same email sequence without checking how they interact. A paid booking can trigger both purchase and booking events, which may result in duplicate emails.
You can also use FluentCRM’s Create Coupon action to generate a FluentCart coupon as part of an automation. For example, you could reward returning clients with a discount on their next session.
Make Payment the Next Step After Every Booking
Selling coaching sessions comes down to one simple idea: a booked call should already be a paid call.
Set the session price in your store, send clients to your checkout after they choose a time, confirm the session once payment arrives, and keep the order connected to the booking.
With FluentBooking and FluentCart, you can manage this entire process on your own WordPress website. And you can set up the FluentCart checkout workflow with the free FluentBooking plugin.
Let clients choose their session, pay through your store checkout, and get confirmed automatically. Connect FluentBooking with FluentCart and manage your bookings and payments from one WordPress site.
Ratul Hasan Ripon
I enjoy making complex ideas simple and engaging through my writing and designs. With a strong knowledge on content writing and SEO, I create technical content that’s both easy to understand and interesting.
Table of Content
Subscribe To Get
WordPress Guides, Tips, and Tutorials



Add your first comment to this post