

How to Create a Dental Appointment Booking System in WordPress (+ Best Practices)


Missed calls, double bookings, A front desk juggling phone calls, walk-in patients, and last-minute rescheduling requests all at once. If that sounds familiar, your dental practice could benefit from an online dental appointment booking system.
The good news is that if your website runs on WordPress, you don’t need a separate booking platform, an expensive monthly subscription, or a developer to get started. With the right booking plugin, you can create a professional appointment scheduling system directly on your website in less than an hour.
Patients can book appointments 24/7, choose a specific dentist or the next available provider, receive automatic confirmations and reminders, and even pay online. In this guide, we’ll show you how to build a complete dental appointment booking system in WordPress.
Why Your Dental Clinic Needs an Online Appointment Booking System
A dental appointment booking system helps streamline your clinic’s scheduling process while creating a more convenient experience for your patients. Here are some of the key benefits:
- Accept appointments 24/7: Let patients book appointments anytime, even outside your clinic’s working hours.
- Reduce double bookings: Sync with Google Calendar to keep your dentists’ availability updated and avoid scheduling conflicts.
- Save your front desk time: Automate appointment scheduling, confirmations, and reminders so your staff can focus on patient care.
- Minimize no-shows: Send automatic email or SMS reminders to help patients remember upcoming appointments.
- Offer a better patient experience: Allow patients to choose a specific dentist or book the first available provider in just a few clicks.
- Collect payments online: Accept consultation fees during booking to reduce administrative work and secure appointments in advance.
- Keep appointment details organized: Store patient information, booking history, and custom responses in one place for easier appointment management.
This isn’t unique to dental clinics, either; the same shift is happening across healthcare. If you want the broader picture, How Doctors Can Automate Appointment Scheduling in WordPress covers the general case; this guide applies specifically to dental practices.
What You’ll Need
- A WordPress website (self-hosted, not WordPress.com’s limited plan)
- Admin access to install a plugin
- A list of your services (cleanings, exams, whitening, etc.) and how long each takes
- Each dentist or hygienist’s working hours
That’s it. No coding required.
Set Up Your Dental Booking System in 7 Simple Steps
Setting up online appointment scheduling doesn’t have to be complicated. With the right plugin and a few simple configurations, you can create a professional booking experience that works for both your staff and your patients.
Step 1: Choose a Booking Plugin
There are a few WordPress scheduling plugins out there, but for a dental clinic you want three things in particular:
- Multiple staff support: most clinics have more than one provider
- Service-based durations: a cleaning and a root canal shouldn’t get the same 30-minute slot
- Calendar sync: so a provider’s personal calendar and booking calendar never conflict
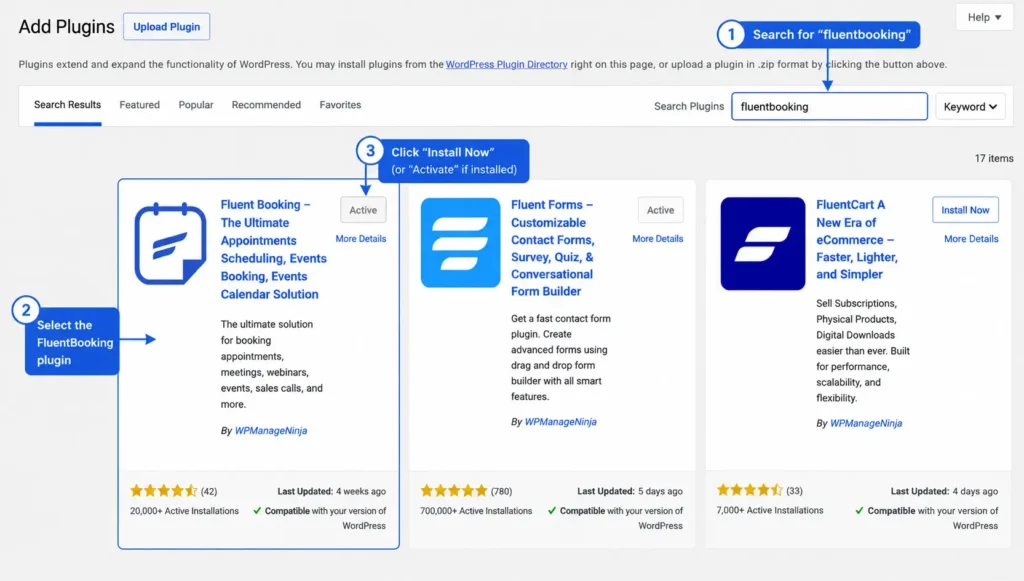
FluentBooking is built with exactly this in mind, and it runs natively on WordPress rather than pulling your site into a separate hosted platform. Install it from your WordPress dashboard under Plugins → Add New, search for “FluentBooking,” and click Install, then Activate.
Step 2: Create a One-to-One Dental Appointment
A One-to-One event lets patients book an appointment with a specific dentist. This setup is ideal for consultations or treatments where patients prefer to choose the provider themselves.
Some common examples include:
- General dental consultation
- Cosmetic dentistry consultation
- Orthodontic consultation
- Root canal consultation
- Dental implant consultation
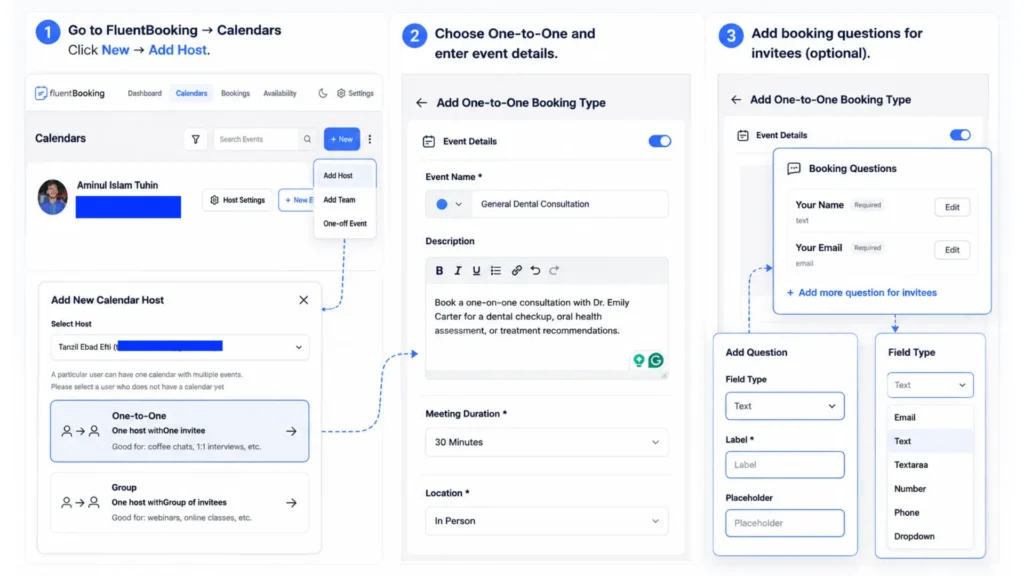
Before creating a One-to-One appointment, make sure you’ve already added the dentist as a Host in FluentBooking. Every appointment is assigned to a Host, so you’ll need at least one Host before creating an event.
- Go to FluentBooking → Calendars.
- Click New Event Type.
- Select One-to-One as the meeting type.
- Choose the dentist (Host) who will provide the appointment.
- Enter an event name, such as General Dental Consultation.
- Set the appointment duration based on the service you offer.
- Select your preferred meeting location, such as In Person.
- Click Continue to configure the remaining settings.
Step 3: Set Up Round Robin Booking for Multiple Dentists
If your clinic has multiple dentists offering the same service, Round Robin Booking is the easiest way to manage appointments. Instead of asking patients to choose a specific dentist, FluentBooking automatically assigns the appointment to the next available team member.
This setup works especially well for services like:
- General dental checkups
- Teeth cleaning
- Emergency dental visits
- New patient consultations
Before creating a Round Robin event, you’ll need to create a team.
- Go to FluentBooking → Calendars.
- Click New and select Add Team.
- Enter a team name, such as General Dentists.
- Select Round Robin as the team type.
- Add the dentists you want to include in the rotation.
- Save the team.
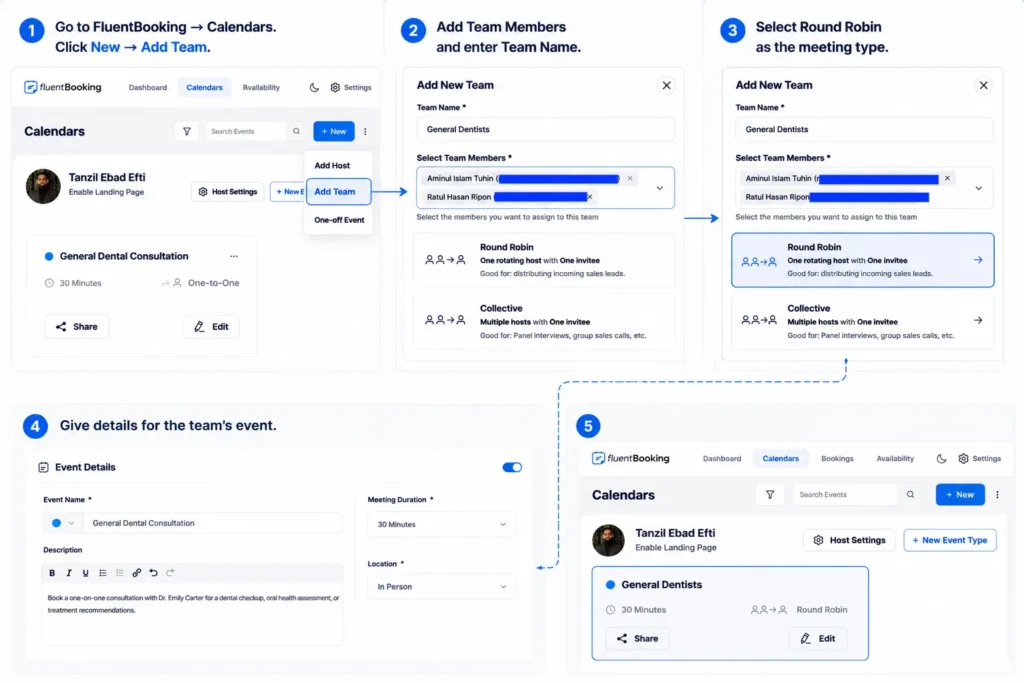
You can then customize booking questions, notifications, payments, and other event settings just like you did for a One-to-One appointment.
You can manage your team’s availability in two ways:
- Individual Host Availability: Each dentist follows their own working schedule. FluentBooking checks every host’s availability and assigns appointments to the next available dentist.
- Common Schedule: All dentists share the same availability schedule. The system distributes appointments among available team members while avoiding scheduling conflicts.
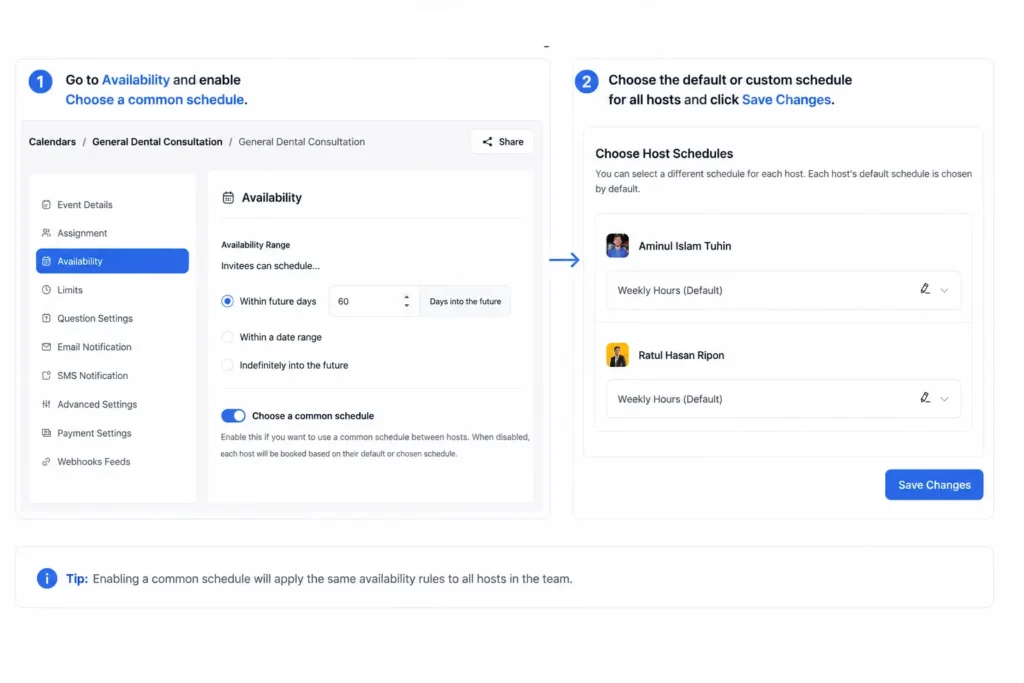
Choose the option that best matches how your dental clinic operates.
Step 4: Turn On Reminders and Confirmations
Appointment confirmations and reminders keep patients informed while helping your clinic reduce missed appointments. With FluentBooking, you can automatically send emails or SMS notifications when an appointment is booked, rescheduled, canceled, or approaching.
To configure notifications:
- Open your appointment event in FluentBooking.
- Navigate to the Email Notifications or SMS Notifications tab.
- Enable the notifications you want to send.
- Customize the message content using dynamic booking fields.
- Save your changes.
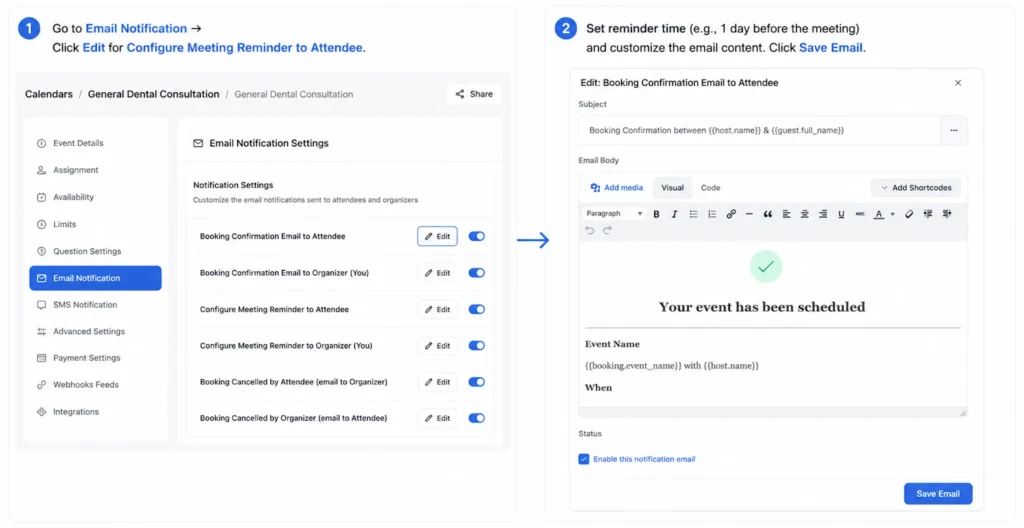
You can also personalize your messages by including dynamic information such as:
- Patient name
- Dentist name
- Appointment date and time
- Clinic address
- Meeting location
- Booking reference
Keep reminder emails short and clear. Including the appointment details, clinic location, and contact information makes it easier for patients to arrive on time or contact your clinic if they need to reschedule.
Step 5: Sync Your Dentists’ Google Calendars
Keeping your dentists’ calendars synchronized is essential for preventing scheduling conflicts. By connecting Google Calendar with FluentBooking, appointments are automatically added to each dentist’s calendar, and existing calendar events block unavailable time slots.
To connect Google Calendar:
- Go to FluentBooking → Integrations.
- Select Google Calendar and connect your Google account.
- Grant the required permissions.
- Choose the calendar you want to sync.
- Save your changes.
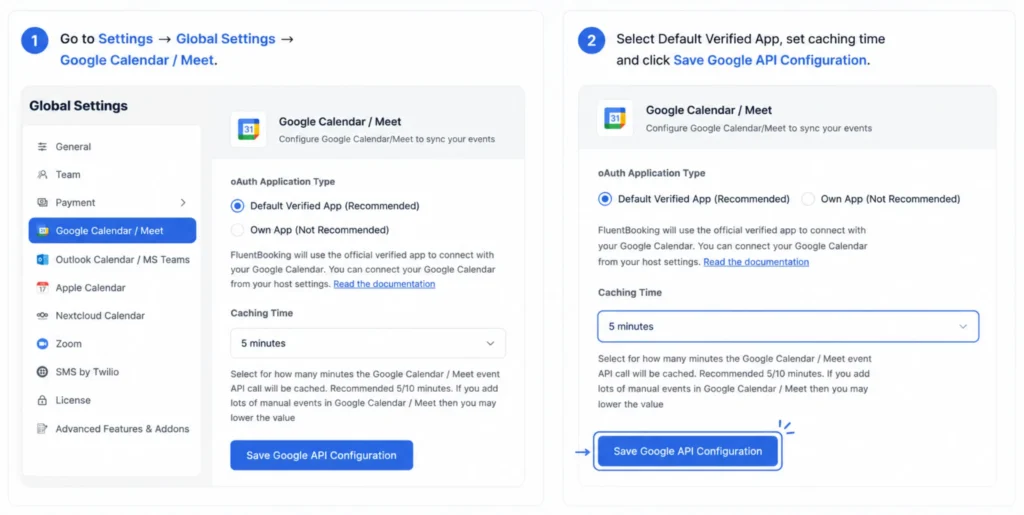
Once connected, FluentBooking automatically keeps your schedule up to date by:
- Creating Google Calendar events whenever a new appointment is booked.
- Blocking time slots that are already occupied by existing calendar events.
- Updating or removing calendar events when appointments are rescheduled or canceled.
- Helping prevent double bookings across your clinic.
Tip: If every dentist has their own Google Calendar, connect each host’s calendar individually. This ensures appointments are assigned only when the selected dentist is actually available. Also, if you are facing any issues with syncing, here is a quick fix.
Step 6: Accept Online Payments for Appointments (Optional)
If your clinic charges a consultation fee, you can collect payments during the booking process. This helps reduce administrative work, minimizes last-minute cancellations, and confirms appointments only after payment is completed.
Common paid services include:
- Initial dental consultations
- Cosmetic dentistry consultations
- Teeth whitening consultations
- Dental implant consultations
To enable online payments:
- Open your appointment event in FluentBooking.
- Navigate to the Payment Settings tab.
- Enable online payments.
- Connect your preferred payment gateway, such as Stripe.
- Enter the consultation fee and save your changes.
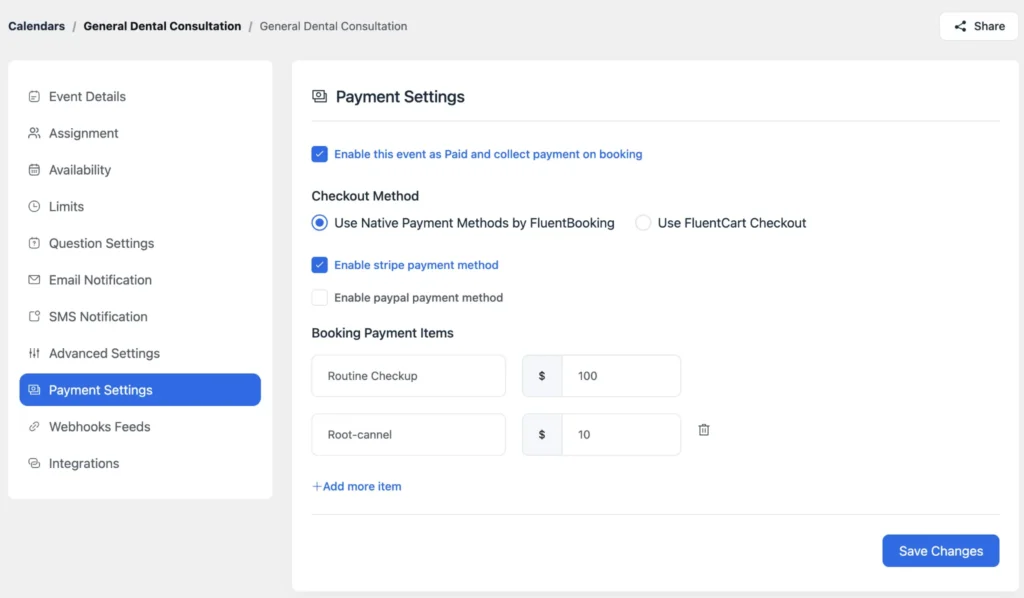
Once enabled, patients will be asked to complete the payment before their appointment is confirmed. After a successful payment, FluentBooking automatically:
- Confirms the appointment.
- Sends a confirmation email to the patient.
- Updates the dentist’s calendar with the booking details.
Tip: If you only charge for certain services, you can enable payments for those appointment types while keeping routine bookings free.
Step 7: Publish Your Dental Appointment Booking Page
Once you’ve finished configuring your appointment events, it’s time to make them available to your patients. FluentBooking lets you share your booking page in multiple ways, so you can choose the option that best fits your website.
You can publish your booking page by:
- Sharing the booking link directly via email, SMS, or social media.
- Embedding it with a shortcode on any WordPress page or post.
- Using the FluentBooking block in the WordPress block editor for a seamless experience.
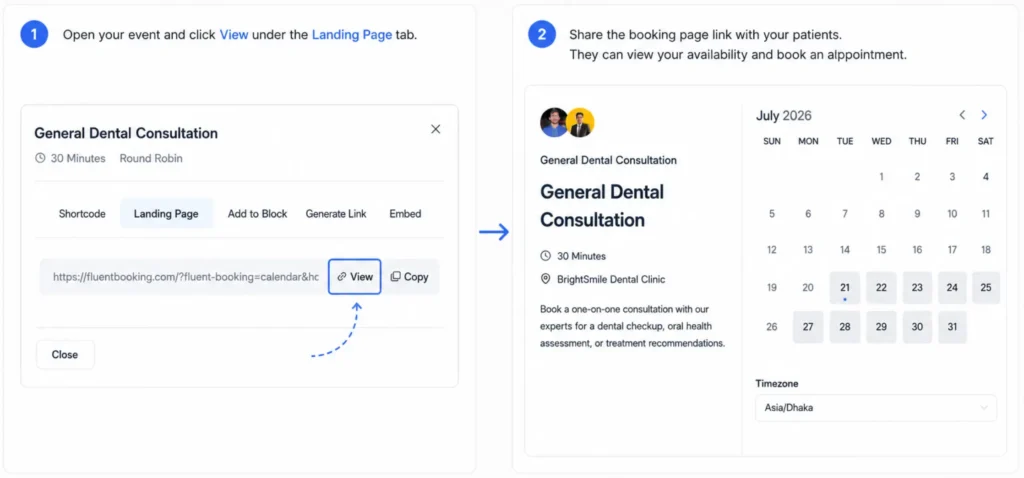
For the best user experience, create a dedicated Book an Appointment page and add it to your website’s main navigation. This makes it easy for patients to find and schedule an appointment without searching through your site.
Best Practices for Dental Appointment Booking
A well-configured booking system not only simplifies scheduling but also helps your clinic provide a better patient experience. Follow these best practices to keep your appointments running smoothly:
- Set realistic appointment durations: Allocate enough time for each service. For example, a routine cleaning may take 30–45 minutes, while a root canal or implant consultation typically requires more time.
- Add a buffer between appointments: Schedule a 10 to 15-minute buffer time to allow time for room preparation, equipment sterilization, and unexpected delays.
- Enable automatic reminders: Send email or SMS reminders before each appointment to reduce no-shows and give patients enough time to reschedule if needed.
- Use Round Robin for routine services: Automatically distribute general checkups, teeth cleanings, and new patient appointments among available dentists to balance workloads.
- Reserve One-to-One bookings for specialist consultations: Allow patients to choose a specific dentist for services such as orthodontics, cosmetic dentistry, or dental implant consultations.
- Keep your dentists’ availability up to date: Regularly review and update working hours, vacations, and time off to ensure patients only see available appointment slots.
- Test your booking experience regularly: Complete a test booking on both desktop and mobile devices to verify that appointments, notifications, payments, and calendar sync are working as expected.
Following these simple practices will help you create a reliable dental appointment booking system that saves your staff time, reduces scheduling conflicts, and delivers a smooth booking experience for every patient.
Transform the Way You Manage Dental Appointments
A reliable dental appointment booking system can make a big difference in how your clinic operates. It reduces manual scheduling, helps prevent double bookings, minimizes no-shows, and gives patients the convenience of booking appointments whenever they need.
By following the steps in this guide, you can create a streamlined booking process that saves time for your staff and delivers a smoother experience for every patient. Once your system is up and running, you’ll spend less time managing appointments and more time focusing on what matters most: providing excellent dental care.
Ratul Hasan Ripon
I enjoy making complex ideas simple and engaging through my writing and designs. With a strong knowledge on content writing and SEO, I create technical content that’s both easy to understand and interesting.
Table of Content
Subscribe To Get
WordPress Guides, Tips, and Tutorials


Leave a Reply