

How to Set Up Automated Patient Reminders in WordPress: A Step-by-step Guide


Missed appointments can disrupt your schedule, reduce revenue, and create extra work for your staff. While some cancellations are unavoidable, many no-shows happen simply because patients forget their appointments.
Automated patient reminders help solve this problem by sending timely email and SMS notifications before each appointment. Instead of making manual phone calls or sending individual messages, you can automate the entire reminder process and keep patients informed every step of the way.
In this guide, you’ll learn how to set up automated email and SMS reminders in WordPress. We’ll cover how to configure reminder notifications, customize your messages, and choose the right timing to reduce no-shows and improve the patient experience.
Why Automated Patient Reminders Matter
Timely reminders play a key role in improving appointment attendance and keeping your schedule organized. They notify patients about upcoming appointments, giving them enough time to prepare, confirm, or reschedule if needed. This simple automation can significantly reduce missed appointments while saving your staff from making manual reminder calls or sending individual emails.
Here are some of the biggest benefits of automated patient reminders:
- Reduce no-shows: Timely reminders help patients remember their appointments and arrive on time.
- Save administrative time: Automate routine follow-ups so your staff can focus on patient care instead of manual reminders.
- Improve patient experience: Clear and timely communication helps patients feel informed and prepared.
- Make better use of your schedule: When patients reschedule in advance, you can fill vacant time slots more easily.
- Keep communication consistent: Every patient receives the right reminder at the right time without additional effort.
By combining email and SMS reminders, you can reach patients through their preferred communication channel and create a more reliable appointment reminder system.
What you need before you start
Before you configure automated patient reminders, make sure your WordPress appointment booking system is already set up. Having the right tools in place will ensure your email and SMS reminders work reliably from the moment a patient schedules an appointment.
- A WordPress website (self-hosted, not WordPress.com’s limited plan)
- An appointment scheduling plugin with built-in reminder automation; this guide uses FluentBooking, since it handles email, SMS, and WhatsApp reminders natively without needing a separate automation tool
- An SMS provider if you want text reminders (Twilio is the most common; FluentBooking connects directly to it)
Note: This guide focuses on configuring automated reminder notifications. If you’re new to online appointment scheduling, before configuring reminders, learn how doctors can automate appointment scheduling in WordPress to set up a complete booking workflow.
How to Set Up Automated Email Reminders For Patients
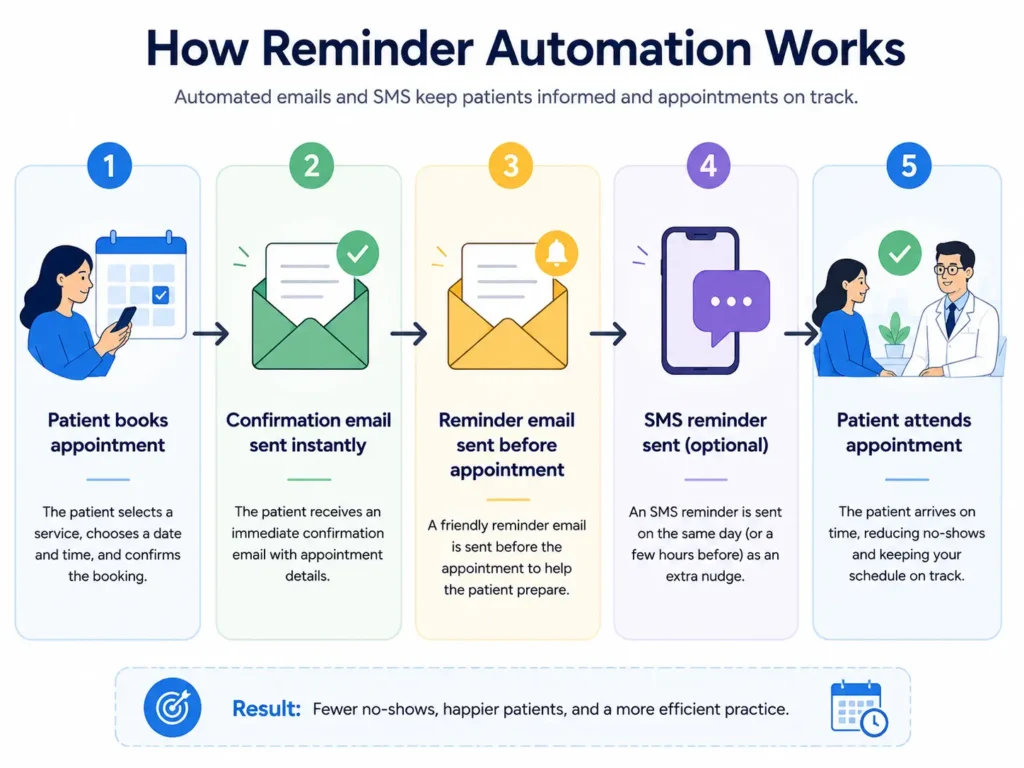
You can automate every stage of your patient email communication, from booking confirmations to appointment reminders and follow-up notifications. Once configured, these emails are sent automatically based on your schedule, helping patients stay informed without requiring any manual effort from your staff.
Step 1: Configure Email Reminder Notifications
Once your booking events are ready, you can start configuring automated email reminders. Go to Event Settings → Email Notification in your FluentBooking dashboard. Here, you’ll find separate notification settings for Attendees (patients) and Organizers (clinic staff), allowing you to customize emails for each recipient.
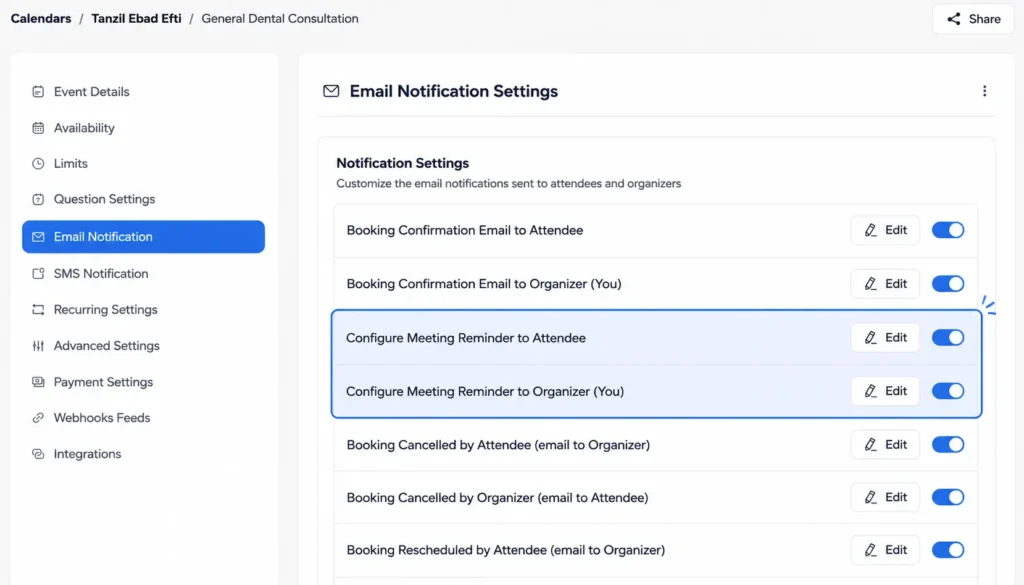
Open the Attendee or Organizer tab and enable the reminder notifications you want to send. You can turn individual notifications on or off depending on your workflow, whether it’s a booking confirmation, appointment reminder, cancellation, or reschedule notification.
Once enabled, you’ll be able to customize the email content and configure when reminder emails should be sent before the appointment. This gives you full control over how and when patients and staff receive important booking updates.
Step 2: Customize Your Reminder Emails
After enabling the notifications, you can customize each email to match your clinic’s communication style. FluentBooking includes a built-in email editor that lets you modify the subject line, email content, and dynamic placeholders for every notification.
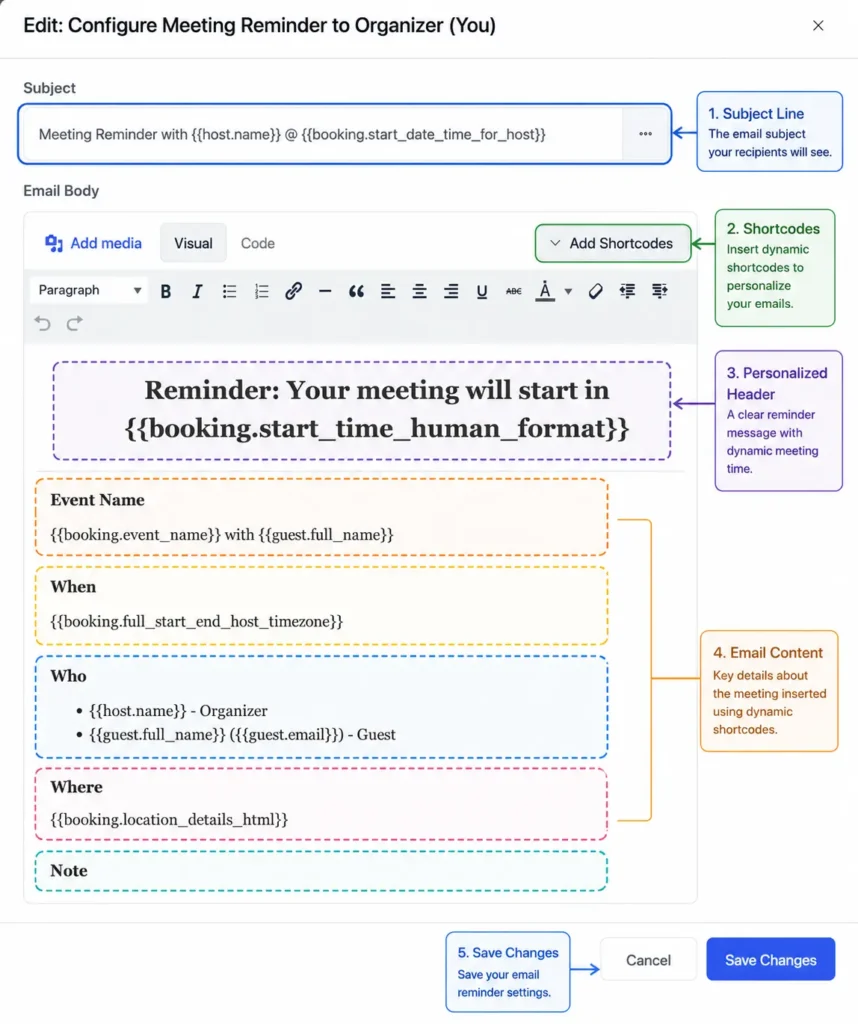
Use clear and concise subject lines so patients immediately recognize the purpose of the email. Then, personalize the message by inserting dynamic placeholders, such as:
- Patient name
- Appointment date
- Appointment time
- Doctor or staff member
- Clinic name
- Meeting location or online meeting link
- Reschedule or cancellation link
Personalized emails are more engaging and provide patients with all the information they need in one place. Before saving your changes, use the preview option (if available) or send a test email to ensure everything appears correctly.
Bonus Tip: Need inspiration for your reminder messages? Explore these ready-to-use dental appointment reminder templates to boost attendance and customize them for your practice.
Step 3: Set up Your Reminder Schedule
Choosing the right reminder schedule is one of the most effective ways to reduce missed appointments. You can schedule multiple reminder emails for the same booking, ensuring patients receive timely notifications leading up to their visit.
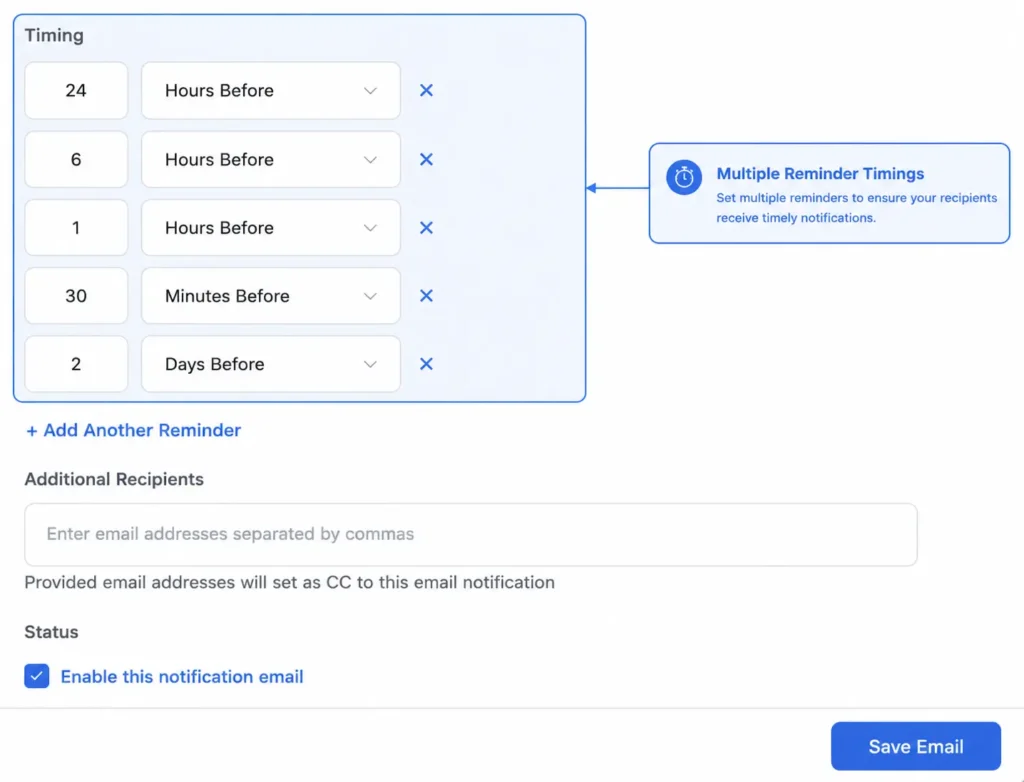
| Timing | Recommended Use |
| 3–7 days before | Give patients enough notice to reschedule if necessary. |
| 24 hours before | The most effective reminder for reducing no-shows. |
| 1–2 hours before | A final reminder for same-day appointments and busy patients. |
Pro Tip: For most healthcare practices, sending a confirmation email immediately after booking, followed by a reminder 24 hours before and a final reminder 1–2 hours before the appointment, provides a good balance between timely communication and avoiding notification fatigue.
Step 4: Connect reminders to your patient follow-up (optional but worth it)
Automated reminders don’t have to end when the appointment begins. If you’re using FluentCRM with FluentBooking, you can continue the patient journey with automated follow-up communications after the visit.
For example, you can automatically:
- Send a thank-you email after the appointment.
- Request a patient review or feedback.
- Send a personalized meeting follow-up email to check in with patients and share post-visit information.
- Share post-visit care instructions or helpful resources.
- Remind patients to book their next check-up, cleaning, or follow-up visit.
These follow-ups can be triggered using the same automation workflow, helping you maintain patient engagement without adding extra work for your staff. It’s a simple way to build stronger patient relationships while encouraging repeat visits and long-term care.
Configure Automated SMS and WhatsApp Reminder Notifications for Your Patients
Since text messages are often read within minutes, they’re ideal for last-minute reminders, schedule changes, and other time-sensitive updates. By combining email with SMS or WhatsApp reminders, you can increase the chances that patients see your notifications before their appointment.
Step 1: Connect Your SMS or WhatsApp Provider
Before sending SMS or WhatsApp reminders, you’ll need to connect a messaging provider to your WordPress site. FluentBooking integrates with Twilio, allowing you to send automated SMS and WhatsApp notifications directly to patients.
To get started, navigate to Settings → SMS and connect your Twilio account by entering your account credentials.
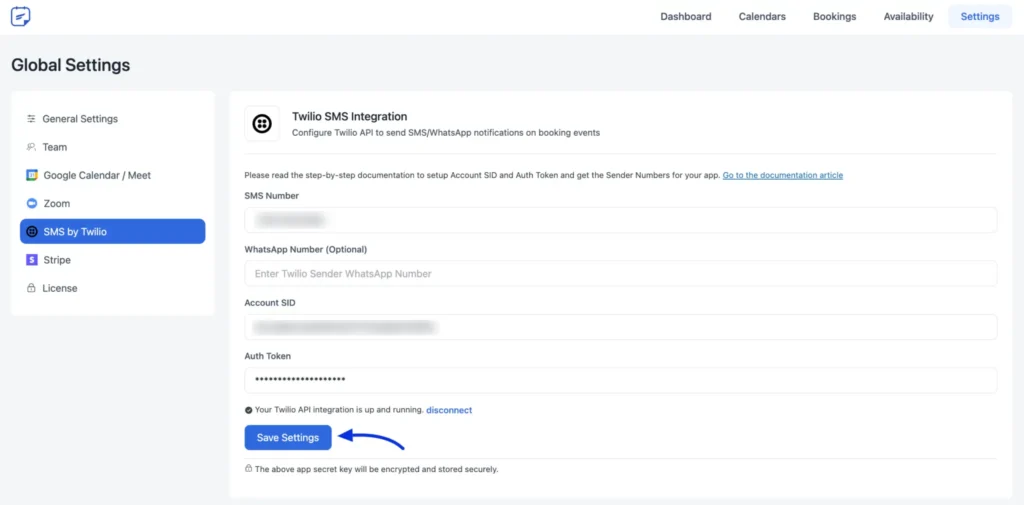
Once the connection is verified, FluentBooking is ready to send automated reminder messages as part of your appointment workflow.
Step 2: Create an SMS or WhatsApp Reminder
After connecting your messaging provider, open your booking event and navigate to the SMS Notifications section. From there, you can enable reminder notifications and decide when they should be sent.
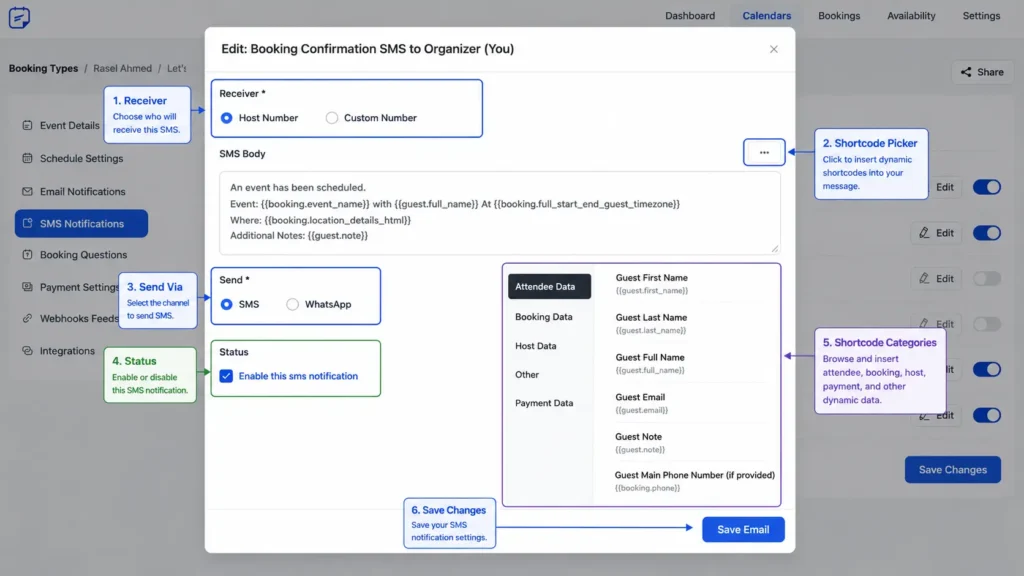
Configure your reminder by:
- Selecting the reminder notification.
- Choosing when the message should be sent (for example, 24 hours or 2 hours before the appointment).
- Writing a concise message using dynamic placeholders.
For example:
Hi John, this is a reminder that you have an appointment with ABC Dental Clinic tomorrow at 10:00 AM. Need to reschedule? Use your booking link to make changes.
Keep your reminder messages short and focused on the essential details, such as the patient’s name, appointment date and time, clinic name, and a reschedule link when appropriate. This helps patients quickly review the information and take action if needed.
Test Your Reminder Workflow
Before relying on automated reminders for real appointments, test the entire workflow to ensure every notification is delivered as expected.
Create a sample appointment and verify that:
- The confirmation email is sent immediately.
- Reminder emails arrive at the scheduled times.
- SMS or WhatsApp reminders are delivered successfully.
- Dynamic placeholders display the correct patient and appointment details.
- Reschedule and cancellation links work properly.
Testing your workflow helps you catch configuration issues before patients encounter them.
Bonus Tip: Need help writing effective reminder messages? Browse our doctor appointment reminder text/sms templates to reduce no-shows for ready-to-use SMS examples that you can customize for your practice.
Best Practices for Automated Patient Reminders
Setting up automated reminders is only part of the process. Following a few best practices can help you improve patient attendance while keeping your communication clear, timely, and professional.
- Send a confirmation email immediately after booking to reassure patients that their appointment has been successfully scheduled.
- Schedule your first reminder 24 hours before the appointment so patients have enough time to prepare or reschedule if needed.
- Send a final SMS or WhatsApp reminder on the day of the appointment to reduce last-minute no-shows.
- Personalize every reminder with the patient’s name, appointment date and time, clinic name, and healthcare provider’s name.
- Keep reminder messages short and easy to understand so patients can quickly review the important details.
- Include a reschedule or cancellation link to make it easy for patients to update their appointments.
- Use multiple communication channels, such as email, SMS, and WhatsApp, to maximize reminder visibility.
- Test your reminder workflow regularly to ensure notifications are delivered on time and dynamic placeholders display correctly.
- Configure SMTP for email delivery to improve deliverability and prevent reminder emails from landing in spam folders.
- Combine automated notifications with proven scheduling strategies to further reduce no-show appointments.
- Avoid sending too many reminders. A confirmation message followed by one or two reminders is usually enough to keep patients informed without overwhelming them.
Turn Every Appointment Into a Successful Visit
Automated patient reminders help reduce no-shows, improve communication, and keep your schedule running smoothly. By combining well-timed email, SMS, and WhatsApp notifications, you can ensure patients stay informed and arrive prepared. Set up your reminder workflow once, and let automation handle the rest so you can focus on delivering excellent patient care.
Frequently Asked Questions
Ratul Hasan Ripon
I enjoy making complex ideas simple and engaging through my writing and designs. With a strong knowledge on content writing and SEO, I create technical content that’s both easy to understand and interesting.
Table of Content
Subscribe To Get
WordPress Guides, Tips, and Tutorials
Add your first comment to this post