

How to Set Up FluentBooking MCP and Connect Your AI Assistant


Managing bookings often means switching between your WordPress dashboard, checking availability, and updating appointments manually. With FluentBooking’s built-in Model Context Protocol (MCP) server, you can handle these tasks through compatible AI clients such as Claude Code, Claude Desktop, Cursor, and OpenAI Codex.
Once connected, your AI assistant can check availability, find booking details, create or reschedule appointments, troubleshoot scheduling issues, and generate booking reports through natural-language commands.
In this guide, we’ll show you how to set up FluentBooking MCP, connect your AI client, and start using it.
What you need before you start
Check these four things first. Most setup problems come from one of them.
- FluentBooking 2.4.0 or newer. The MCP server ships in the plugin. There’s no separate add-on to buy.
- WordPress 6.9 or newer. The MCP adapter FluentBooking relies on uses a WordPress feature added in 6.9. Check your version under Dashboard → Updates.
- Your site is running on HTTPS. WordPress application passwords, which Claude uses to sign in, need a secure connection. Most live sites already have this. A local test site on plain http may not work.
- An MCP-compatible AI client: FluentBooking provides connection instructions for Claude Code, Claude Desktop, Cursor, OpenAI Codex, and other MCP clients.
You’ll also need to be a site administrator, because only admins can turn on the MCP settings.
How to Connect FluentBooking to Your AI Assistant
Follow these steps to enable the FluentBooking MCP server, connect your AI client, and verify that everything is working correctly.
If you’re new to MCP, check out our guide on what MCP is to understand how MCP connects AI assistants with FluentBooking and what you can do with it.
Step 1: Turn on the FluentBooking MCP server
The MCP server is off by default, so nothing about your site changes until you switch it on.
In your WordPress admin, go to FluentBooking → Settings, then select MCP for AI Agents in the left sidebar. Everything you need for this guide is on this one page.
Switch on the Enable the FluentBooking MCP server toggle. The badge in the top-right corner shows where things stand:
- Disabled: the server is off and your site doesn’t respond to AI clients.
- Adapter Required: the server is on, but one more piece needs installing (Step 2).
- Connected: everything is working and the tools are live.
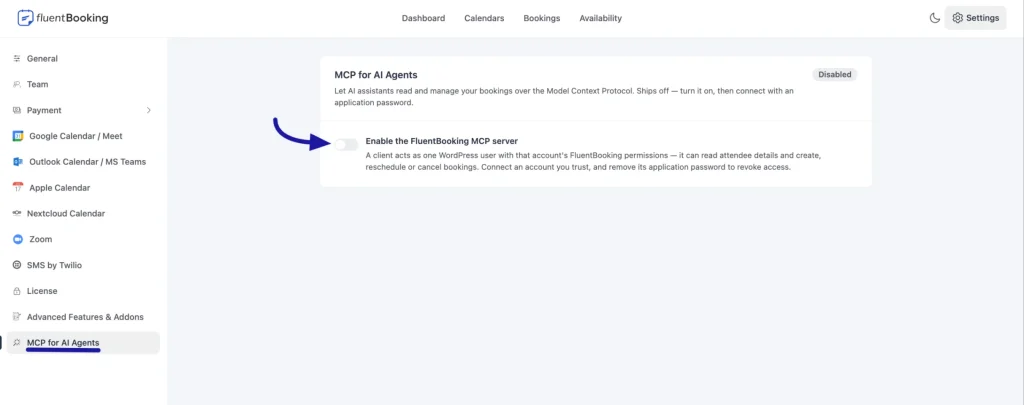
This toggle is also your master off switch. If you ever want to cut off every connected AI client at once, switch it back off and the connection stops immediately.
Step 2: Install the FluentHub adapter
After you switch the server on, the badge will most likely say Adapter Required. FluentBooking provides the booking tools, but they need a small adapter plugin called FluentHub to reach AI clients.
In the Status panel, click Install FluentHub. WordPress installs and activates it in the background, and the page refreshes. The badge should now read Connected.
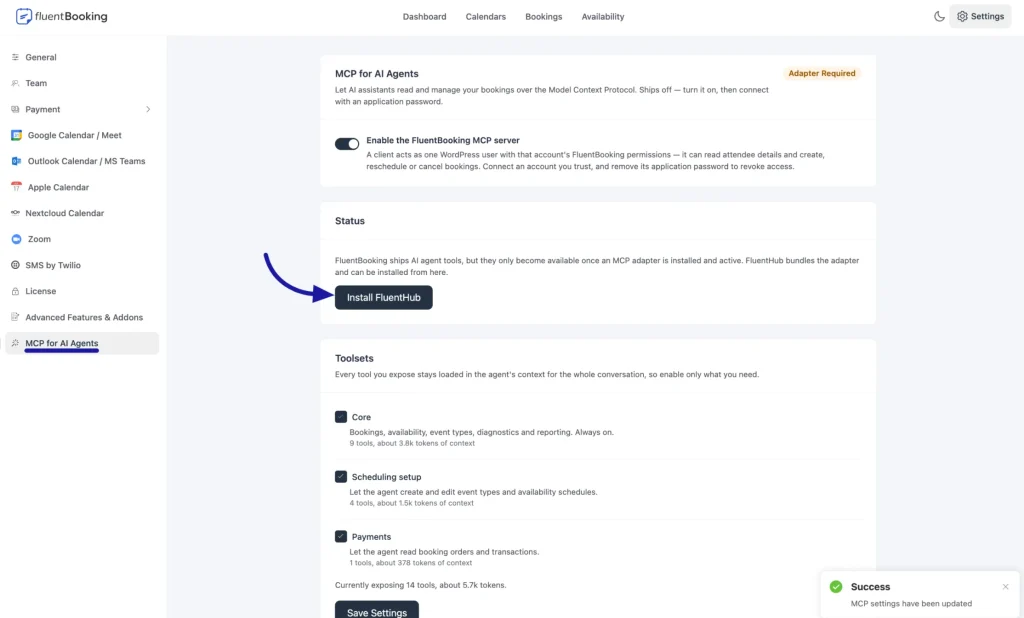
Once it’s connected, the Status panel shows three details:
- Adapter: the FluentHub version, with a green Connected badge.
- Endpoint URL: your site’s MCP address, usually https://your-site.com/wp-json/fluent-booking/mcp. You don’t need to copy it by hand. FluentBooking adds it to your setup snippet in Step 5.
- Tools available: how many actions Claude will be able to use.
If the badge still says Adapter Required, hard-refresh the page and confirm FluentHub is active under Plugins.
Step 4: Choose Your Toolsets
FluentBooking lets you control which tools your AI assistant can access. This is useful because every tool you expose stays loaded in the agent’s context throughout the conversation.
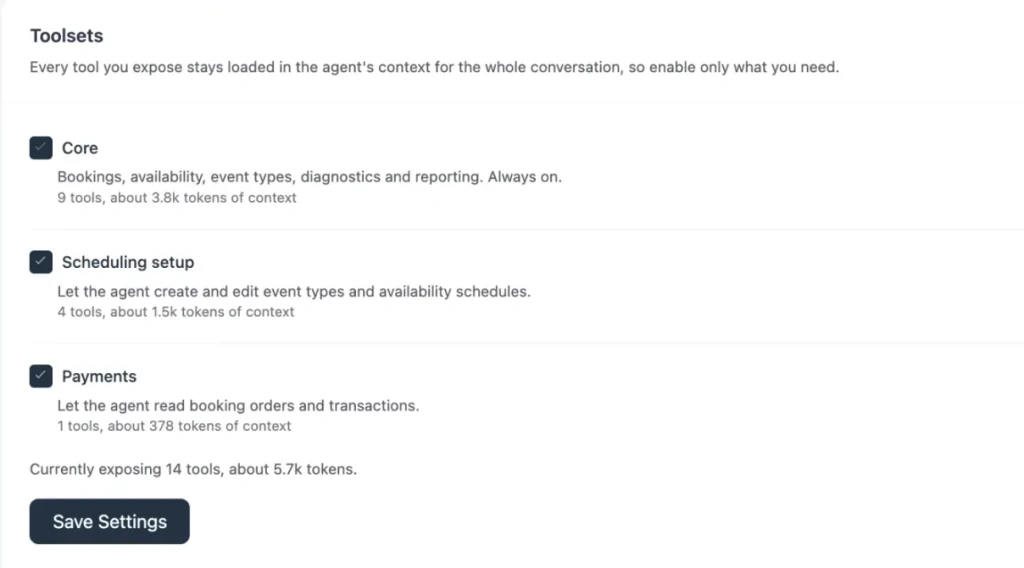
Under Toolsets, select the groups you want to make available to your AI client.
- Core: Includes 9 tools for everyday booking tasks, including managing bookings, checking availability, viewing event types, diagnosing availability issues, and running booking reports. This toolset is enabled by default and is the starting point for most FluentBooking MCP tasks.
- Scheduling Setup: Includes 4 tools that allow the AI agent to create and edit event types and availability schedules. It is turned off by default, so you need to enable it if you want the AI assistant to make changes to your scheduling setup.
- Payments: Includes 1 tool for reading booking orders and transactions. This toolset is also turned off by default and is available with FluentBooking Pro. It allows the AI agent to access payment-related information without giving it the ability to move money.
Click Save Settings when you’re finished.
Which Toolsets Should You Enable?
If you only need your AI assistant to work with existing bookings, availability, and reports, the Core toolset may be enough.
Keep Scheduling setup and Payments disabled unless you specifically need those capabilities. A smaller toolset keeps the agent’s context focused and prevents it from accessing tools you don’t need.
Next, you’ll create a WordPress Application Password, which your AI client will use to authenticate with your FluentBooking site.
Step 5: Generate a WordPress Application Password
The next step is to give your AI client a way to authenticate with your WordPress site. FluentBooking uses WordPress’s built-in Application Passwords for this connection.
Application Passwords are built into WordPress, so you don’t need an additional plugin. You can also create a separate password for each AI client, which makes it easier to revoke access to one client without affecting your main WordPress login or other connections.
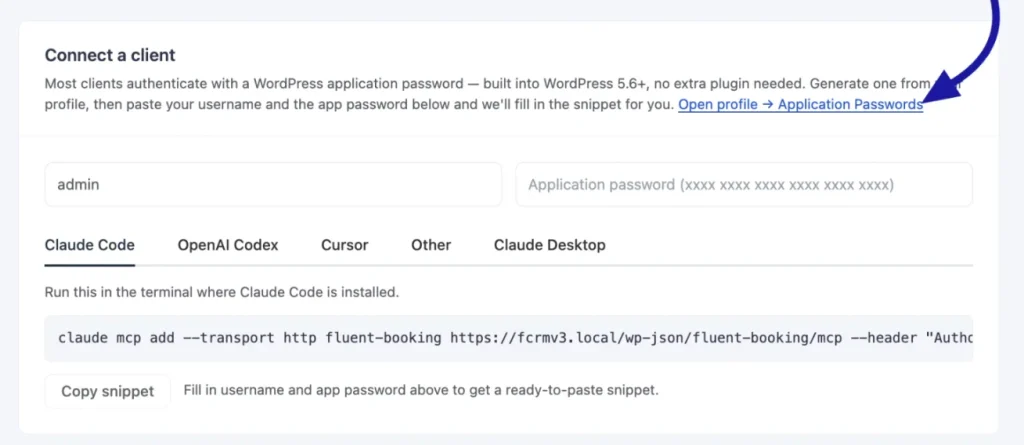
The Connect a client panel in FluentBooking includes a direct link to the Application Password settings.
To create one:
- Click Open profile → Application Passwords, or go to Users → Profile and scroll down to the Application Passwords section.
- Enter a name that identifies the connection, such as Claude Code, Claude Desktop, or Cursor.
- Click Add Application Password.
4. WordPress will generate a one-time password. Click Copy and save it somewhere secure.
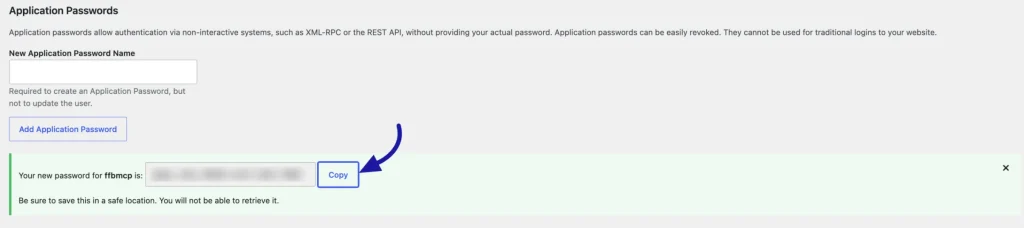
Note: Make sure you copy the generated password before closing the page. WordPress won’t show that password again later, so you’ll need to create a new one if you lose it. If you lose it, you can revoke the old password and generate a new one from the same screen.
Step 6: Copy Your Connection Snippet
Once you’ve created your WordPress Application Password, return to FluentBooking → Settings → MCP for AI Agents and scroll down to the Connect a client panel.
FluentBooking can generate the connection details for your AI client, so you don’t have to manually build the authentication configuration.
To generate your connection snippet:
- Enter the WordPress username associated with the Application Password.
- Paste your Application Password into the second field. Spaces in the password are fine.
- Select the tab for your AI client. You can choose Claude Code, OpenAI Codex, Cursor, Other, or Claude Desktop.
- Click Copy snippet.
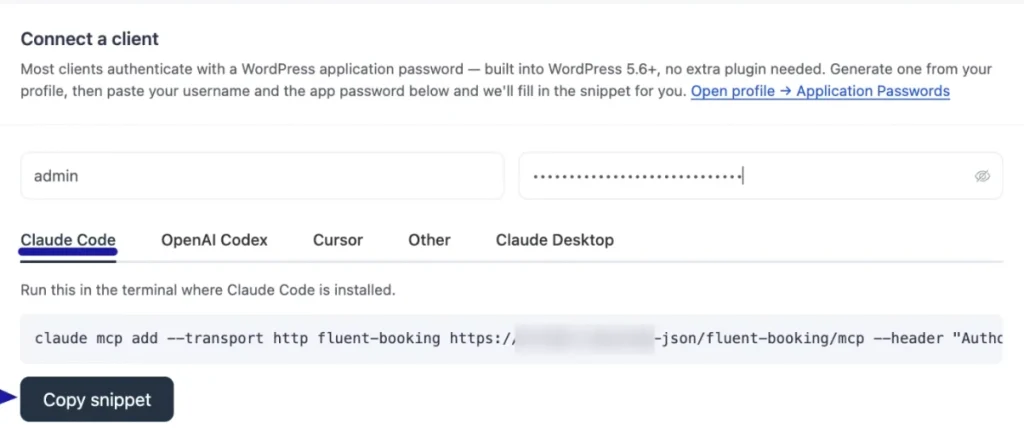
The generated snippet already includes your encoded credentials, so you can paste it directly into your AI client’s MCP configuration.
Important: Treat the generated snippet like a password. It contains your authentication credentials, so never share it in a public repository, shared chat, or screenshot.
Once you have copied the snippet, you’re ready to connect FluentBooking to your AI client.
Connect Your AI Client
With your connection snippet copied, you can now add FluentBooking to your AI client. FluentBooking provides dedicated setup instructions for Claude Code, Cursor, Claude Desktop, OpenAI Codex, and other MCP-compatible clients.
Before choosing your client, check whether it requires Node.js and npx.
| AI Client | Node.js/npx required? |
| Claude Code | Yes |
| Claude Desktop | Yes |
| OpenAI Codex | Yes, if your configuration uses npx |
| Cursor | No |
You can check whether Node.js is already installed by opening Terminal or Command Prompt and running:
node -vIf you see a version number, such as v20.11.0, Node.js is installed. If you get a “command not found” message, install the LTS version of Node.js and reopen your terminal.
Let Your AI Agent Set It Up for You
If you don’t want to edit configuration files manually, you can also ask Claude Code, Claude Desktop, or Cursor to configure the MCP connection for you.
Open the AI client on your own computer and give it a prompt like this:
“Set up this MCP server for me. First check whether Node.js and npx are installed and install them if they are not. Then add this configuration to my MCP config file, and tell me if I need to restart anything afterward:”
Then paste the connection snippet you copied from FluentBooking.
The AI agent can handle the configuration file, JSON formatting, and restart instructions for you.
Important: Your connection snippet contains your login credentials. Only use this approach in an AI client running on your own computer, and never paste the snippet into a shared or public workspace.
The following sections walk you through connecting each supported AI client step by step.
Connecting Claude Code
Claude Code is the terminal version of Claude, so you can connect FluentBooking by running a command instead of editing a configuration file.
1. Install Claude Code
If Claude Code isn’t already installed, run the following command in your terminal:
npm install -g @anthropic-ai/claude-code
2. Add FluentBooking as an MCP Server
Use the connection snippet you copied from FluentBooking and paste it into your terminal.
It will look similar to this:
claude mcp add –transport http fluent-booking https://your-site.com/wp-json/fluent-booking/mcp –header “Authorization: Basic <encoded-credentials>”
Your actual snippet will already contain your FluentBooking endpoint and encoded credentials, so use the generated version instead of manually typing the command.
After running the command, Claude Code should confirm that the fluent-booking server has been added and connected.
3. Restart Claude Code
Restart Claude Code or start a new session after adding the MCP server. The configuration is saved immediately, but the tools won’t be loaded into the session that is already running.
Once restarted, you should have access to the mcp__fluent-booking__* tools. You can also type:
/mcp
to see your connected MCP servers.
Use FluentBooking Across All Projects
By default, Claude Code stores the MCP connection per project folder. If you want to use FluentBooking from any folder on your computer, add –scope user to the end of the command.
Connecting Cursor
Cursor connects to FluentBooking through its MCP settings, so you don’t need Node.js or npx for this setup. You can add the connection directly to Cursor’s MCP configuration.
1. Open Cursor’s MCP Settings
Open the Cursor command palette and search for Cursor Settings.
Then:
- Open Tools & MCPs from the left sidebar.
- Find Installed MCP Servers.
- Click New MCP Server.
2. Add the FluentBooking Configuration
Open mcp.json and paste the connection snippet you copied from the Cursor tab in FluentBooking.
The configuration will have a structure like this:
{

  "mcpServers": {

    "fluent-booking": {

      "url": "https://your-site.com/wp-json/fluent-booking/mcp",

      "type": "http",

      "headers": {

        "Authorization": "Basic <encoded-credentials>"

      }

    }

  }

}
Use the snippet generated by FluentBooking rather than replacing the placeholder values manually.
3. Save and Reload Cursor
Save the configuration and reload Cursor.
Then open Tools & MCPs again. You should see fluent-booking under Installed MCP Servers, along with the FluentBooking tools available to your AI assistant.
Once FluentBooking appears in the list, your Cursor connection is ready.
Connecting Claude Desktop
Claude Desktop connects to FluentBooking through its MCP configuration file. You’ll need to add the configuration generated by FluentBooking and then restart Claude Desktop to load the connection.
1. Open the Claude Desktop Configuration
In Claude Desktop, go to:
Settings → Developer → Edit Config
Claude Desktop will create the configuration file if it doesn’t already exist and will show you where the file is located.
The default locations are:
- macOS: ~/Library/Application Support/Claude/claude_desktop_config.json
- Windows: %APPDATA%\Claude\claude_desktop_config.json
2. Add the FluentBooking Configuration
Open the configuration file in a plain text editor, such as TextEdit on macOS or Notepad on Windows.
Then paste the configuration from the Claude Desktop tab in FluentBooking.
It will look similar to this:
{

  "mcpServers": {

    "fluent-booking": {

      "command": "npx",

      "args": [

        "-y",

        "mcp-remote",

        "https://your-site.com/wp-json/fluent-booking/mcp",

        "--header",

        "Authorization: Basic <encoded-credentials>"

      ]

    }

  }

}
Use the snippet generated by FluentBooking so your endpoint and authentication details are correct.
3. Add It Without Removing Existing MCP Servers
If your configuration file is empty or contains only {}, you can replace its contents with the generated configuration.
If you already have other MCP servers configured, don’t replace the entire file. Instead, add only the “fluent-booking”: { … } section inside the existing “mcpServers” block. Make sure there is a comma between entries.
4. Save and Restart Claude Desktop
Save the configuration file and fully quit Claude Desktop. Simply closing the window isn’t enough.
Quit the application from the menu bar on macOS or the system tray on Windows, then open it again.
5. Check the Connection
Open a conversation and look for the tools or connectors icon in the message box.
You should see fluent-booking listed there along with its available tools.
If the tools don’t appear, check the configuration file for JSON formatting errors. A missing or extra comma can prevent Claude Desktop from loading the MCP servers.
Verify Your FluentBooking MCP Connection
Once you’ve connected FluentBooking to your AI client, it’s a good idea to test the connection before using it for real booking tasks.
Open your AI client and ask it something that requires information from FluentBooking. For example:
“Show me the available slots for Morning Yoga Flow”
The AI agent should connect to your FluentBooking MCP endpoint, retrieve the relevant booking data, and return your actual bookings, including details such as the attendee name, event type, host, time, and booking status.
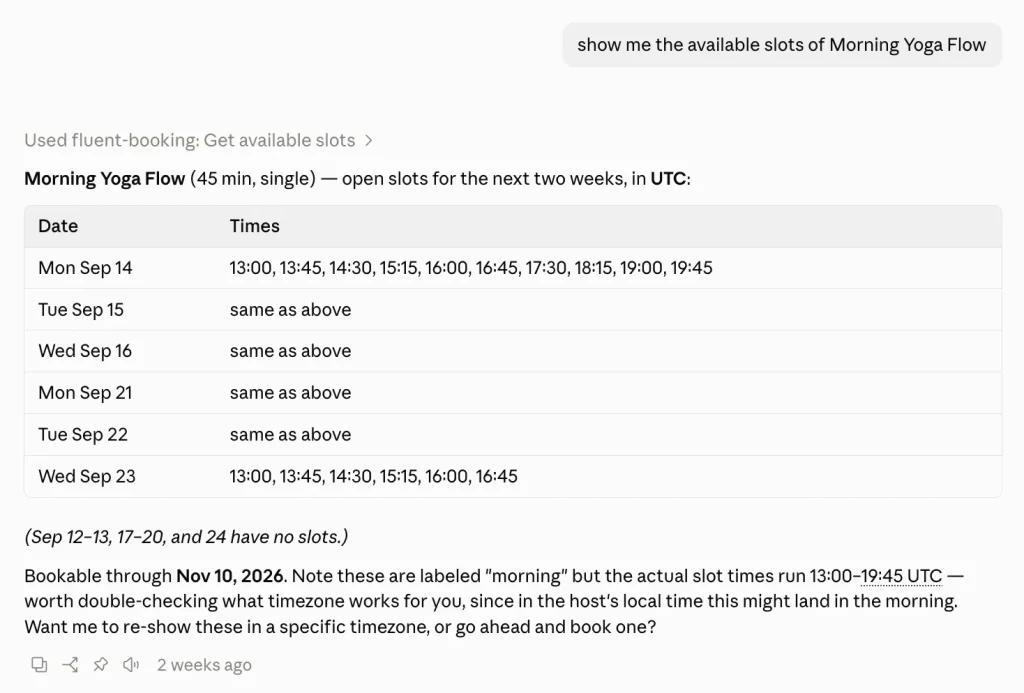
If the response contains your real FluentBooking data, your MCP connection is live and authenticated.
You can now start using natural-language commands to work with your bookings, availability, event types, and reports.
How to Revoke or Disable AI Access
You can manage your AI connections from WordPress at any time. Since Application Passwords are separate from your main WordPress login, you can revoke a specific AI client without affecting your other connections.
Here are the available options:
- Revoke one AI client: Go to Users → Profile → Application Passwords, find the Application Password by its name, and click Revoke.
- Disable MCP entirely: Go to FluentBooking → Settings → MCP for AI Agents and switch off the Enable the FluentBooking MCP server toggle. The endpoint stops responding immediately.
- Reduce what the agent can access: Open the Toolsets section, turn off Scheduling setup or Payments, and click Save Settings. Those tools will no longer be registered for the AI client on its next connection.
- Rotate your credentials: Revoke the existing Application Password, create a new one, and then generate a fresh connection snippet from the Connect a client panel.
Use a Separate Application Password for Each AI Client
It’s a good practice to create a separate Application Password for each AI client you connect. For example, you can use one for Cursor and another for Claude Desktop.
This makes access easier to manage because you can revoke one client without disconnecting the others.
Bring FluentBooking Into Your AI Workflow
Connecting FluentBooking to an AI client through MCP turns everyday booking tasks into simple conversations. Once the connection is set up, you can check availability, find booking details, create or reschedule appointments, troubleshoot scheduling issues, and generate booking reports without switching between different screens.
You also stay in control of what your AI assistant can access. You can choose the toolsets it can use, connect it through a specific WordPress account, and revoke access or disable MCP whenever you need to.
With FluentBooking MCP configured, your AI assistant becomes another way to work with the booking system you already use, while FluentBooking continues to handle the underlying bookings, schedules, and permissions.
Frequently Asked Questions
Ratul Hasan Ripon
I enjoy making complex ideas simple and engaging through my writing and designs. With a strong knowledge on content writing and SEO, I create technical content that’s both easy to understand and interesting.
Table of Content
Subscribe To Get
WordPress Guides, Tips, and Tutorials
Add your first comment to this post