

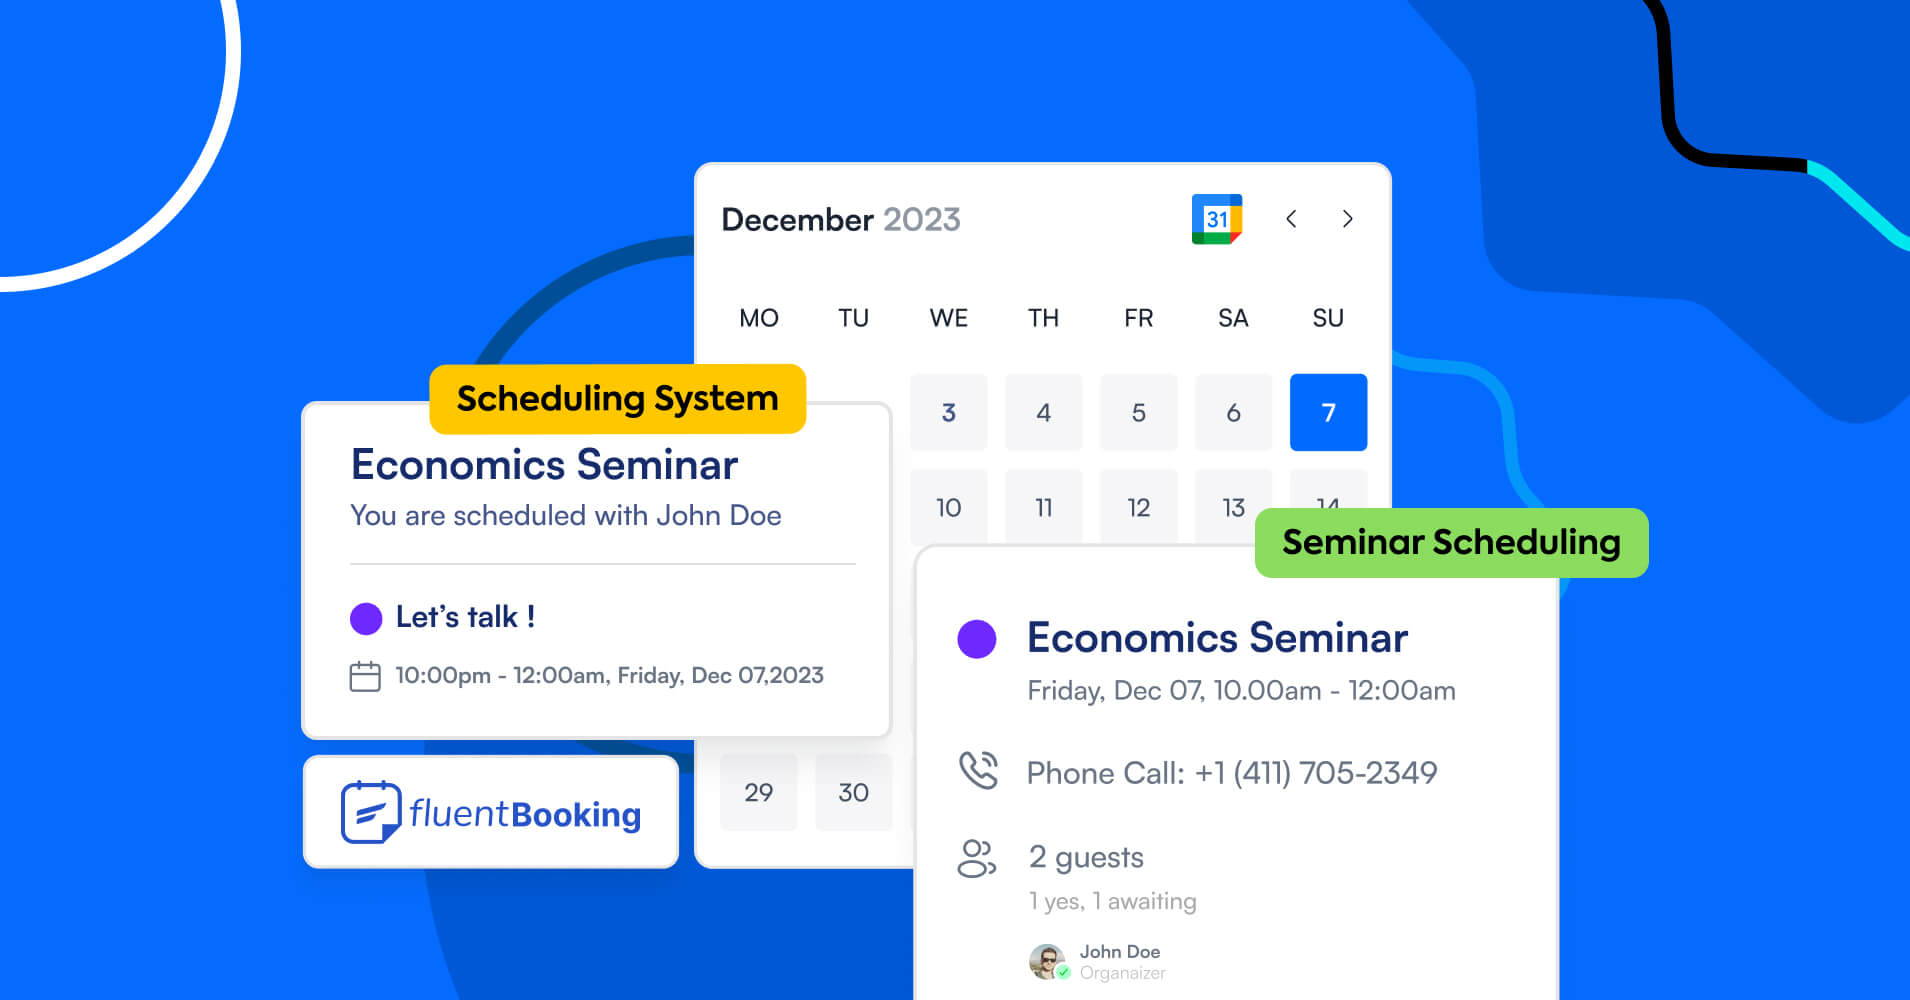
How to Set Up Lesson Scheduling Software on Your Website to Elevate Teaching


In today’s world, most college and university teachers take many of their lessons online. Consider this: In 2021, about 60% of U.S. post-secondary degree students took some online classes, with 30% studying fully online!
With this growing popularity, the demand for an efficient class scheduling system, or what we’ll refer to as lesson scheduling software, becomes increasingly crucial for both students and teachers.
In this article, we will introduce you to a step-by-step guide to setting up scheduling software with your WordPress site.
But, before we begin, let’s give you a small glimpse of the whys and how a lesson scheduling system can make a difference in education.
The challenges without lesson scheduling software
Traditional lesson scheduling might seem straightforward when you’re dealing within a set limit. But things start to get messy when there are varied needs of students, faculties, and courses.
Here are the few challenges academics, faculty, or administration face without lesson scheduling software:
- Course Conflict: With so many subjects or courses being offered, overlapping course timing can create conflict between lessons within the same time slot —leaving students with limited access to courses they are passionate about
- Resource Misallocation: While dealing with courses that require lab allocation, a manual scheduling process can cause errors, leading to the underutilization of resources and overcrowding in certain areas
- Inflexible Learning: Traditional lesson scheduling doesn’t allow any personalized learning scope for students. Creating personalized timetables allows both students and faculties to eliminate academic overload.
- Ineffective Communication: Collaboration among students, professors, advisors, and support staff is essential for an institution. Difficulties in coordination can hinder effective communication.
- Student Dissatisfaction: When students can’t communicate or get the support they need, they get frustrated and that affects student retention rate.
How a lesson scheduling software improve learning?
With so much juggling throughout the academic years, many struggle to find the proper lesson or fail to connect with the right faculty member – all because of the outdated scheduling systems.
To meet the needs, automated lesson scheduling software will simplify the academic journey for both institutions and their students. It will help institutions bring out productive team performance and best output from students.
But that’s not all, a lesson scheduling system has more benefits that can be unlocked by integrating it with your WordPress website, including:
- It will automate the process of lesson scheduling based on teacher availability and student preferences
- Scheduling tools will improve communication among students, teachers, parents, and institutions
- More flexibility to schedule lessons or arrange appointments between teachers and students with 24/7 accessibility
- Teachers offering in-demand courses can handle the timeslot and number of students for each lesson, avoiding an overload of students per lesson
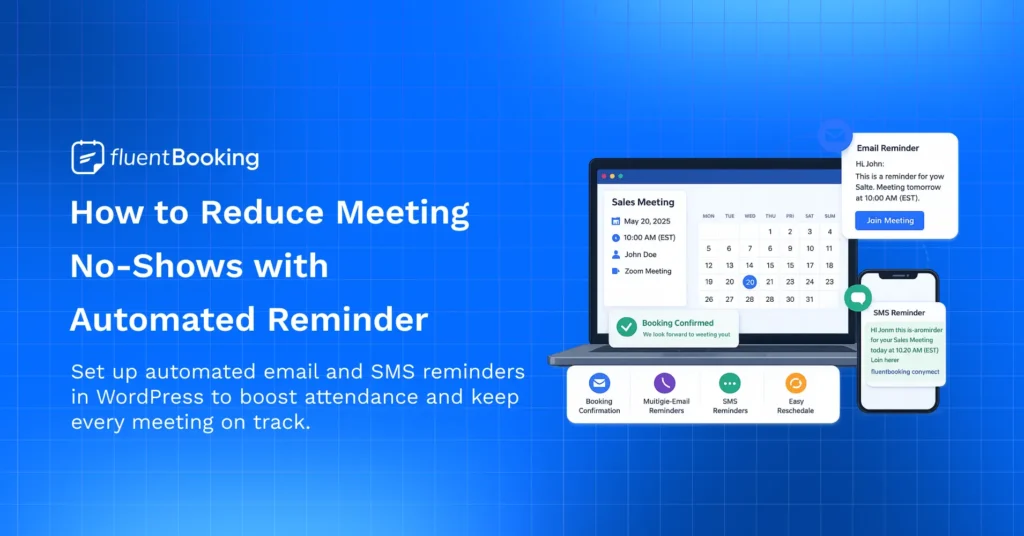
- Automated reminders eliminate no-shows, ensuring teachers and students both attend their scheduled lessons on time
- Tools with feedback or review features will allow students to rate their opted lesson which can help teachers improve their method of teaching
How automated lesson scheduling software work?
By now, you may have understood the improvement a lesson scheduling software can bring to the education system.
Here’s how an automated lesson scheduling system can assist you:
- Share daily available timeslots for advising, counseling, and tutoring students
- Attendees can select a schedule as per their availability
- Arrange online or in-person, one-to-one or one-to-group lessons or meetings
- Organize exam prep sessions under a dedicated exam collection so students can easily find and book the right slot during peak exam periods
- Automated reminders to attendees and service providers prior to the class
- Automated cancellation email if any lesson gets canceled
- Collect student’s data and sync them with the CRM tool
- Receive analytics to view the yearly booking trends
A step-by-step guide to setting up a lesson scheduling software
When it comes to scheduling software, FluentBooking emerged as a game changer for all. Till date, it’s the easiest online scheduling tool present in WordPress.
It offers the freedom to effortlessly navigate through the chaos of appointments, meetings, classes, webinars, and more – no matter how tangled your schedule may be!
Sounds interesting, right?
But hold on, because the real magic happens when you integrate this plugin with your WordPress site.
Incorporating FluentBooking is just like a walk in the park!
Don’t want to believe us, check this documentation to set it up with your website and you’ll be ready to make your lesson scheduling process swift.
Now, let’s start demonstrating – how you can create and enroll students in a lesson from start to end.
Create lesson-based scheduling calendars
Say, you are the admin of the institutional website, and you have already added different course instructors as a host through the user panel.
If you have done that, then the task ahead is simple.
Initially, you’ll be landed in the “Dashboard” of FluentBooking. To create a lesson and set the availability of an instructor you need to follow these steps:
- Step 1: Go to the FluentBooking Dashboard and navigate to Calendars. Look for the New button and click on it.
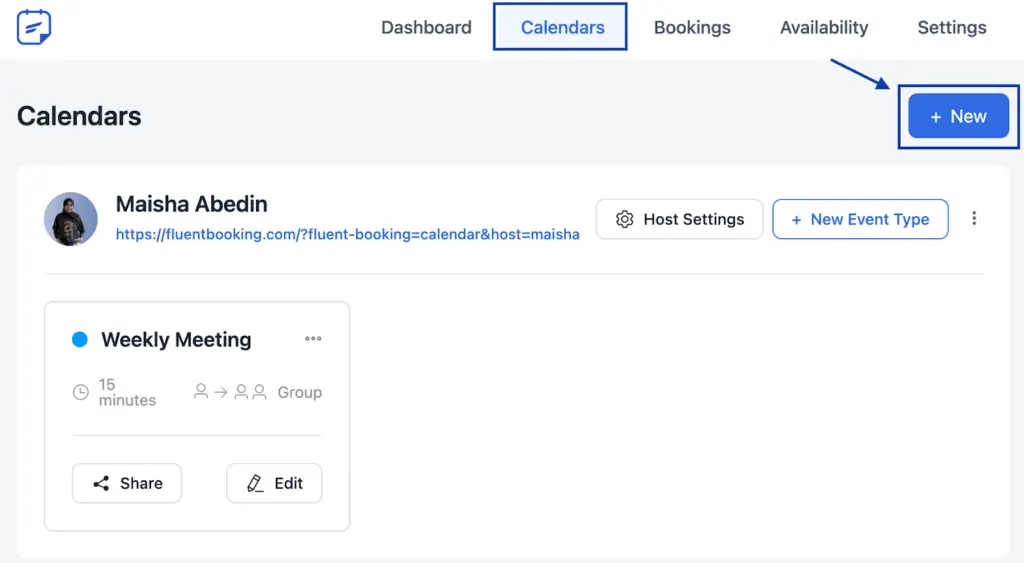
- Step 2: A “Create New Booking Type” slider will open. Add the instructor’s name as a host and click on the one-to-group option.
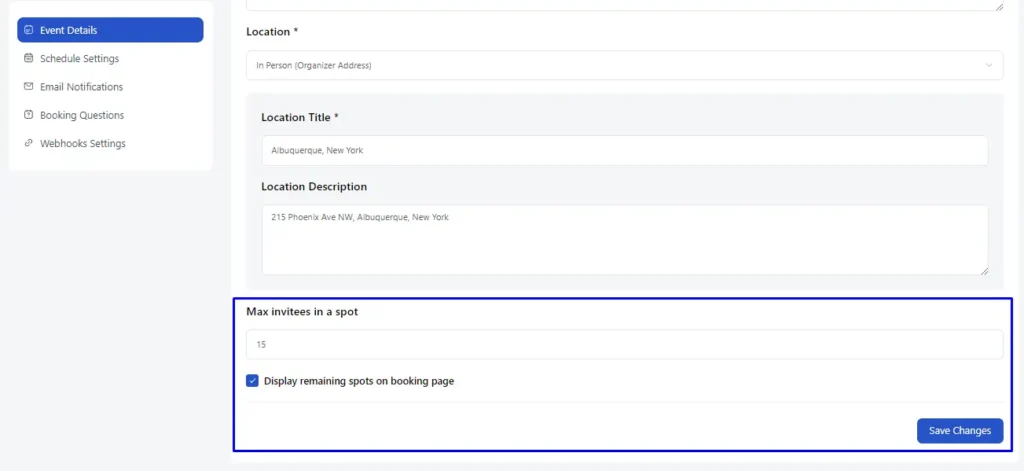
- Step 3: In a new window, fill in the “Event Details” that include the lesson name, duration, location (in-person or online), and timezone. And don’t forget to hit the continue button.
Here for the demonstration purpose, we selected an in-person location but an instructor can take lessons online using Google Meet too.

- Step 4: Next, add the maximum number of attendees that are allowed to join each lesson then enable the checkbox below so attendees can view the remaining spots for each lesson. Lastly, hit the Save Changes button.
Setting Up Availability
Once you create the lesson, it will by default set your weekly available hours.
But, you can always update it according to your preferences. To make changes to your daily available hours – follow these steps:
Booking Calendars > [Your Event Name] >Schedule Settings > Change availability to Set Custom Hours
If you’ve followed these steps then you will view something similar to the picture below where you’ll able to make changes to your weekly hours.

Moreover, the Date Overrides will allow you to manage limited availability if there are any schedule changes happening on any weekdays.
Viewing Your Lesson on Your Webpage
Till now if you have followed our step-by-step guidelines correctly, then congrats on you’ve successfully completed creating a lesson for attendees.
Now, you might be wondering how attendees will view this on the webpage to attend it. Simply,
Go to Booking Calendars > Copy Event Shortcode >Paste on Webpage
So far, if you configured it just the way we told you then your course enrolment page will look like this to the students:

Sending Automated Emails
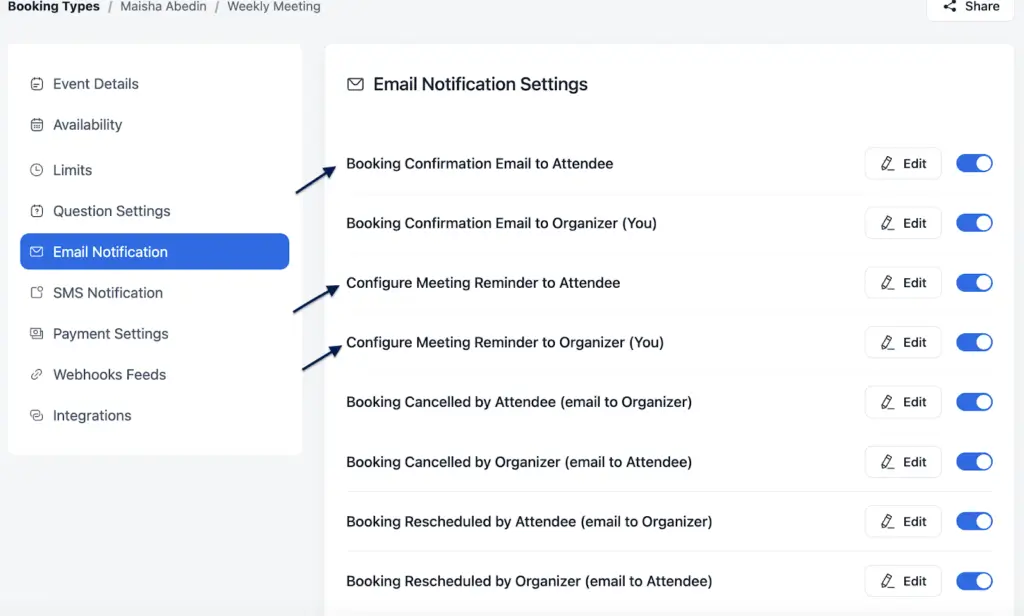
An automated scheduling software won’t be called automated if there’s no auto email-sending feature for booking confirmation and reminders.
For lesson enrolment confirmation, if any students enrolled at any given timeslot a booking confirmation email will be sent to both instructor and students.

Likewise, in terms of reminder emails, an automated email will be sent to instructors and students to avoid any no-shows. You just need to enable the reminder toggle from Email Notifications of the event.
Keep Your Attendees Posted Using FluentCRM
Simply being present in a class and going through the motions doesn’t guarantee real learning. True learning involves a dynamic exchange between instructors and students that drives student engagement and encourages active participation in lessons.
Asking for feedback and offering student assignments will enable a rich teacher-student relationship.
But, can you do that with FluentBooking?
Technically, yes!
Consider your students as valuable leads, their email addresses are already in your possession from the enrollment process.
By seamlessly integrating these emails into FluentCRM, a powerful email automation tool, you open the doors to sending further emails, getting feedback, and providing course materials.
To illustrate, check out this course automation funnel we’ve created for you:

Make learning accessible!
Today’s education is all about efficiency. Students crave instant access to learning, and old-school methods just won’t cut it.
Leverage automated lesson scheduling software and adopt the modern way to bridge the gap between eager learners and knowledgeable.
In this article, we discussed how you can simplify lesson scheduling with FluentBooking – an automated scheduling system that makes learning accessible to anyone from anywhere in the world.
Tanzil Ebad Efti
Hi! I’m a creative content writer at WPManageNinja. As a research-oriented persona, my passion is to bring my research to life through storytelling.
Table of Content
Subscribe To Get
WordPress Guides, Tips, and Tutorials

Leave a Reply