FluentBooking offers seamless integration with your Google Calendar and Google Meet, making your scheduling experience even more efficient and effective. There are two ways to integrate Google Calendar with FluentBooking. We’ll show you both.
Default Verified App #
Unlike any other WordPress appointment plugin, we have a default verified app to integrate Google Calendar.
To use this, go to Settings and switch to Google Calendar/Meet. Then, choose Default Verified App and set your caching time. The recommended setting is 5 minutes however, you can set any duration.

In the Calendars section, select the host you want to sync booking events for on Google Calendar/Meet. If you don’t have a host, check out our documentation for guidance on creating one. Now, go to the Host Settings > Remote Calendar of that host and click Connect with Google Calendar/Meet.
To sync your host’s FluentBooking events with their Google Calendar/Meet, add your host’s Google Account.

Then, give FluentBooking the necessary permissions and click Continue.

That’s it, that’s all you need to integrate Google Calendar with FluentBooking! Now you can choose your calendar and check conflicts to prevent double bookings.

Own App (Not Recommended) #
Alternatively, you can use our own app to integrate Google Calendar. Here are the steps below:
Create or Select Project #
First, go to the Google Cloud Console and here you have to select a project. You can create a new project too.
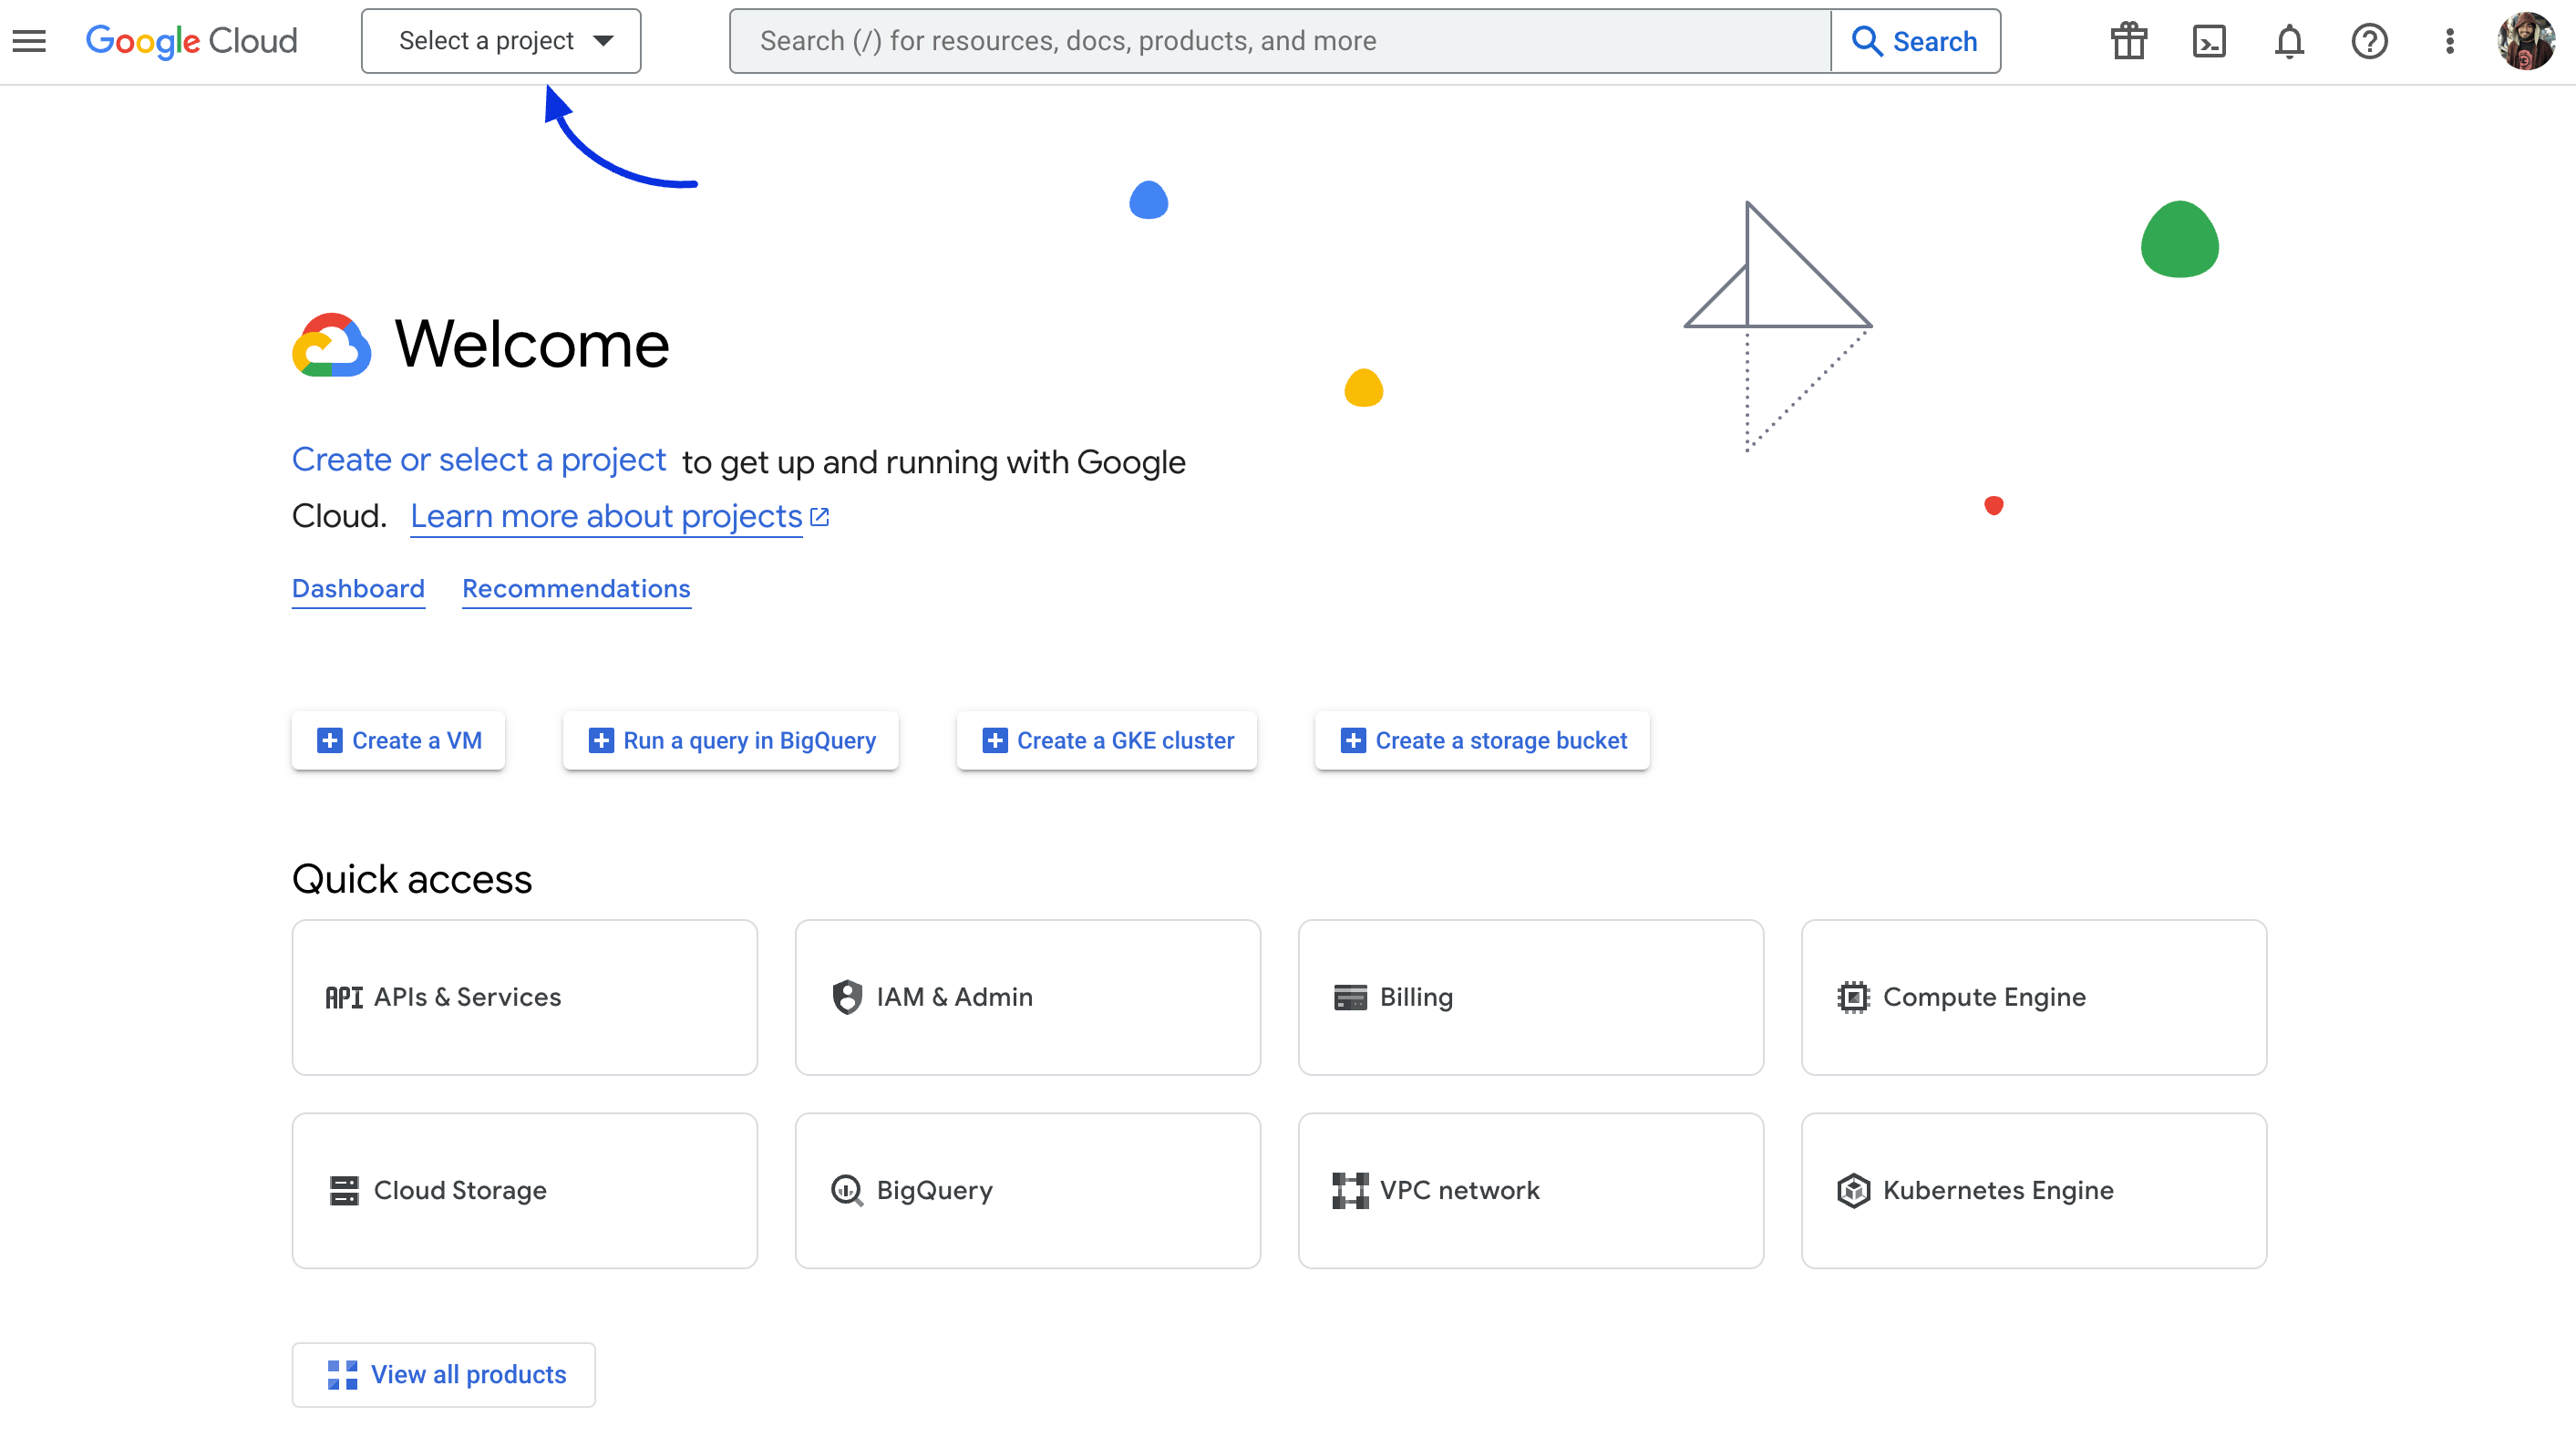
For creating a new project click on the New Project button here.
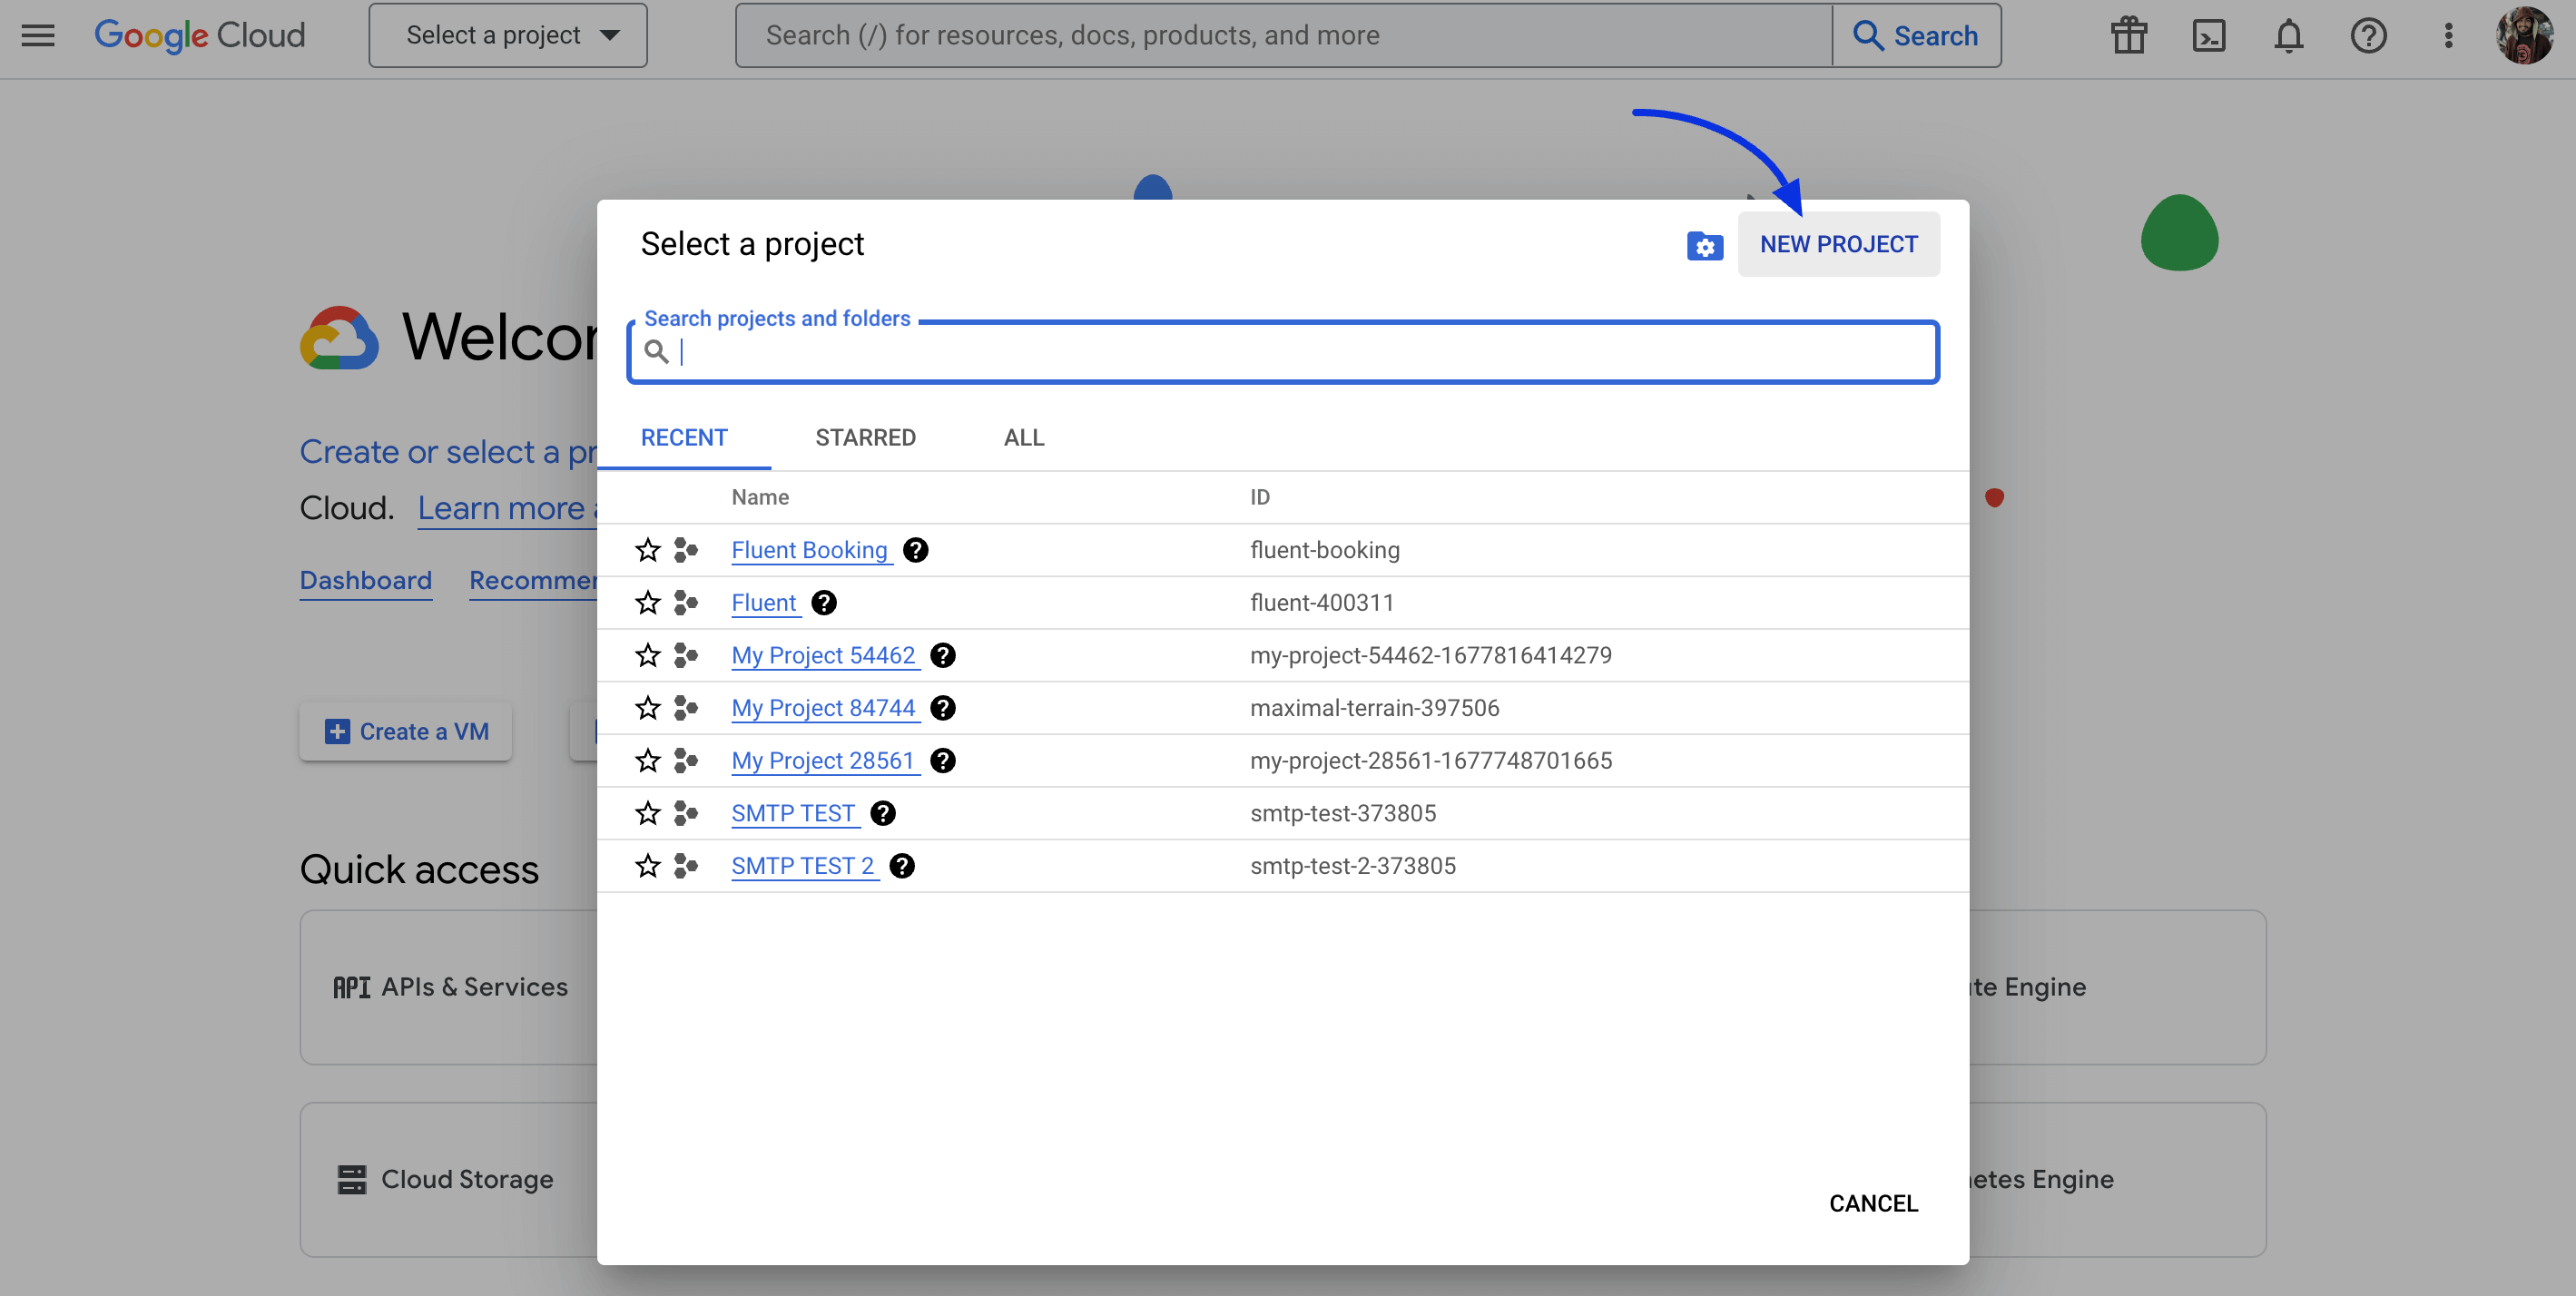
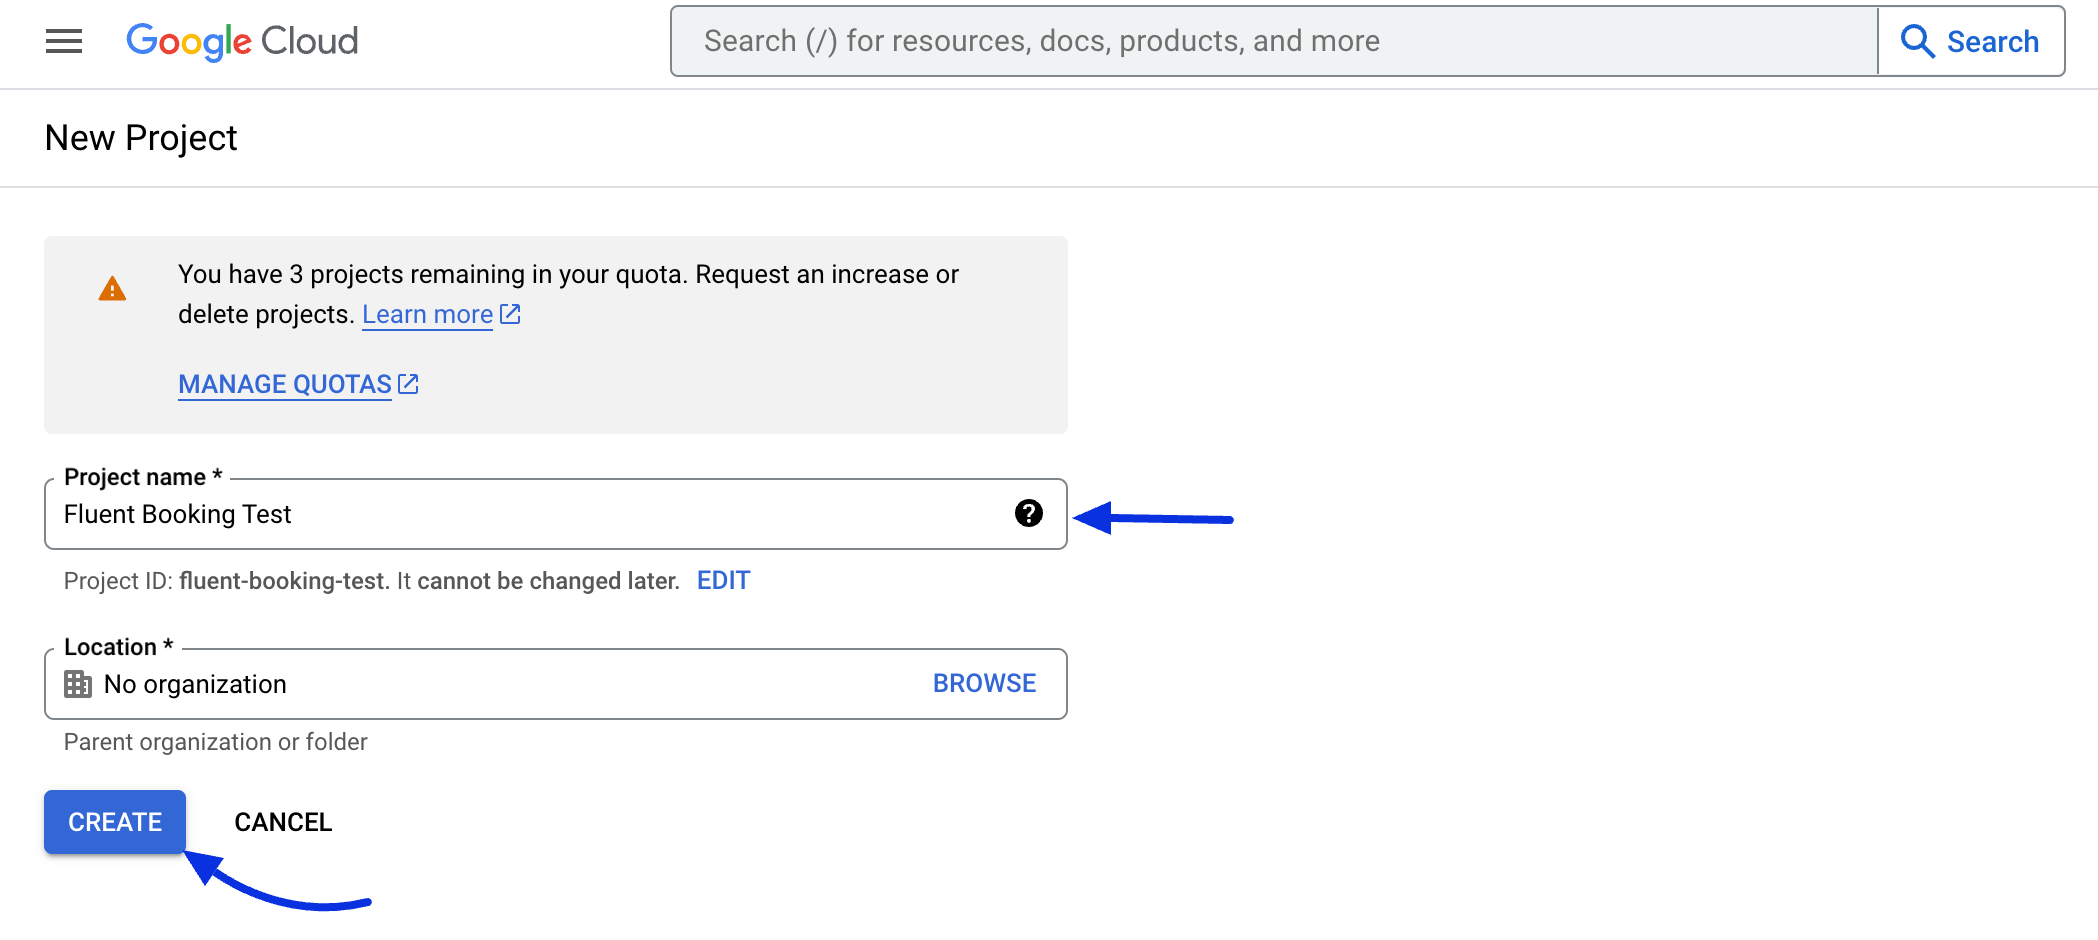
Give a name to your project and press the Create button.
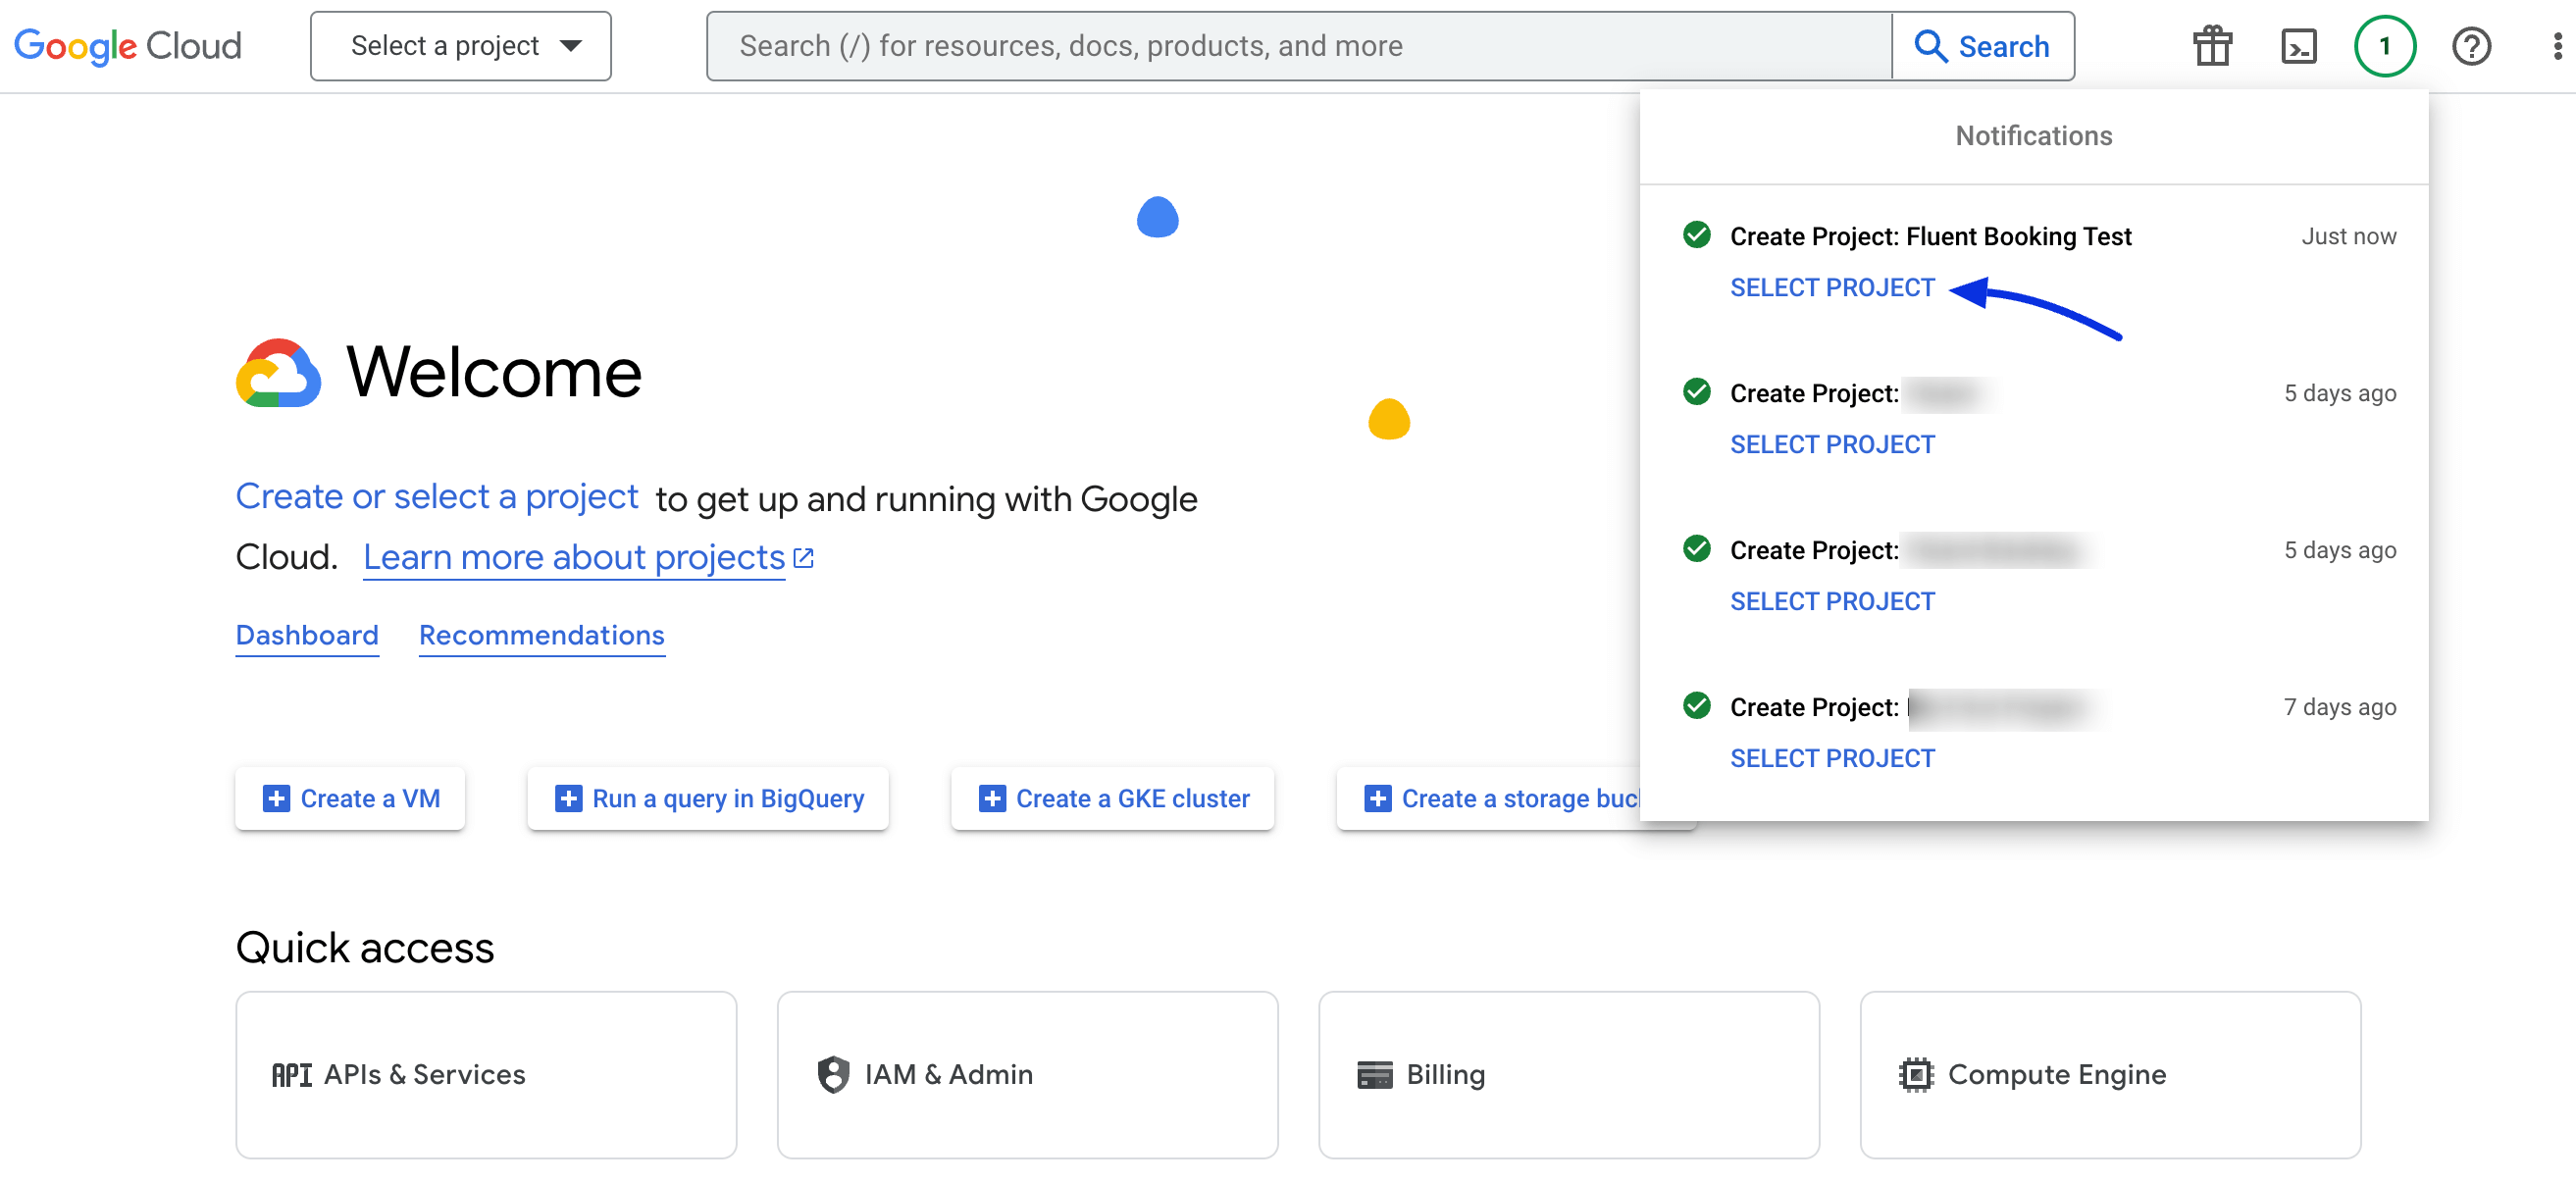
You will see a project create confirmation on your notification panel. Now select your project here.
Configuring 0Auth Consent #
Go to the APIs & Services and select the OAuth consent screen
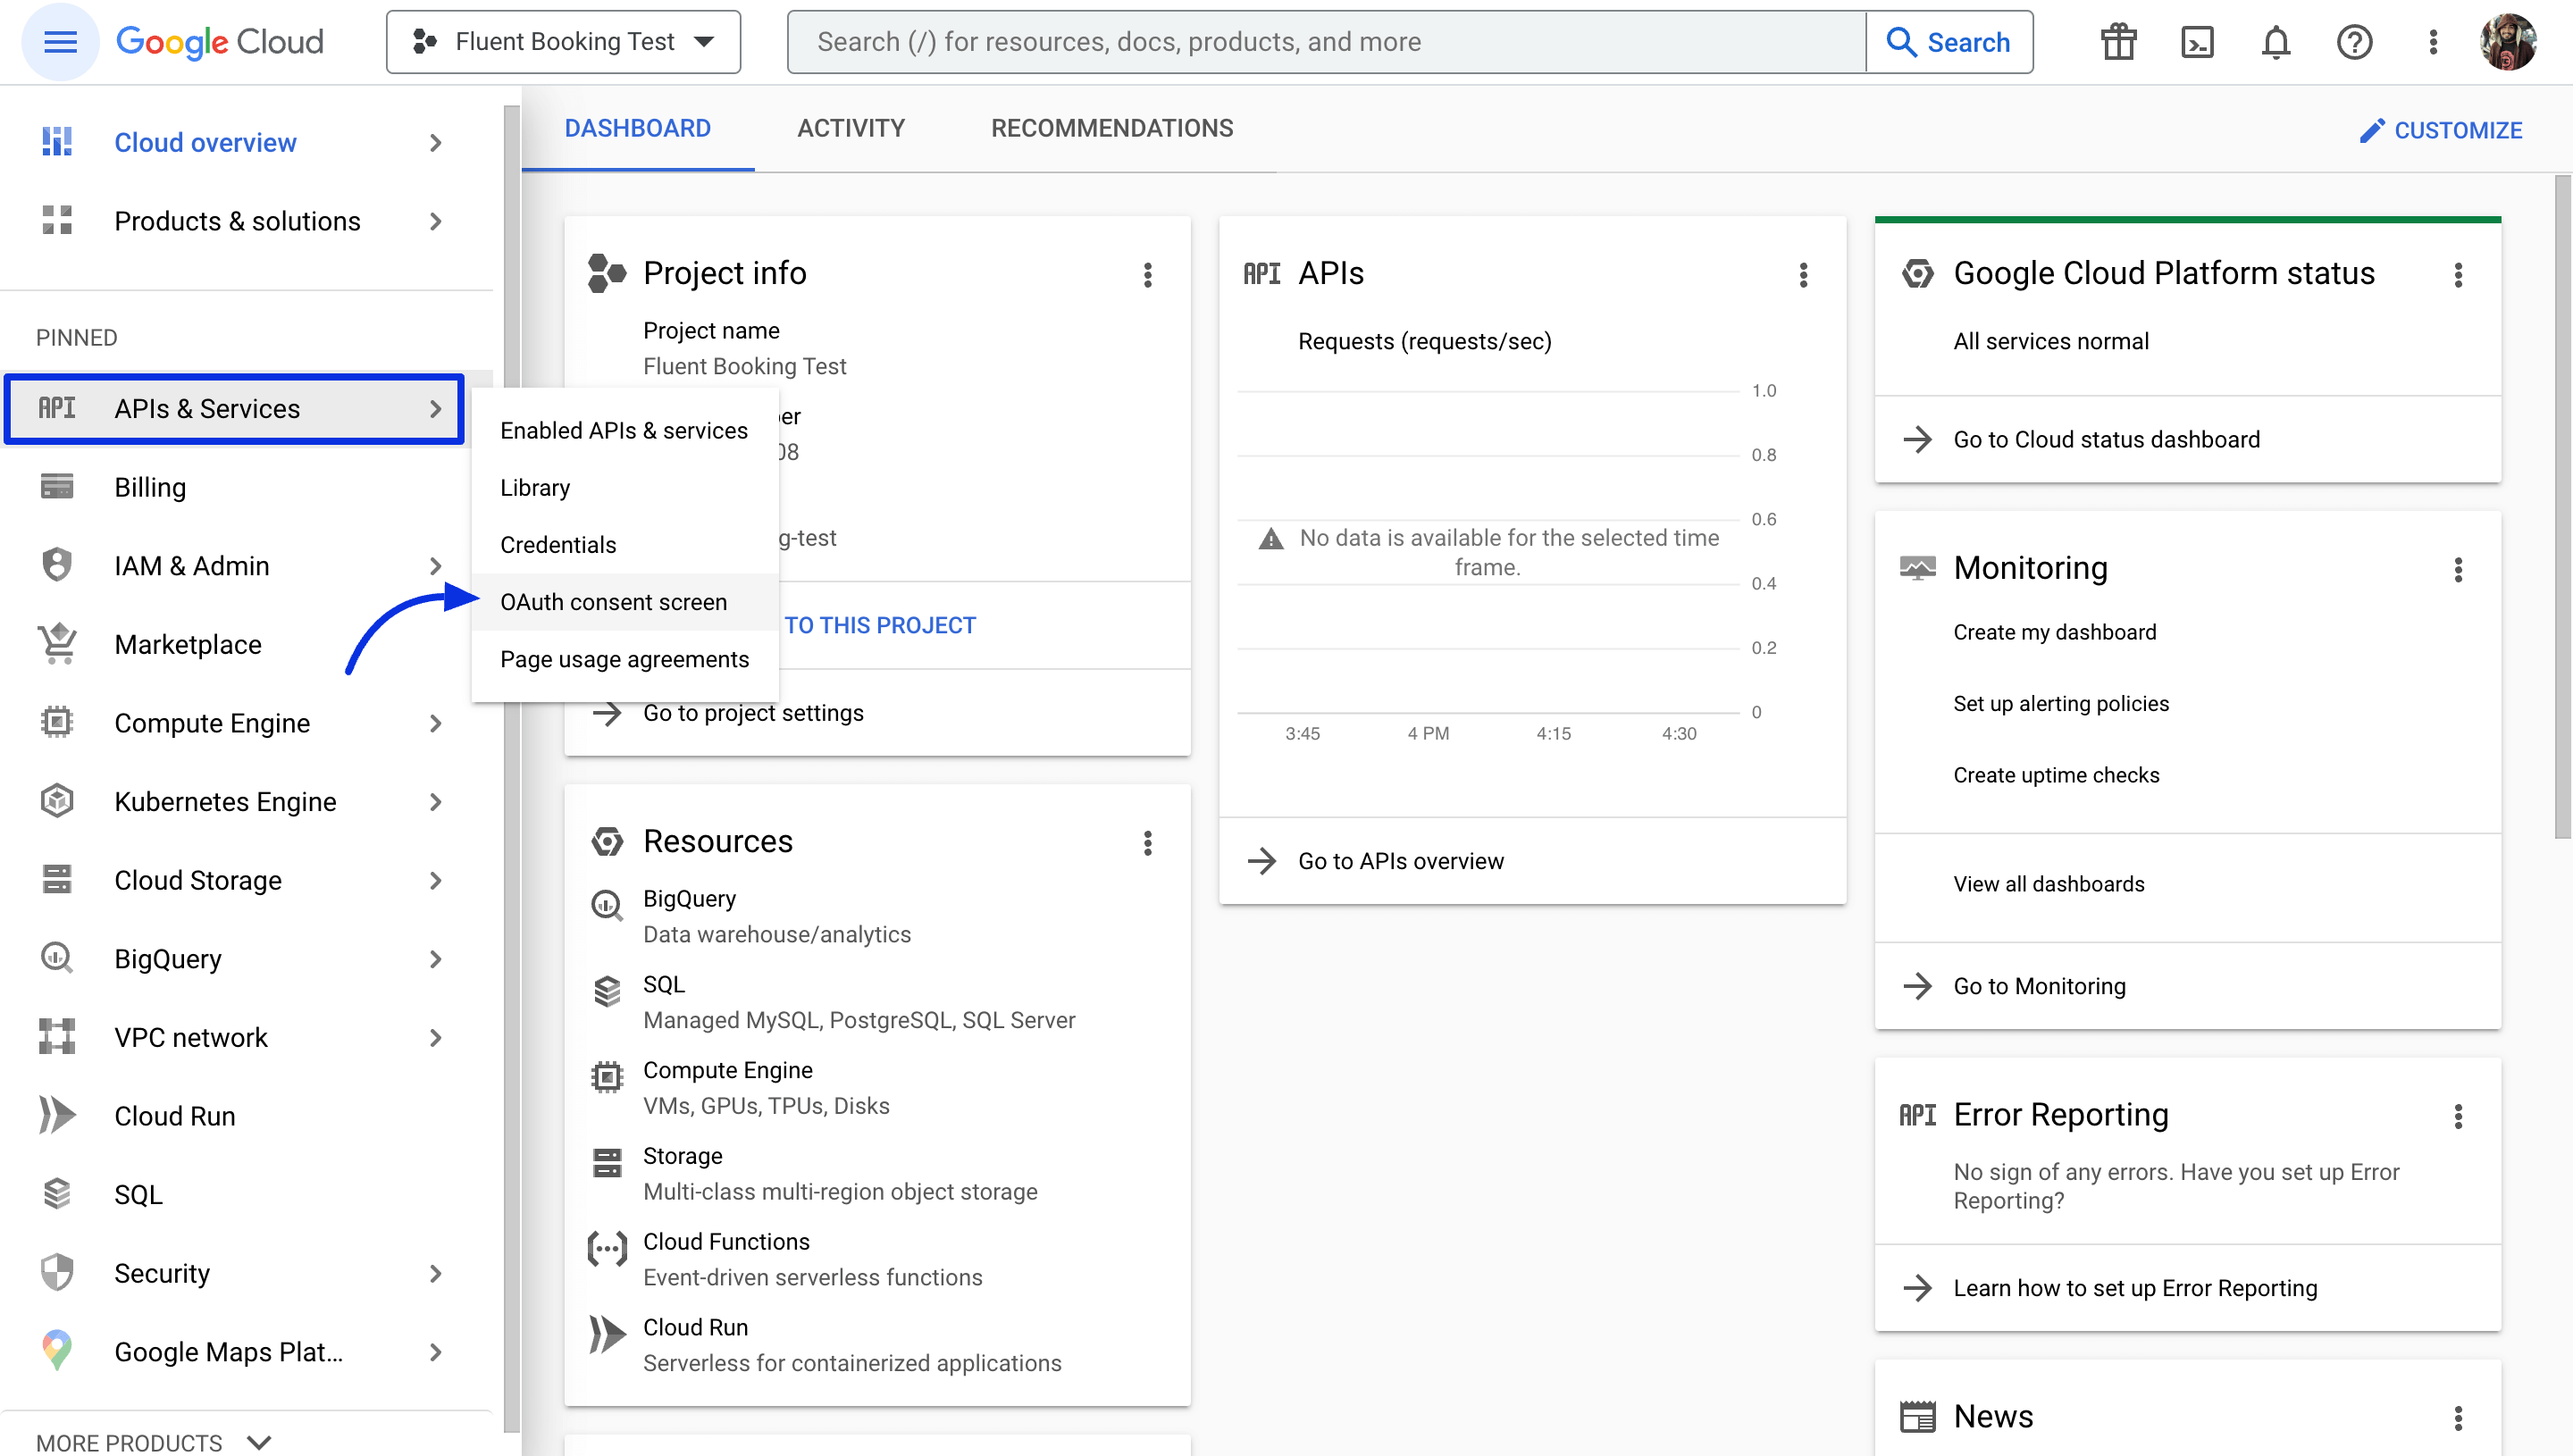
Here you have to select the Internal user type and click on the Create button.
Note: If you’re not using Google Workspace, select External User. Please be aware that the External user type app may break integration with FluentBooking in one to two weeks.
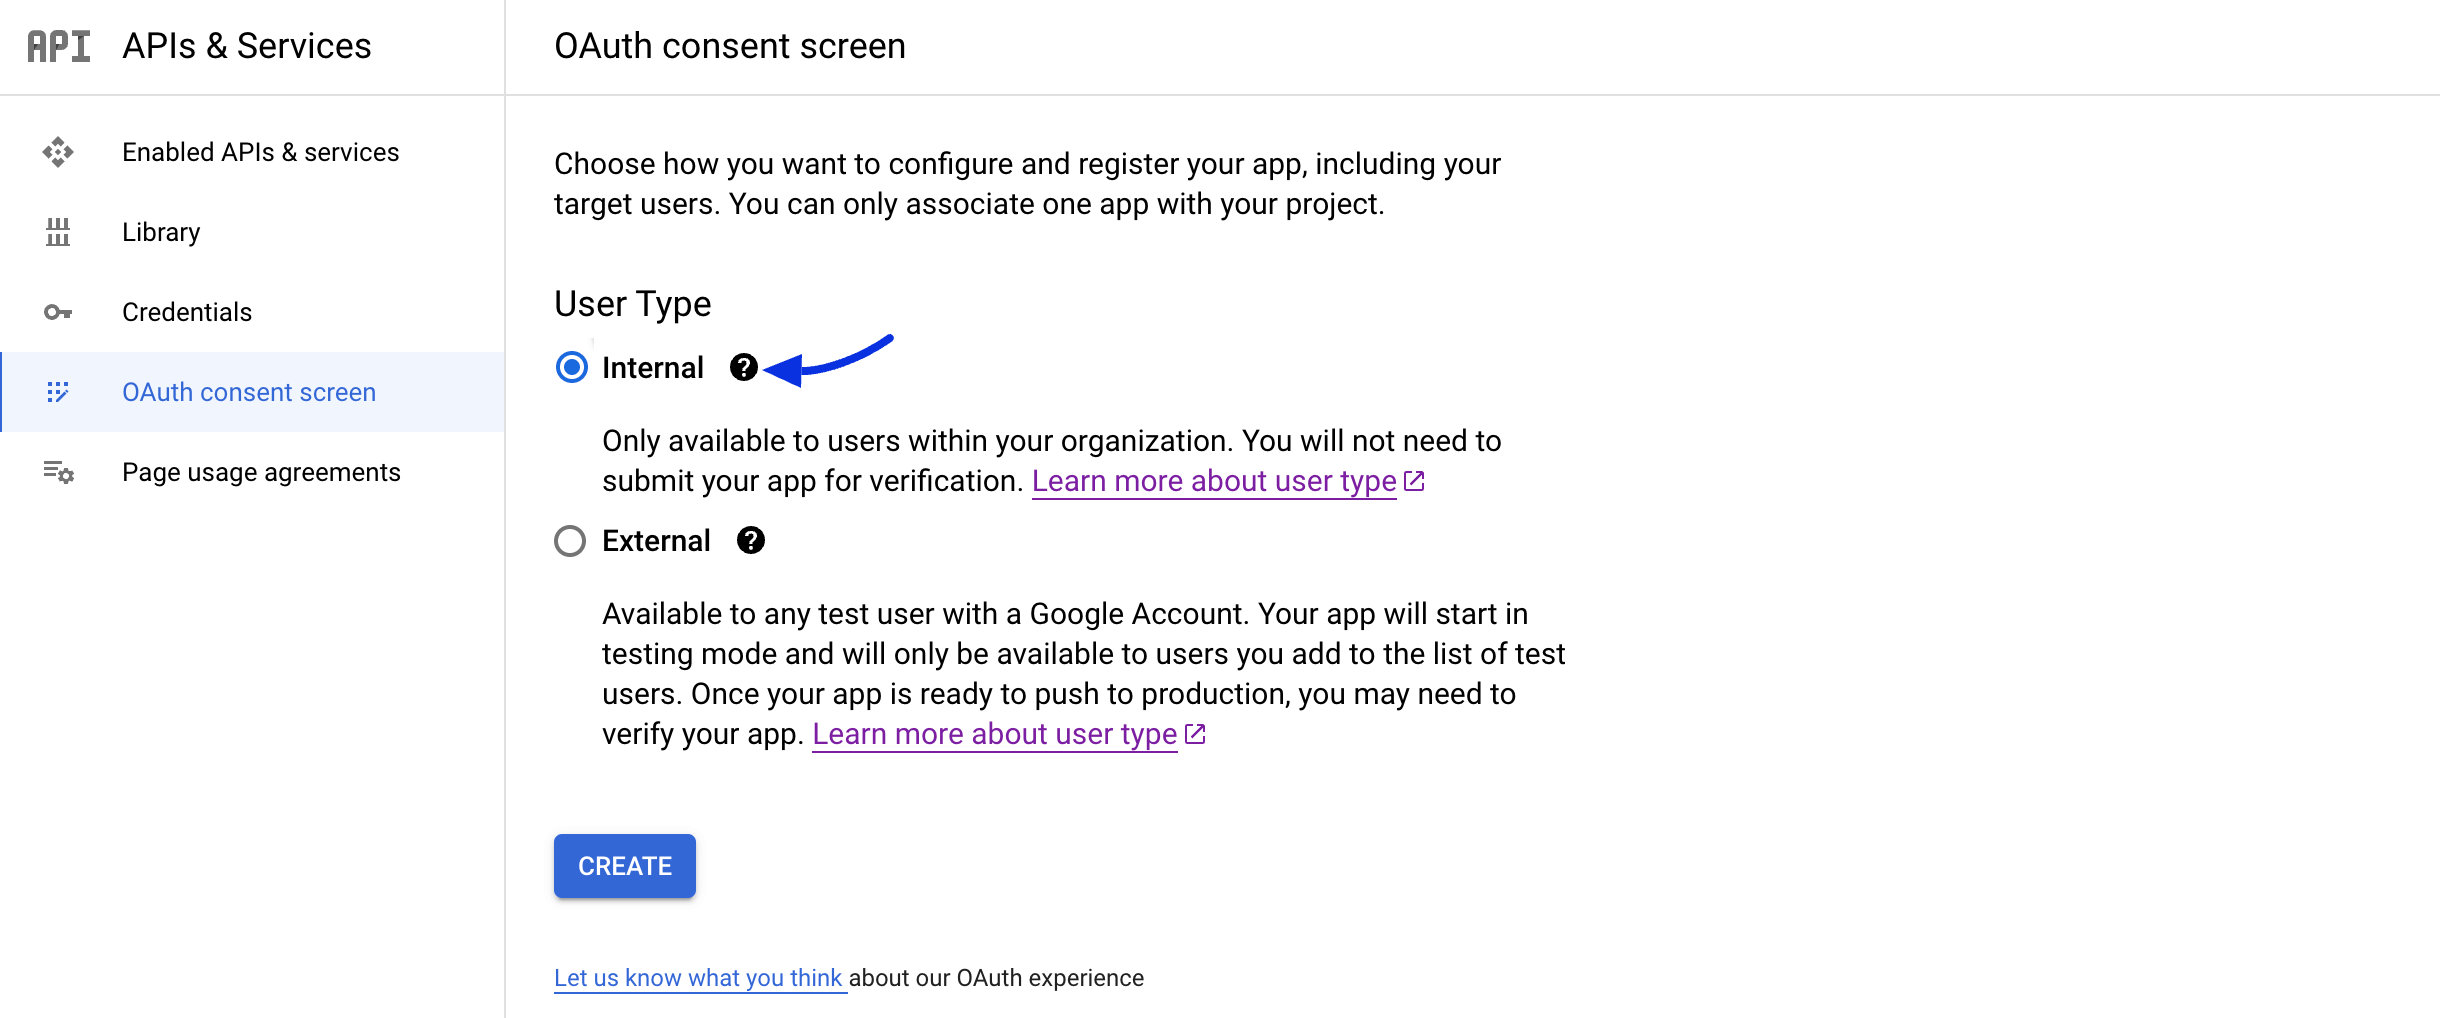
Here you will see four steps to complete the OAuth consent screen. In the first step, you have to give the App name, User Support Email, Authorized domain, and Developer Contact information then click on the Save & Continue button.
You can simply Save and Continue the other three steps.
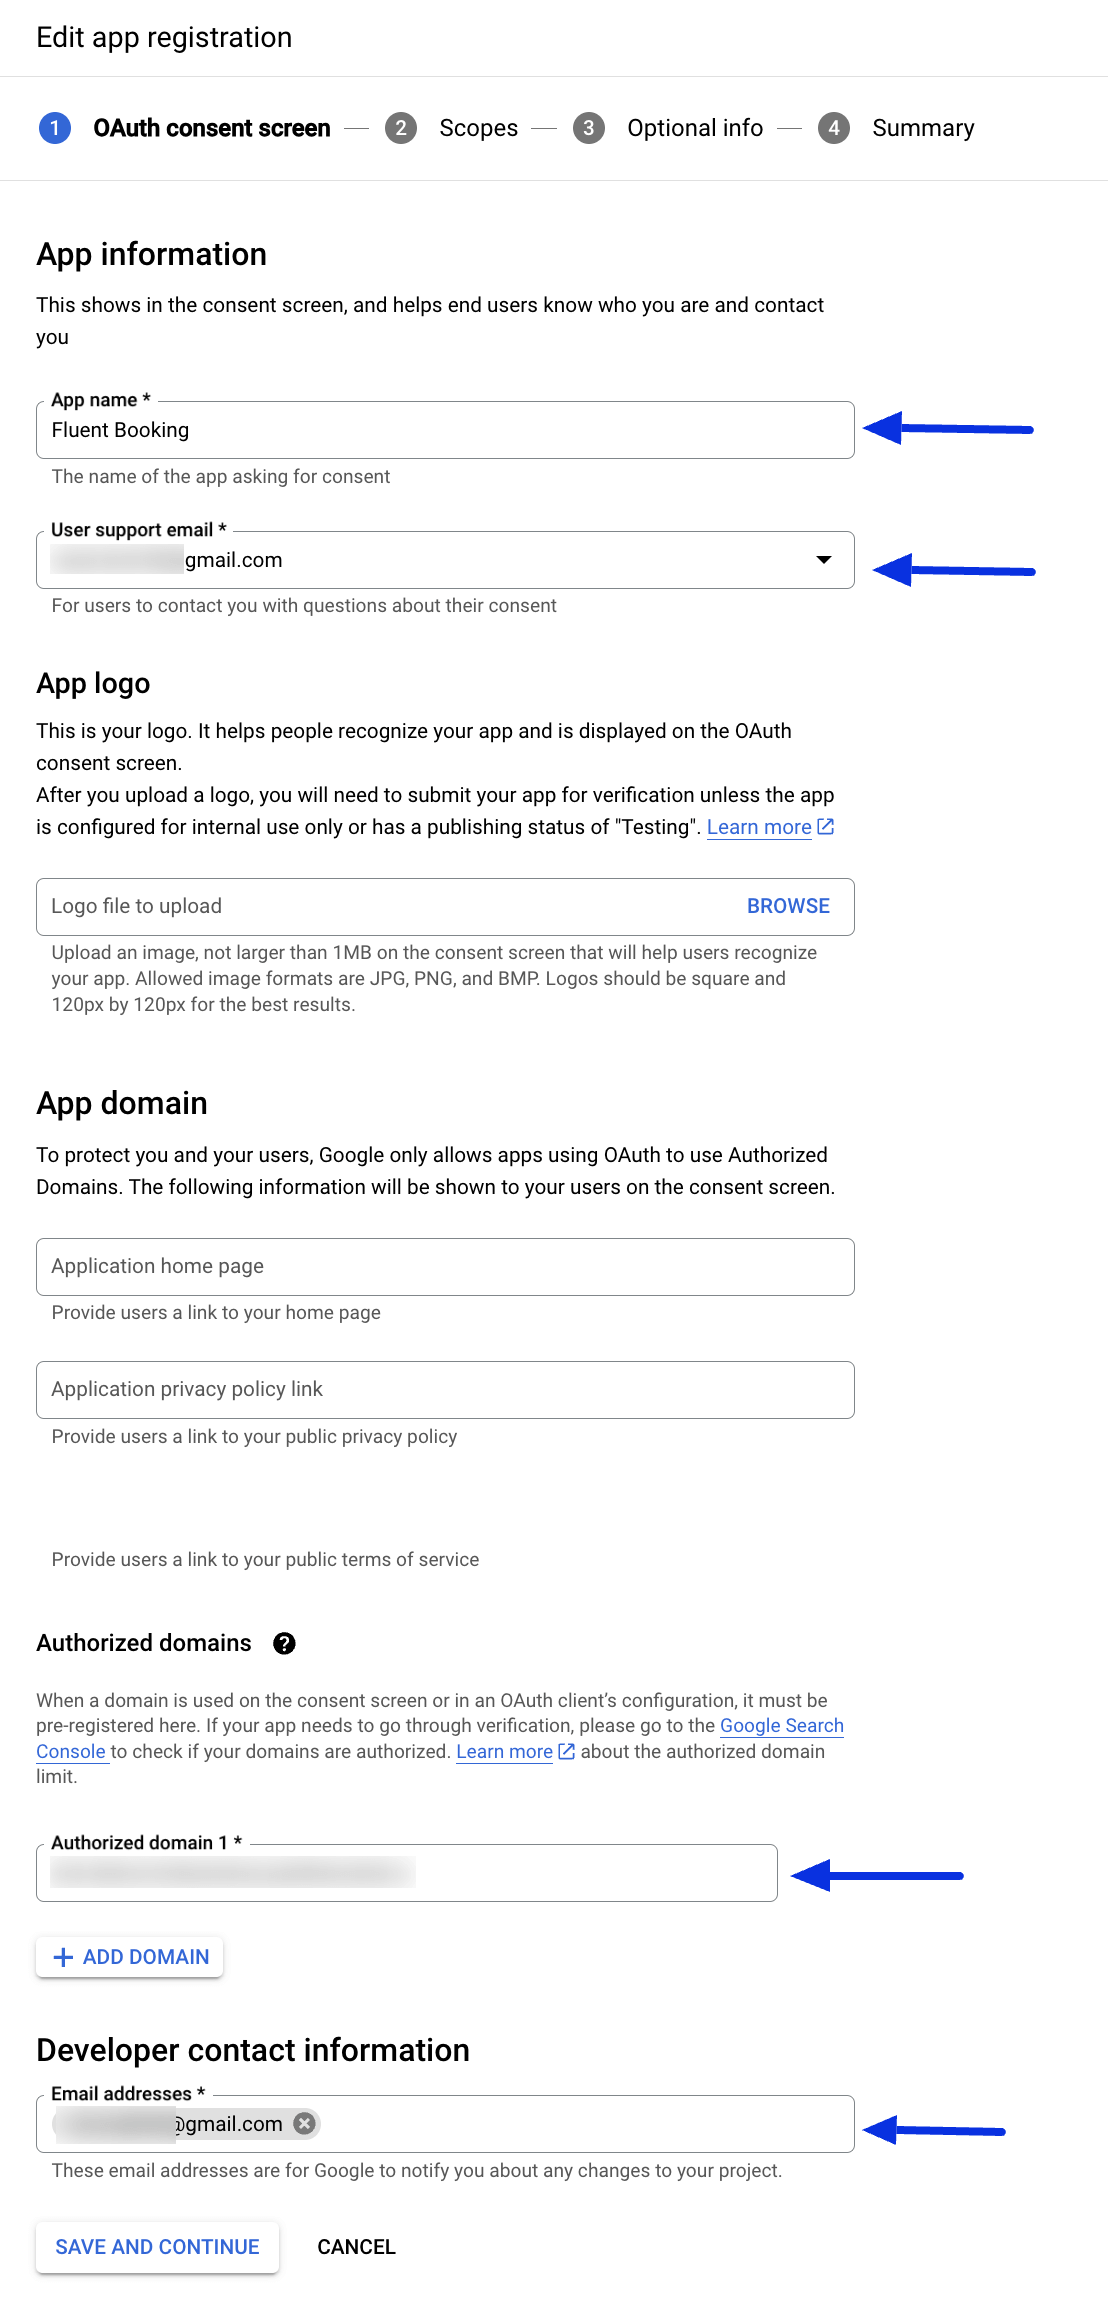
After completing the above steps you have to publish the app. Just click on the Publish App button.
Enabling Google Calendar API #
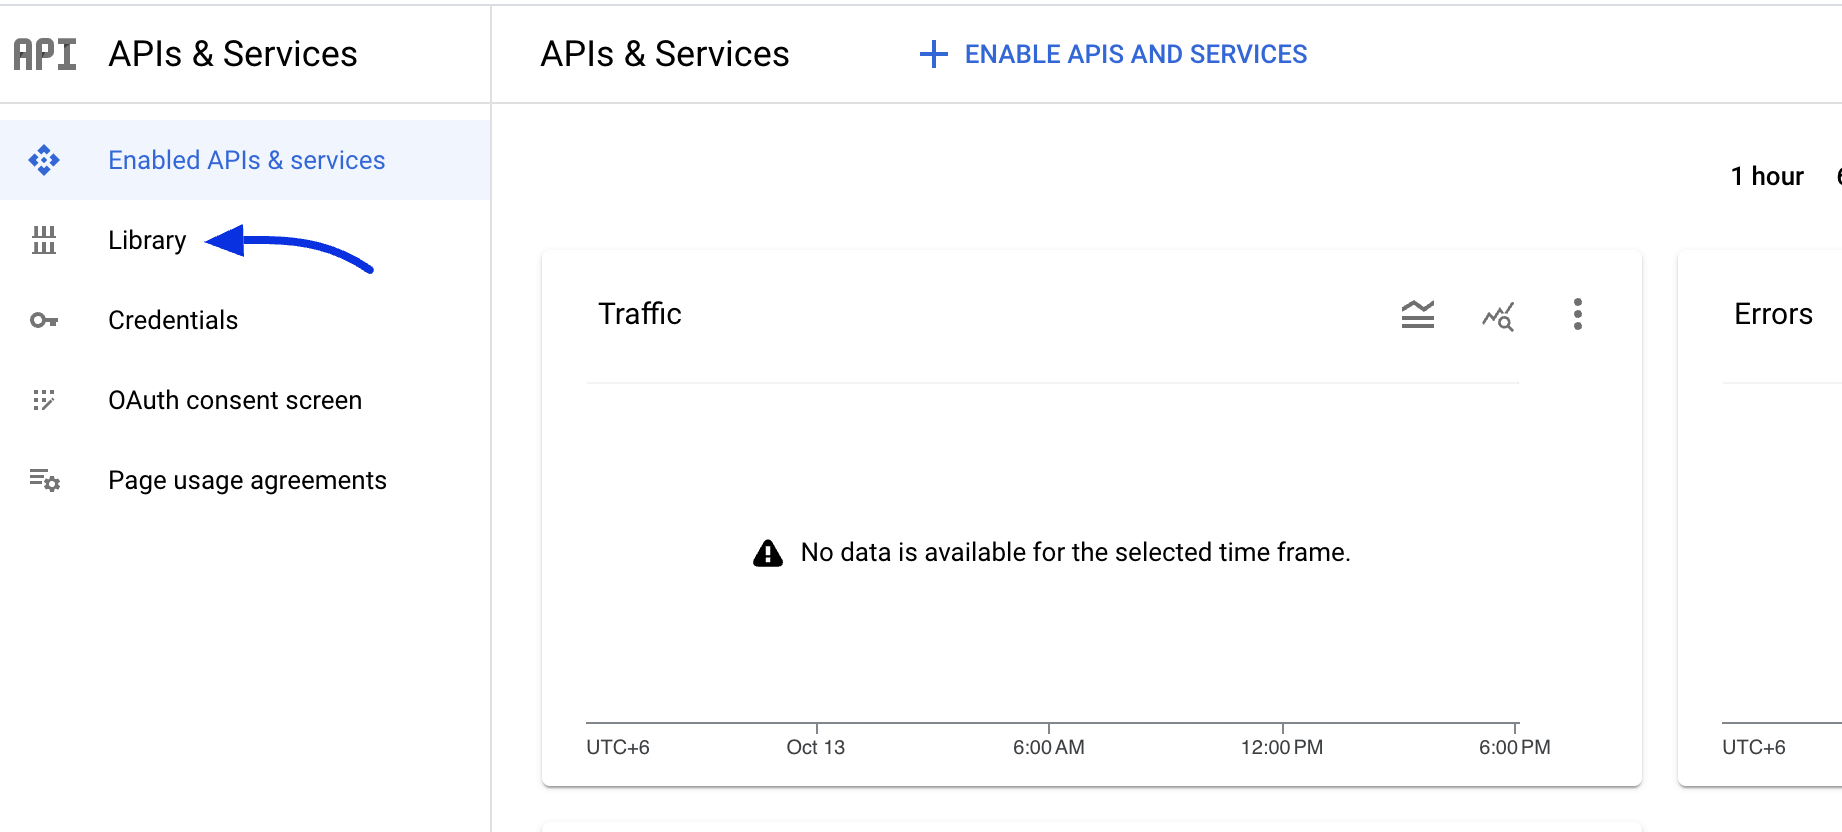
Now go to the Library and enable the Google Calendar API.
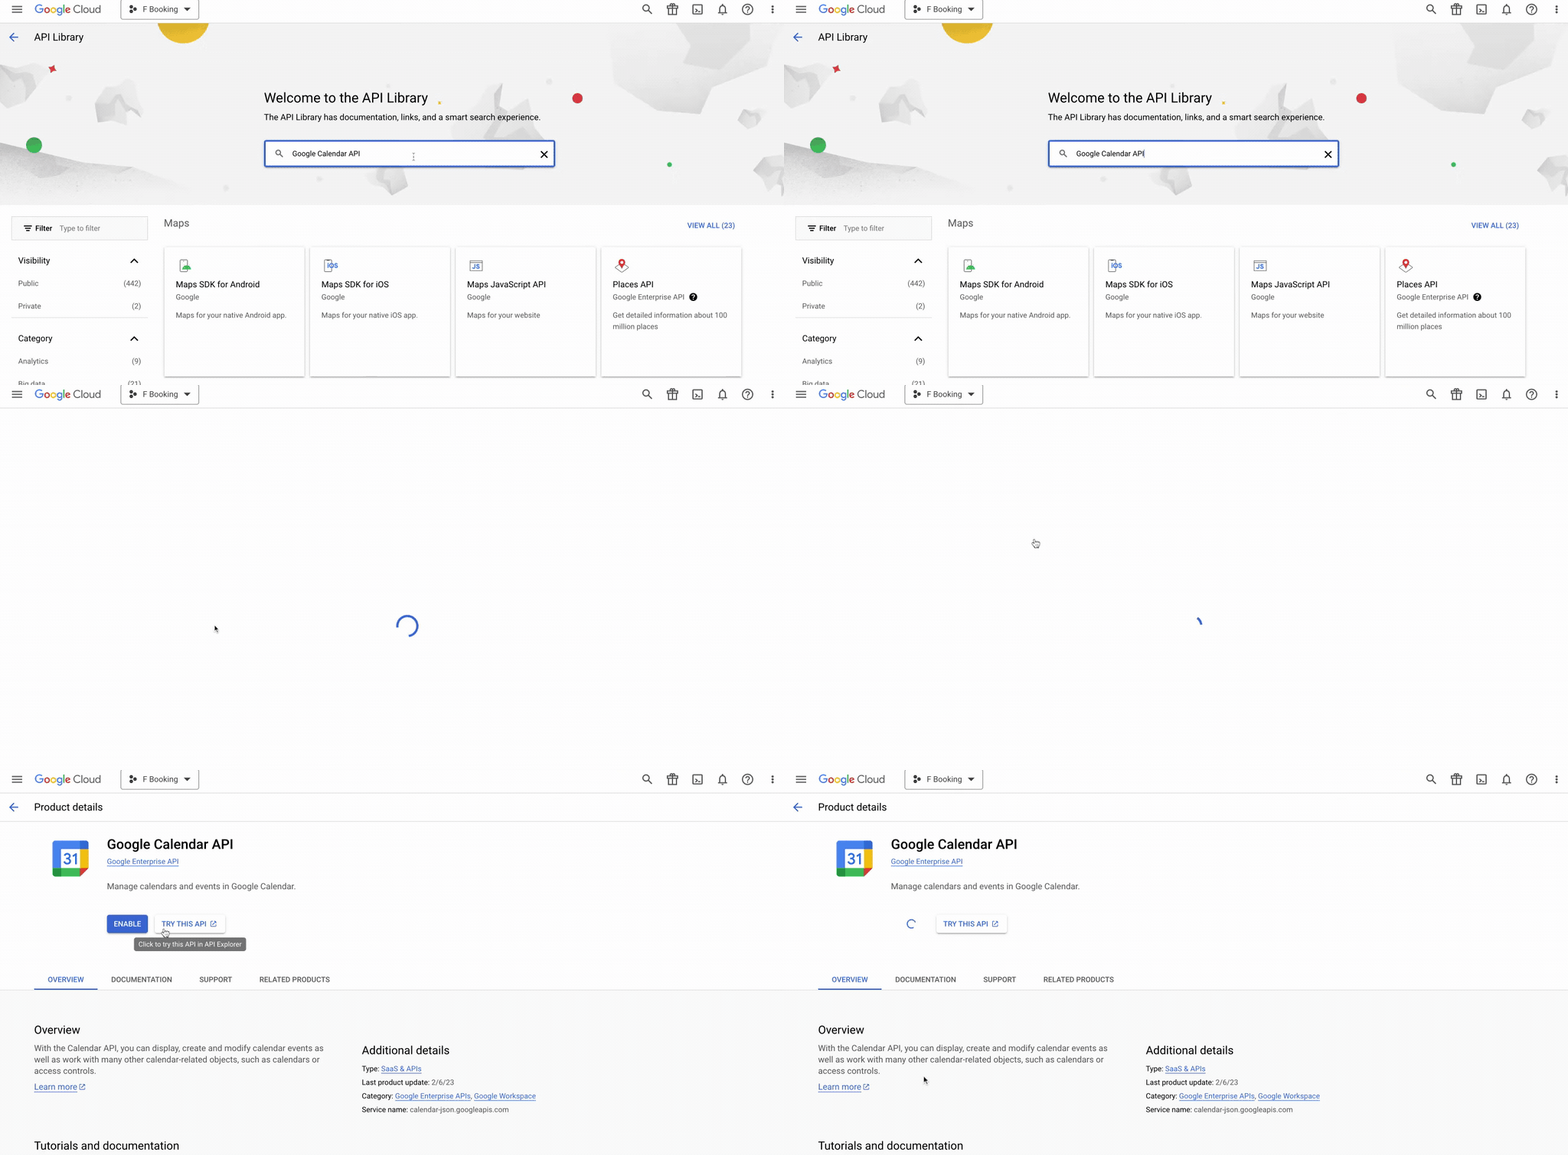
Here search for the Google Calendar API and simply enable it.
Create Credentials #
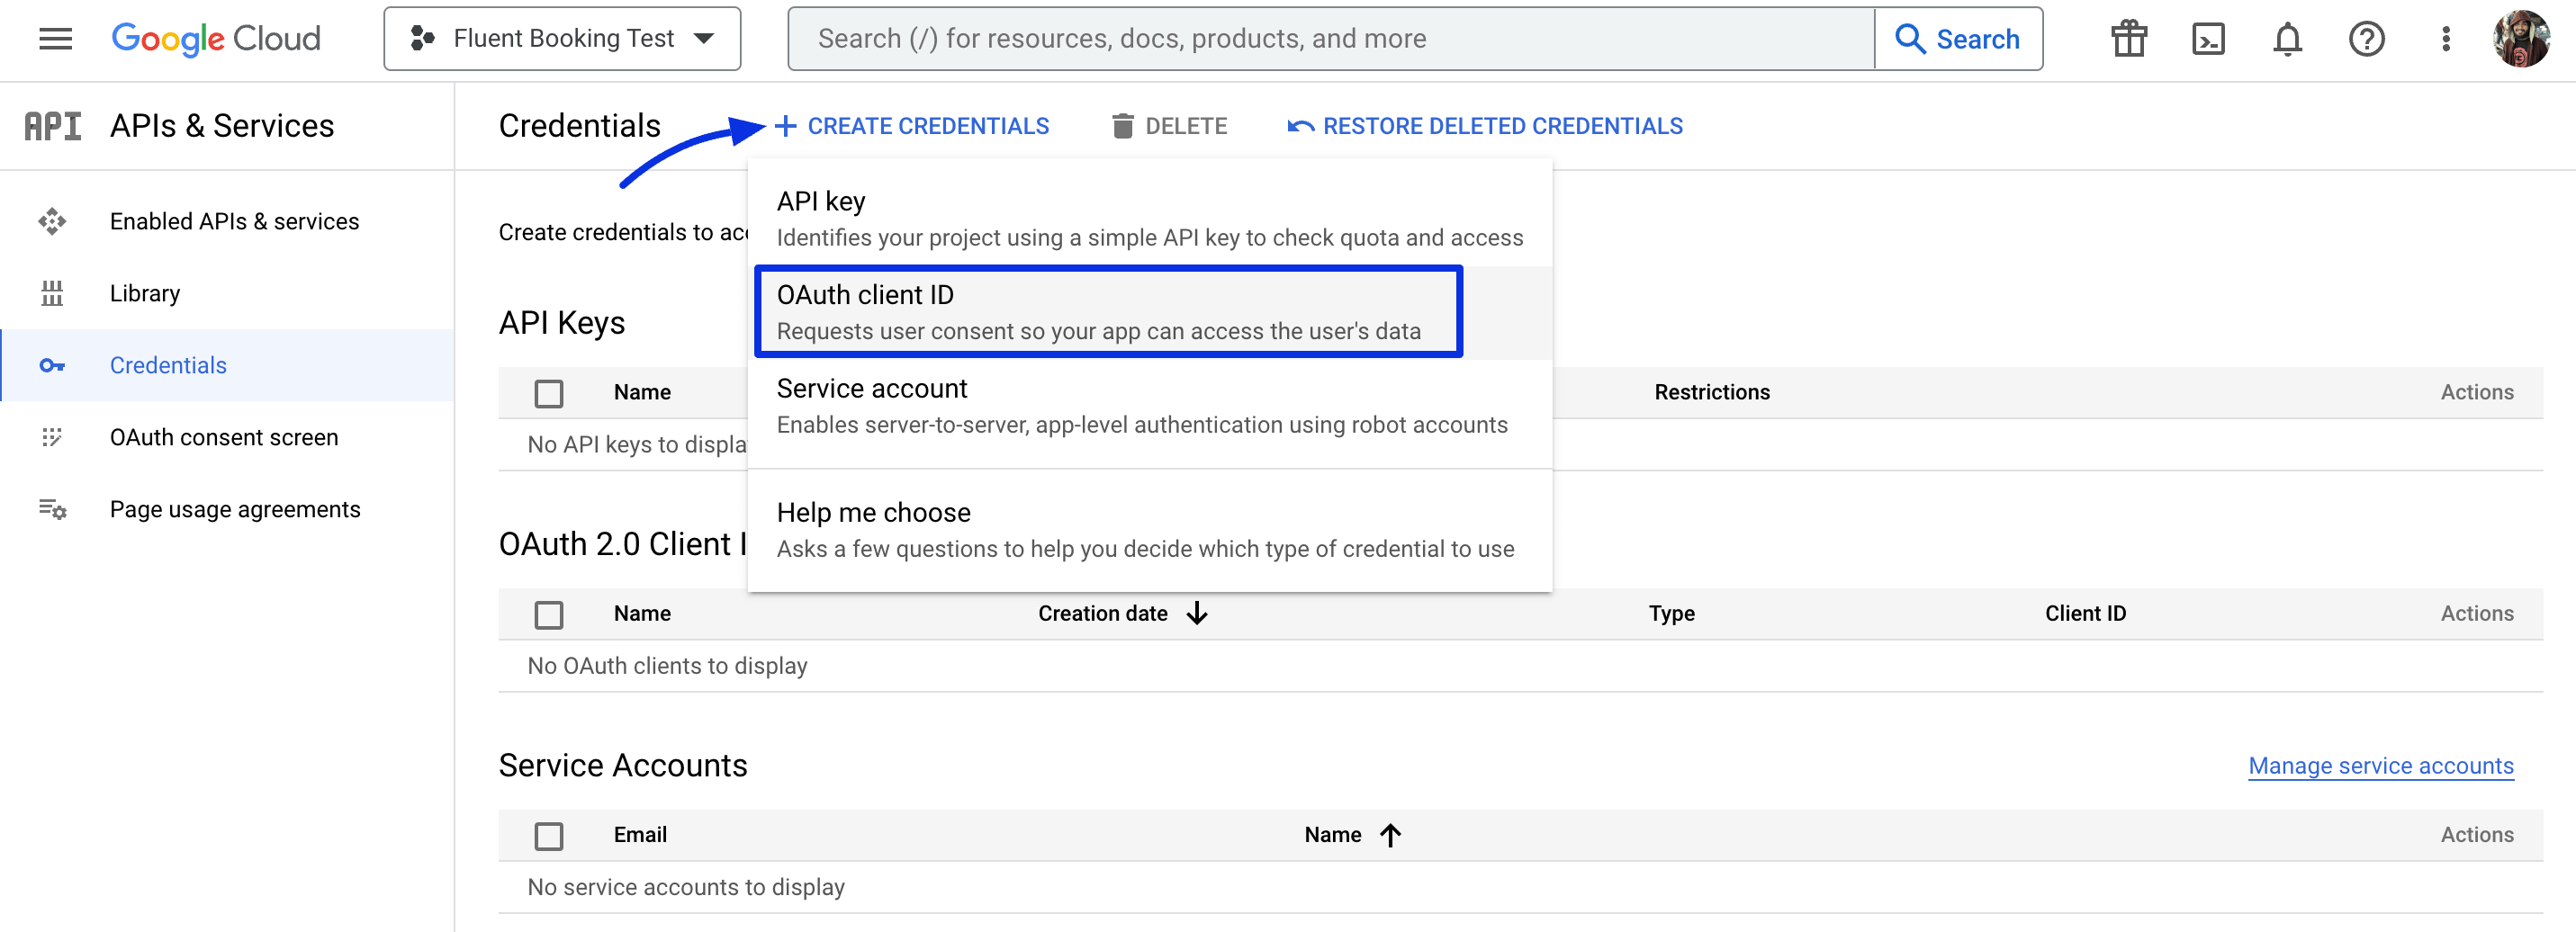
Now go to your project and select Create Credentials > OAuth client ID
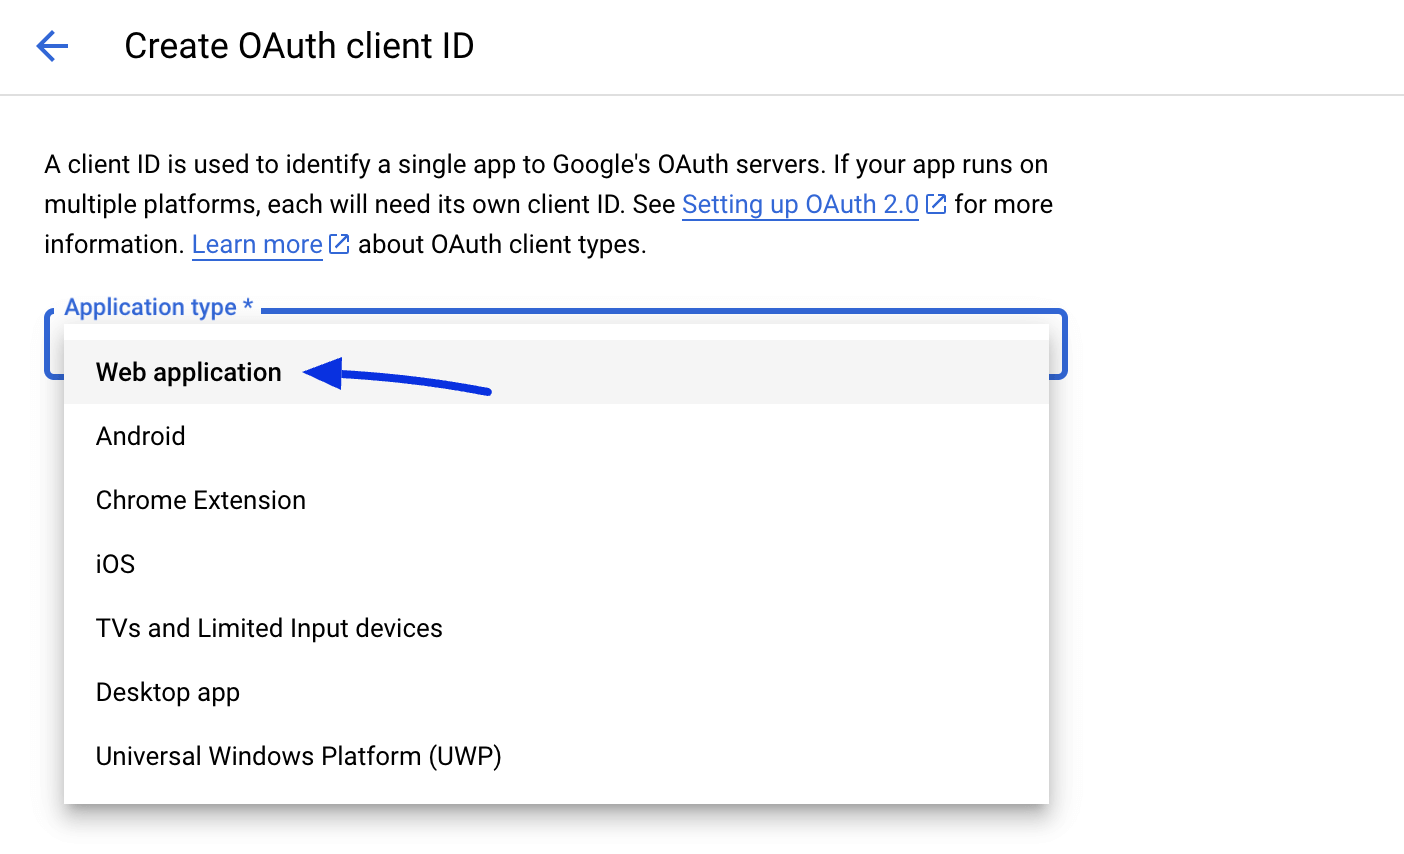
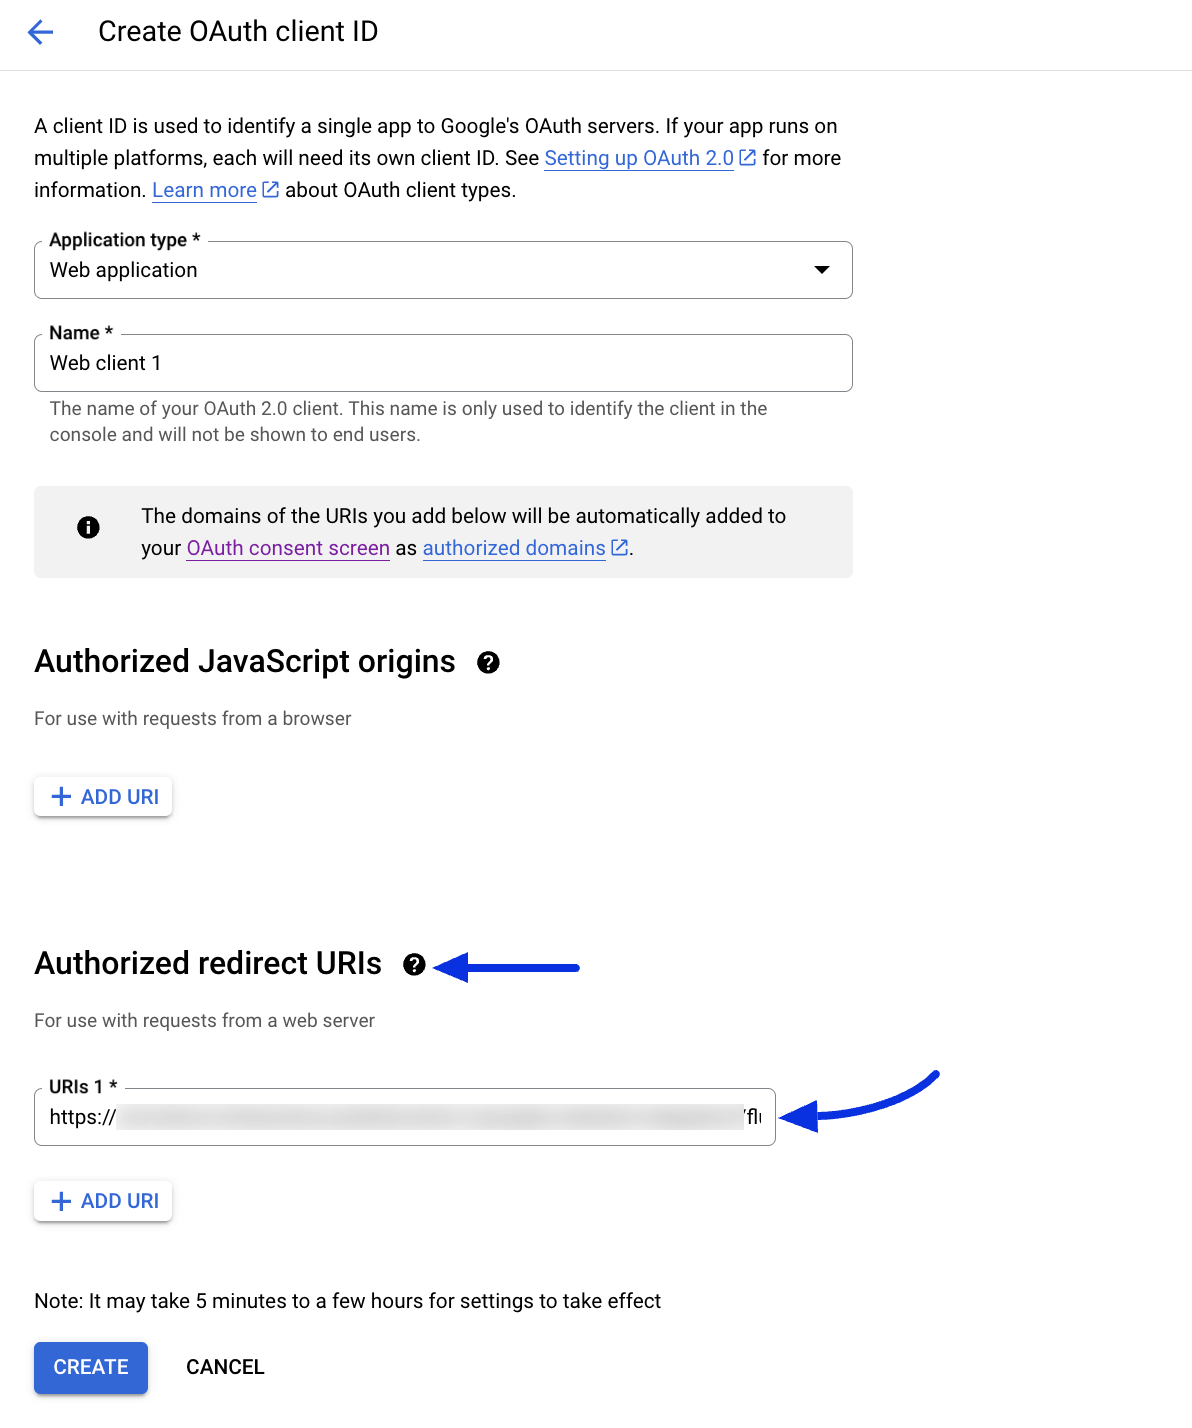
Here you need to create a web application to get your credentials.
Now you need the Authorized redirect URL of FluentBooking. Go to Settings > Google Calendar of your FluentBooking plugin and you will get the redirect URL.
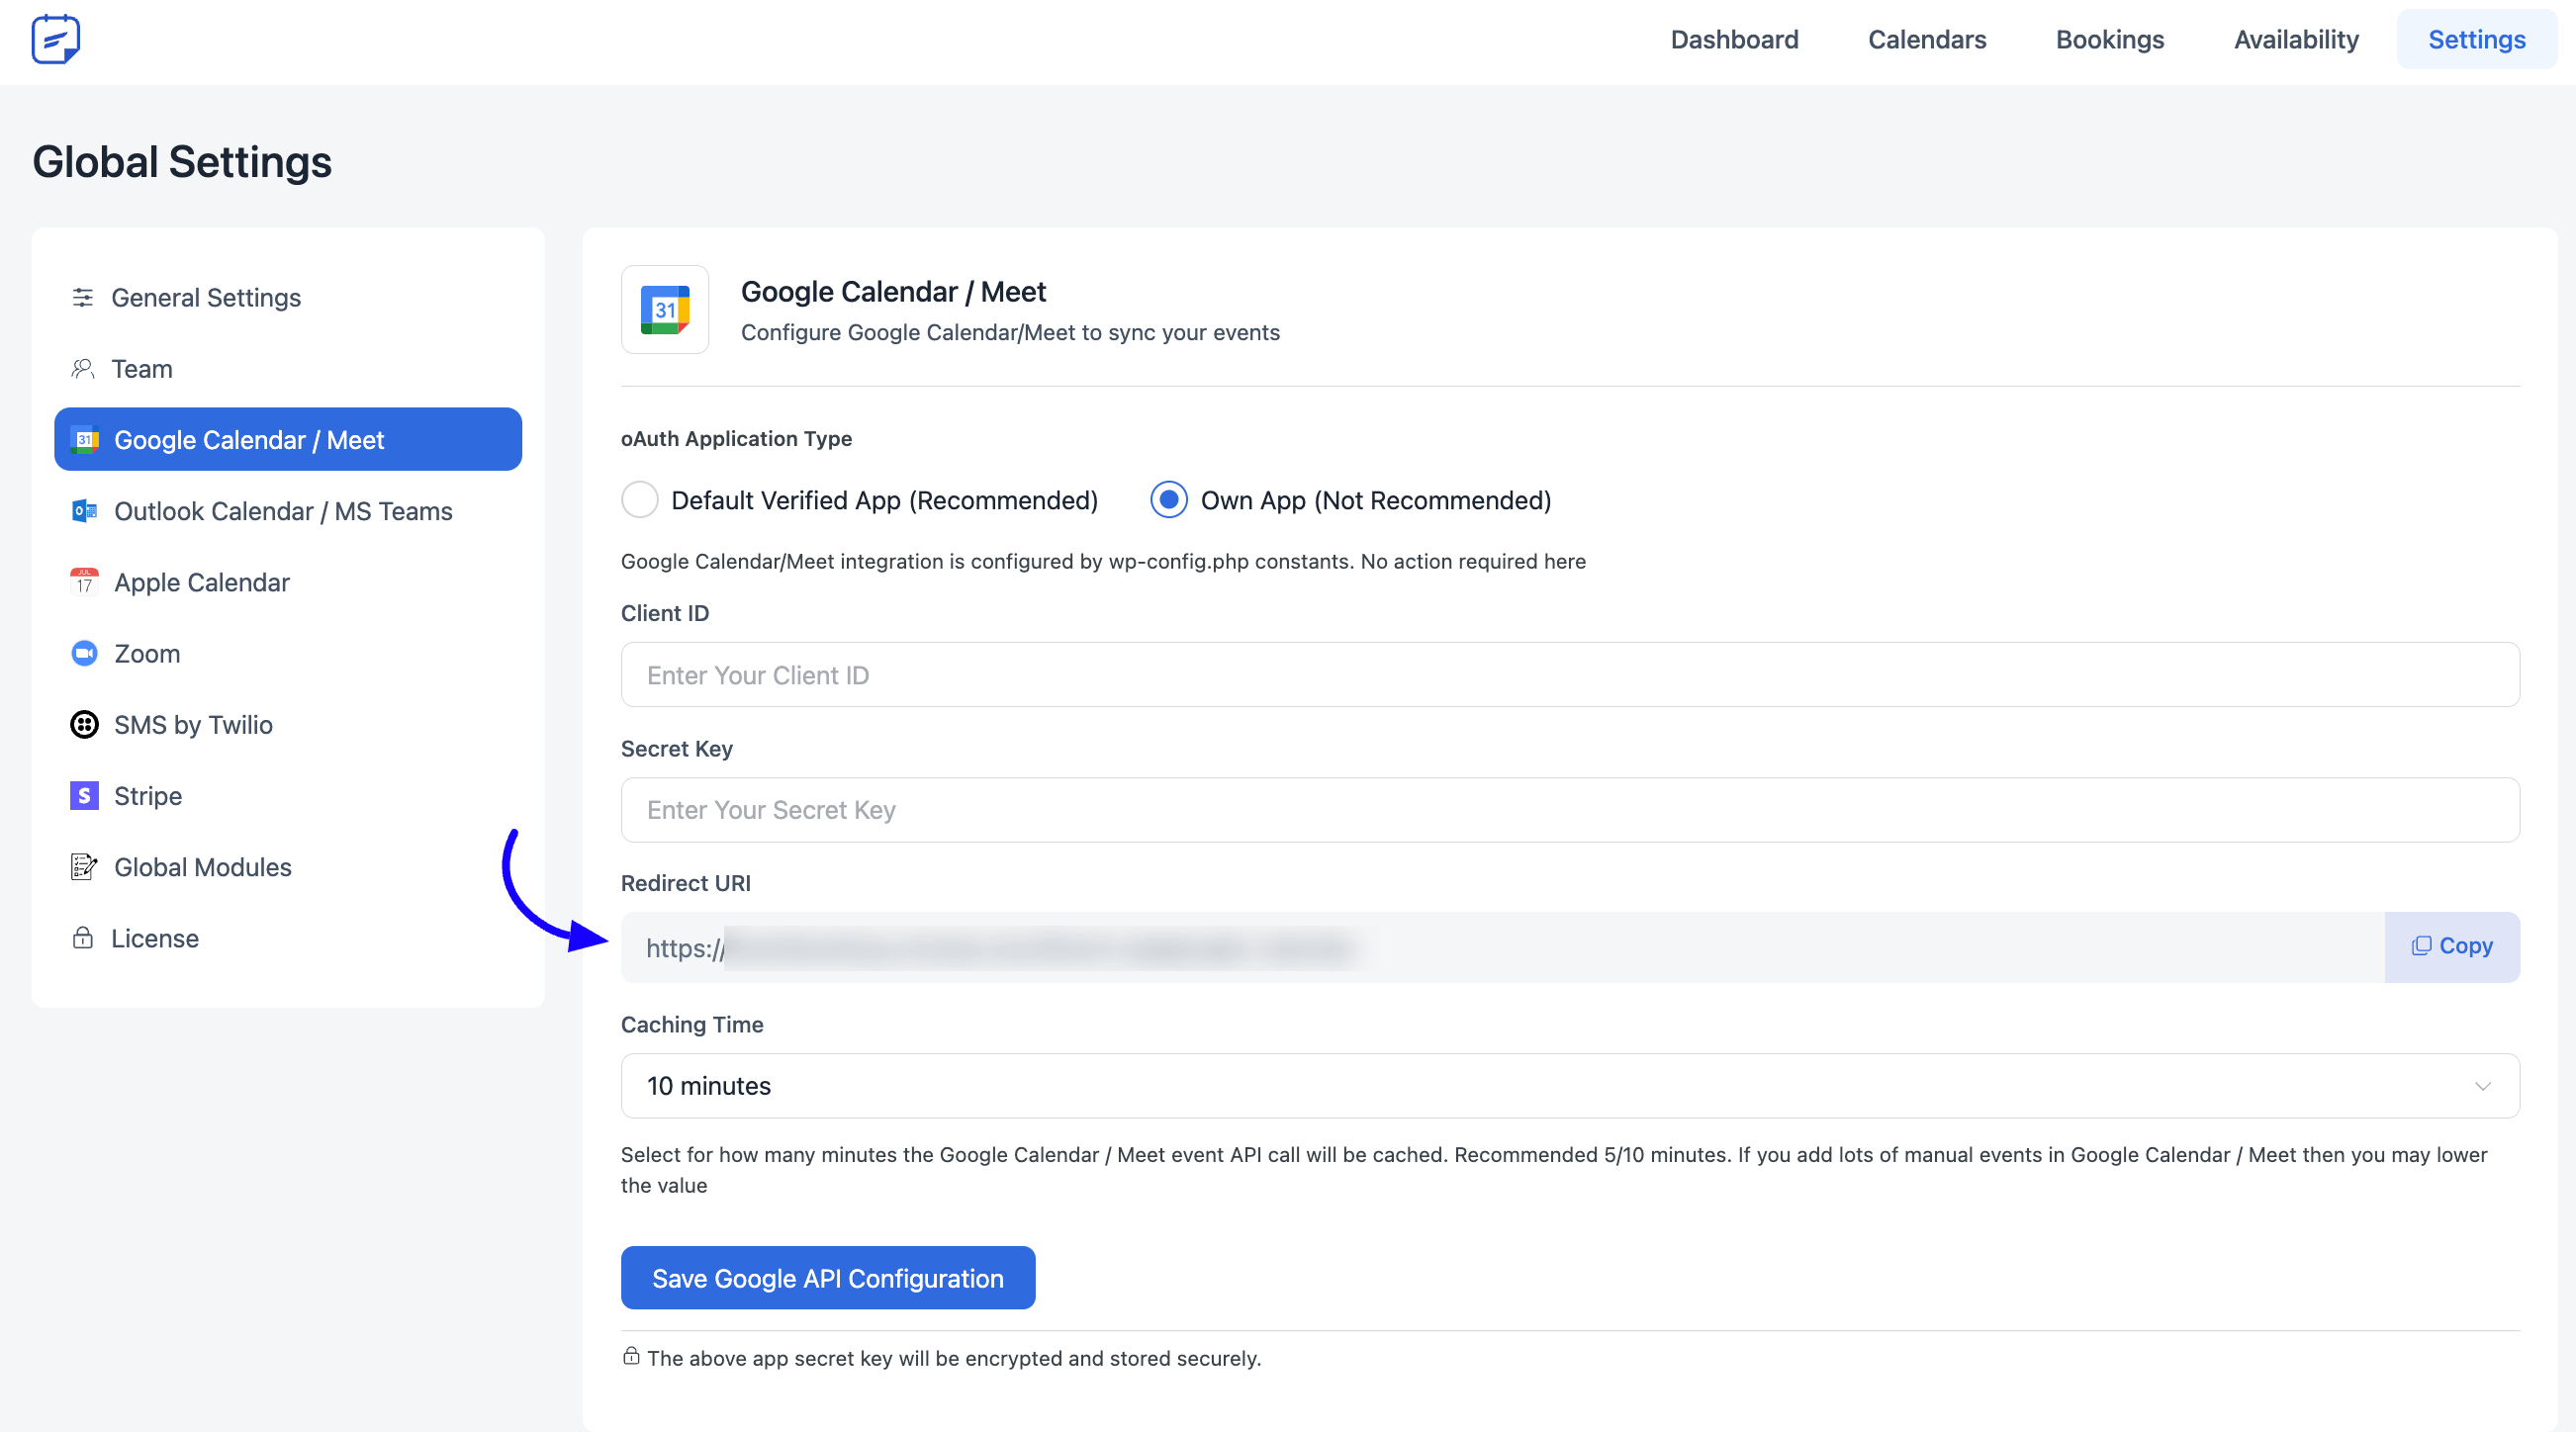
Copy the URL and paste it into the Authorized redirect URL field.
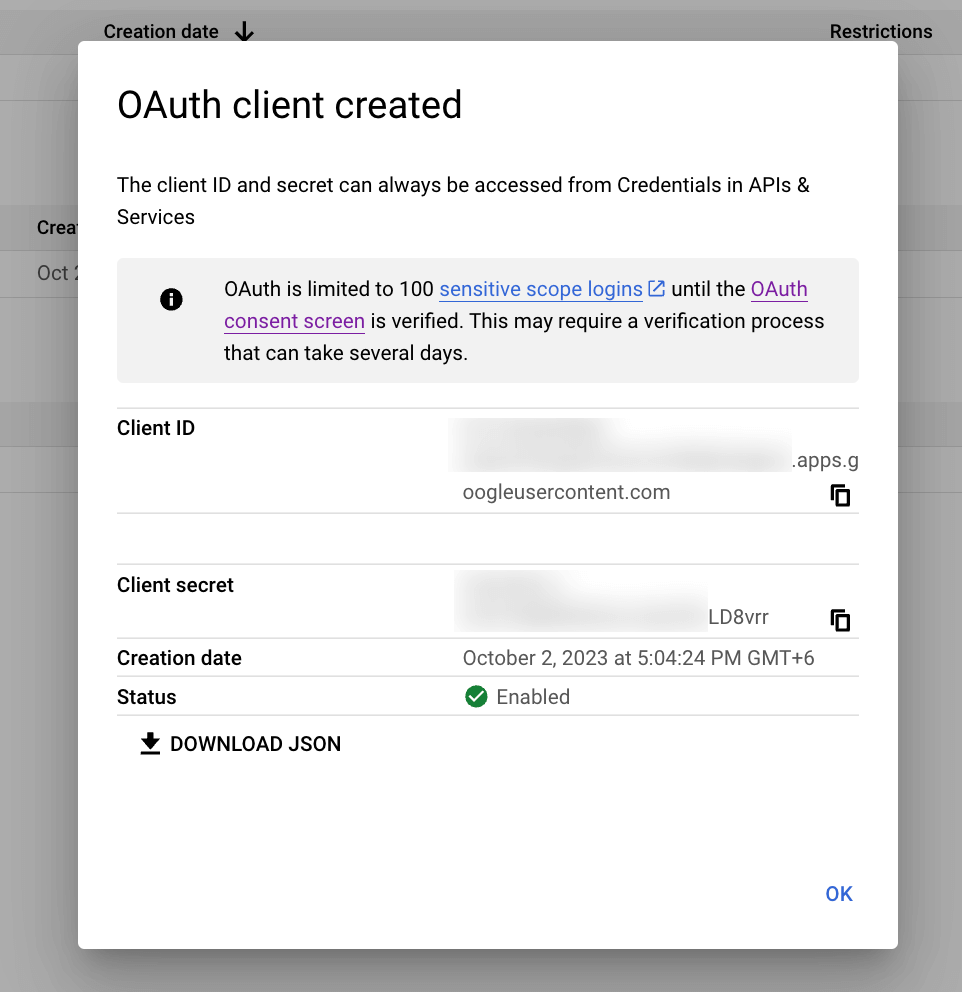
After that click on the Create button and a pop-up will show up with the necessary credentials.
Copy the Client ID and Client Secret from here.
Configuring Admin Google Calendar #
You must have to add an Admin Google Calender/Meet account in FluentBooking in order to use Google Calender/Meet integration.
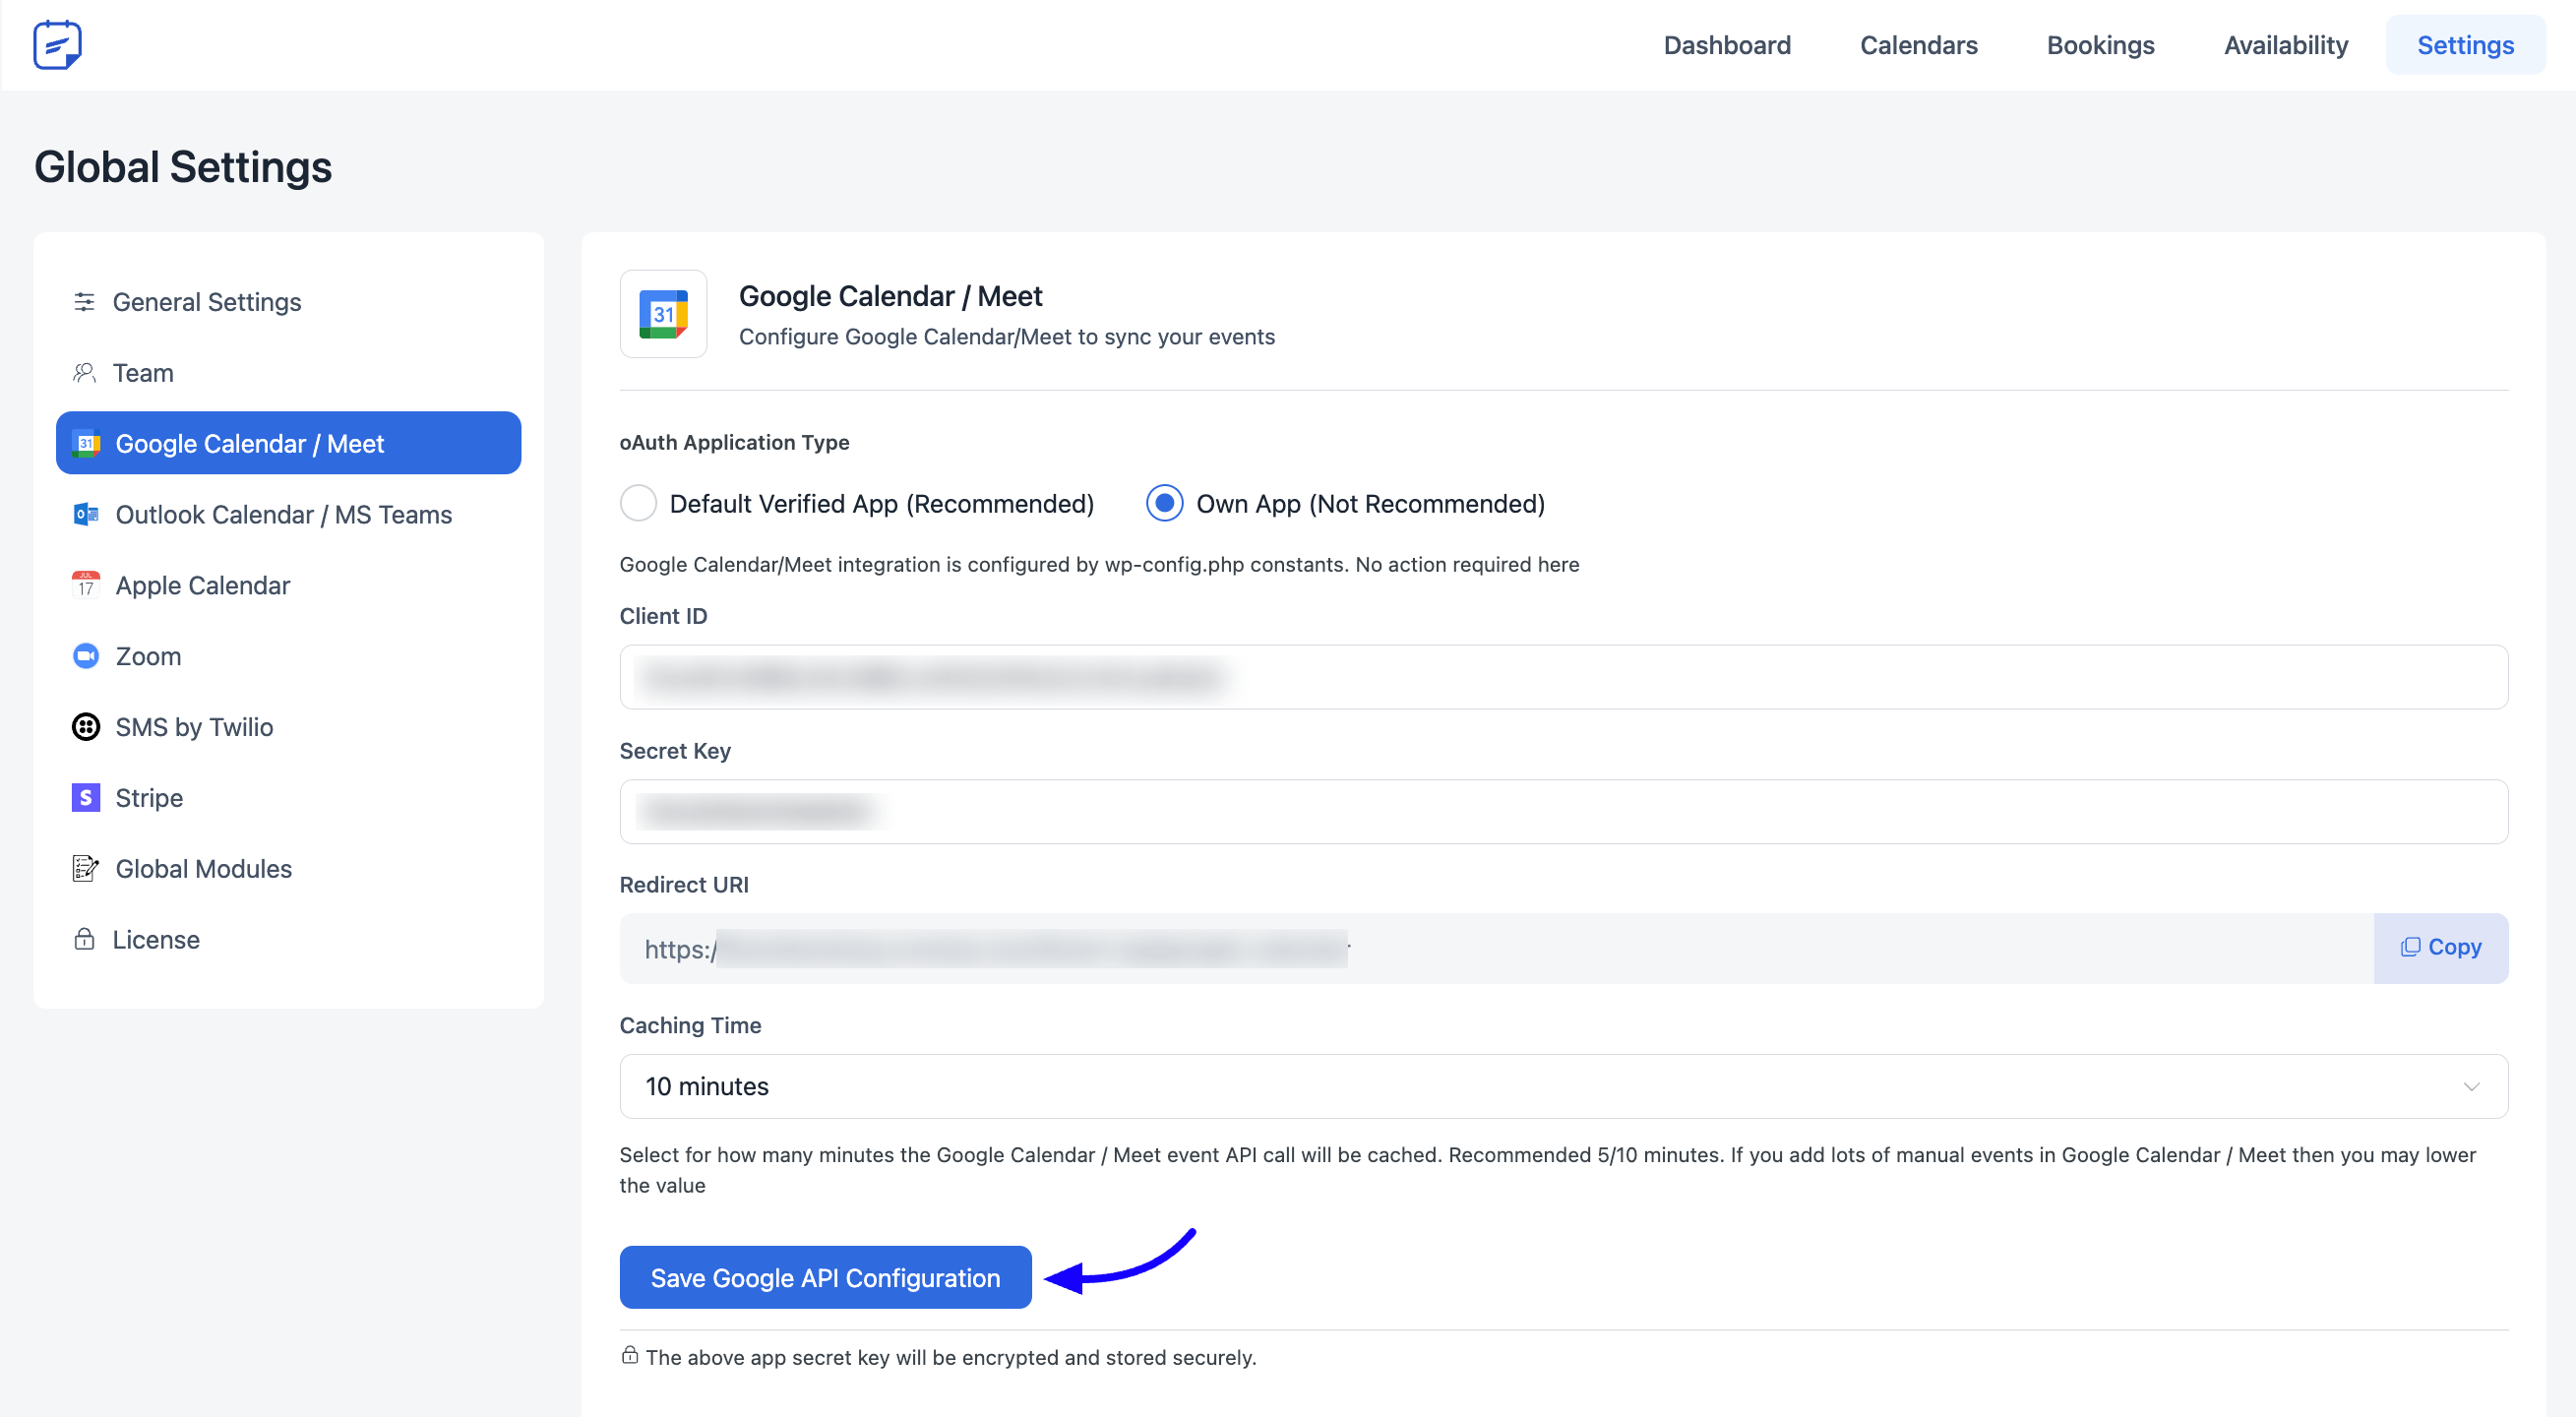
To add an Admin Google Calender Account go to your FluentBooking plugin Settings > Google Calendar and paste the Credentials (Client ID, Client Secret) to integrate FluentBooking with Google Calendar/Meet. Click on the Save Google API Configuration button and you will see a Success notification.
To synchronize your booking events with Google Calendar/Meet you have to connect your Google account to host profiles.
Configuring Host Google Calendar #
After setting up an Admin Google Calendar account you will be able to add a Google Calendar/Meet account for every individual host also the hosts can add their own Google Account to synchronize their booking events with their Google Calendar/Meet. You don’t need to re-configure Google OAuth Credentials to add a Google account for each host, as you have already connected the authenticator app. Hosts can add multiple Google accounts to manage their booking events.
To synchronize your booking events with Google Calendar/Meet you need to connect a Google account of yours. Go to Calenders > Host Settings > Remote Calendars now select the Connect with Google Calendar/Meet button.
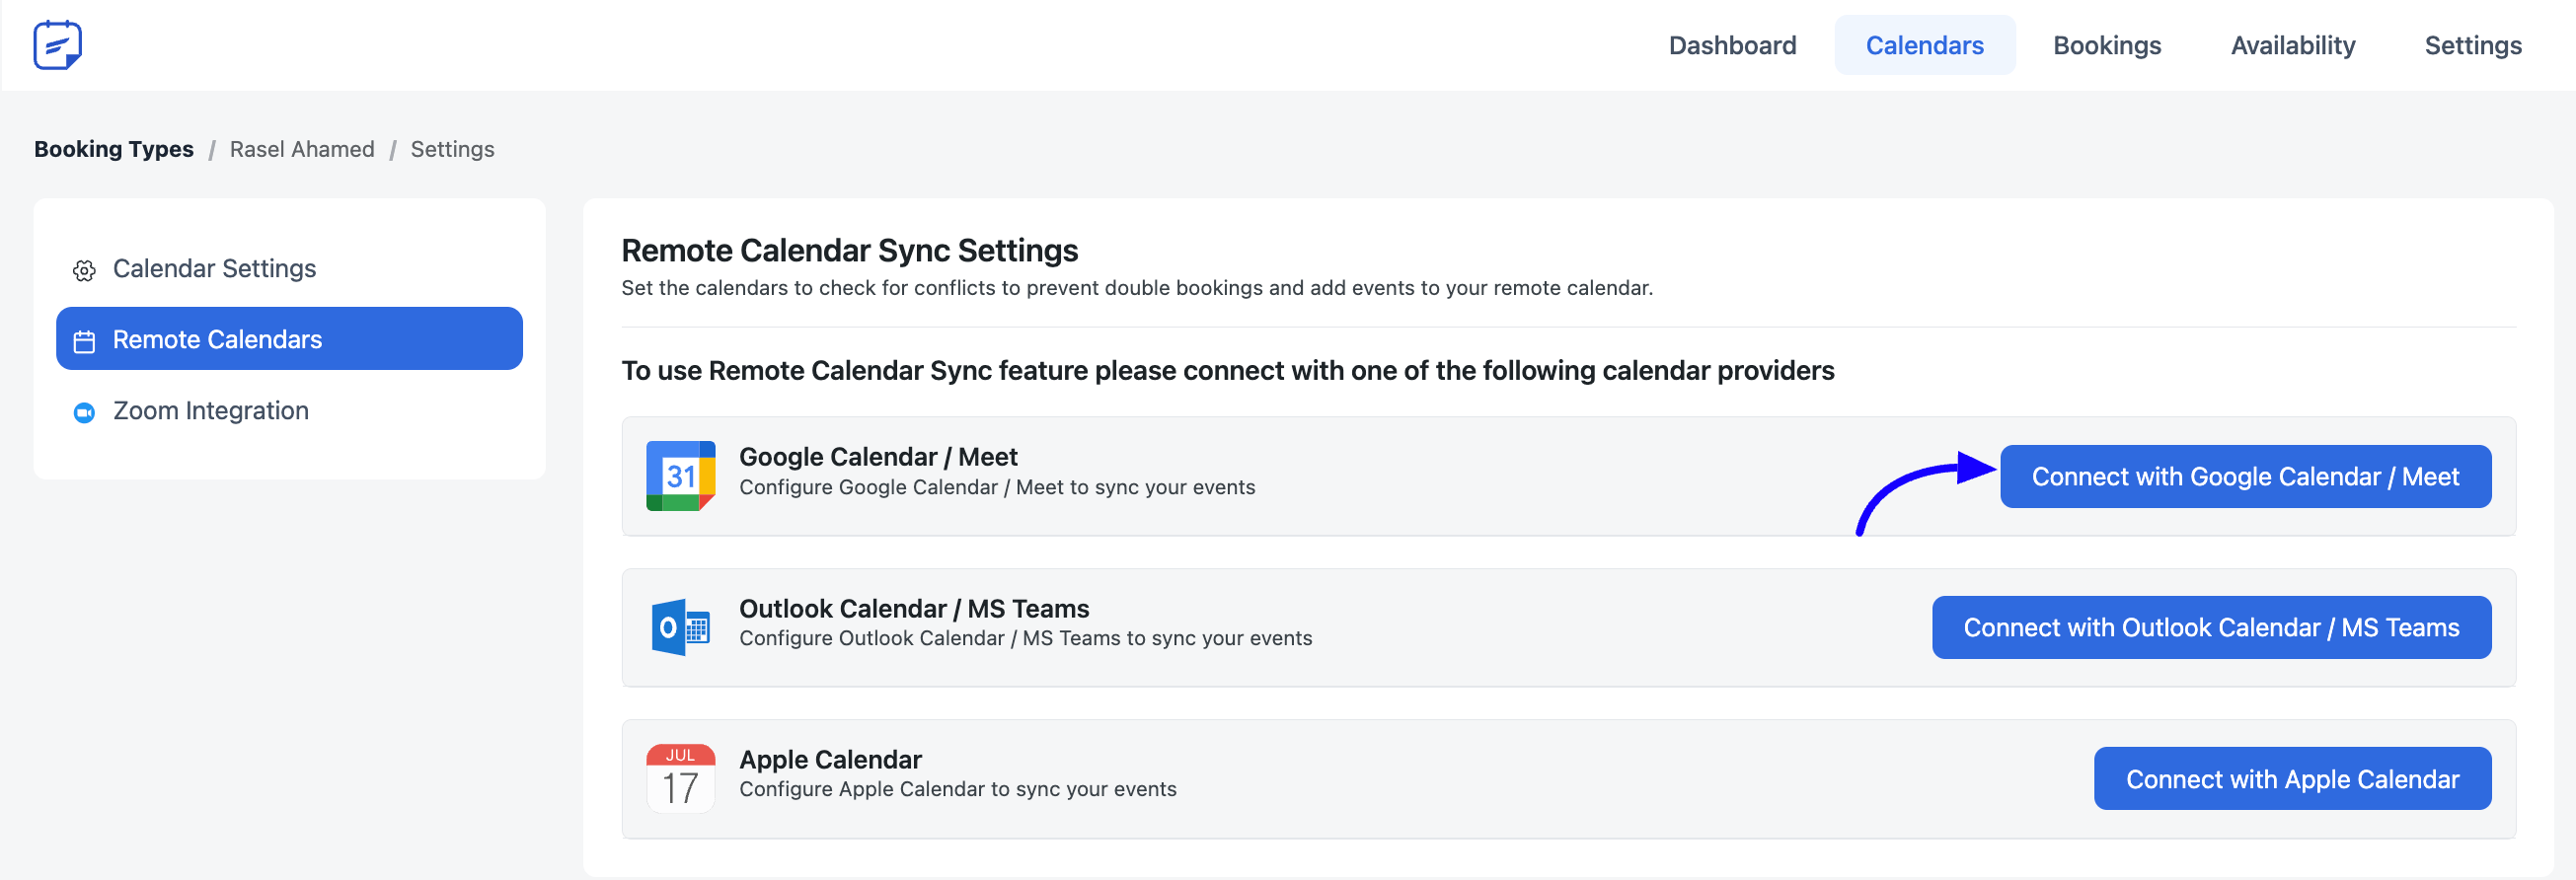
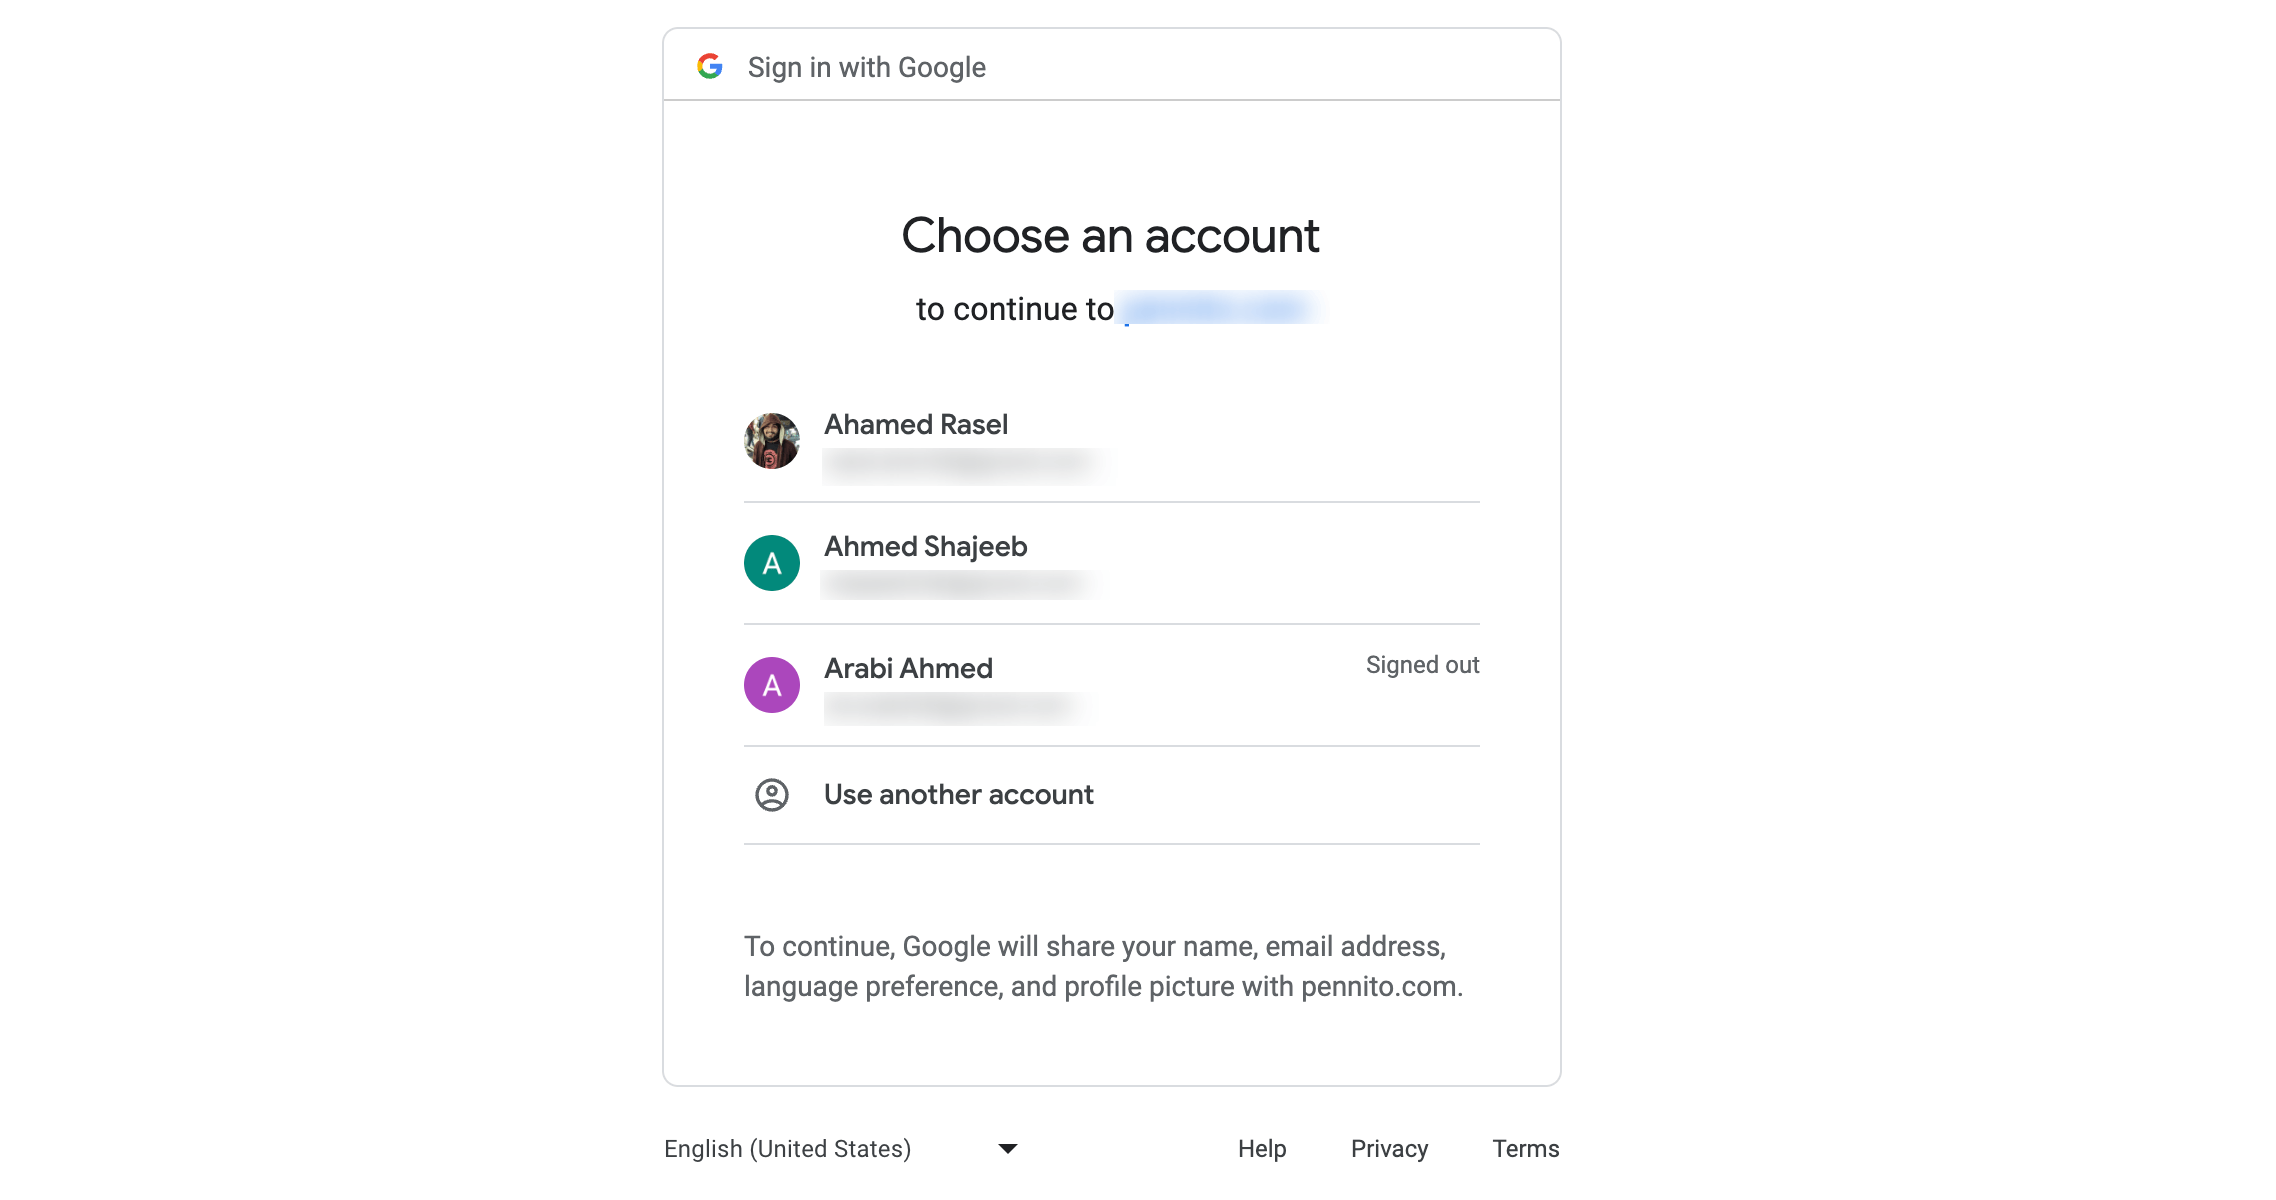
You have to log in or select the account you want to synchronize your FluentBooking events.
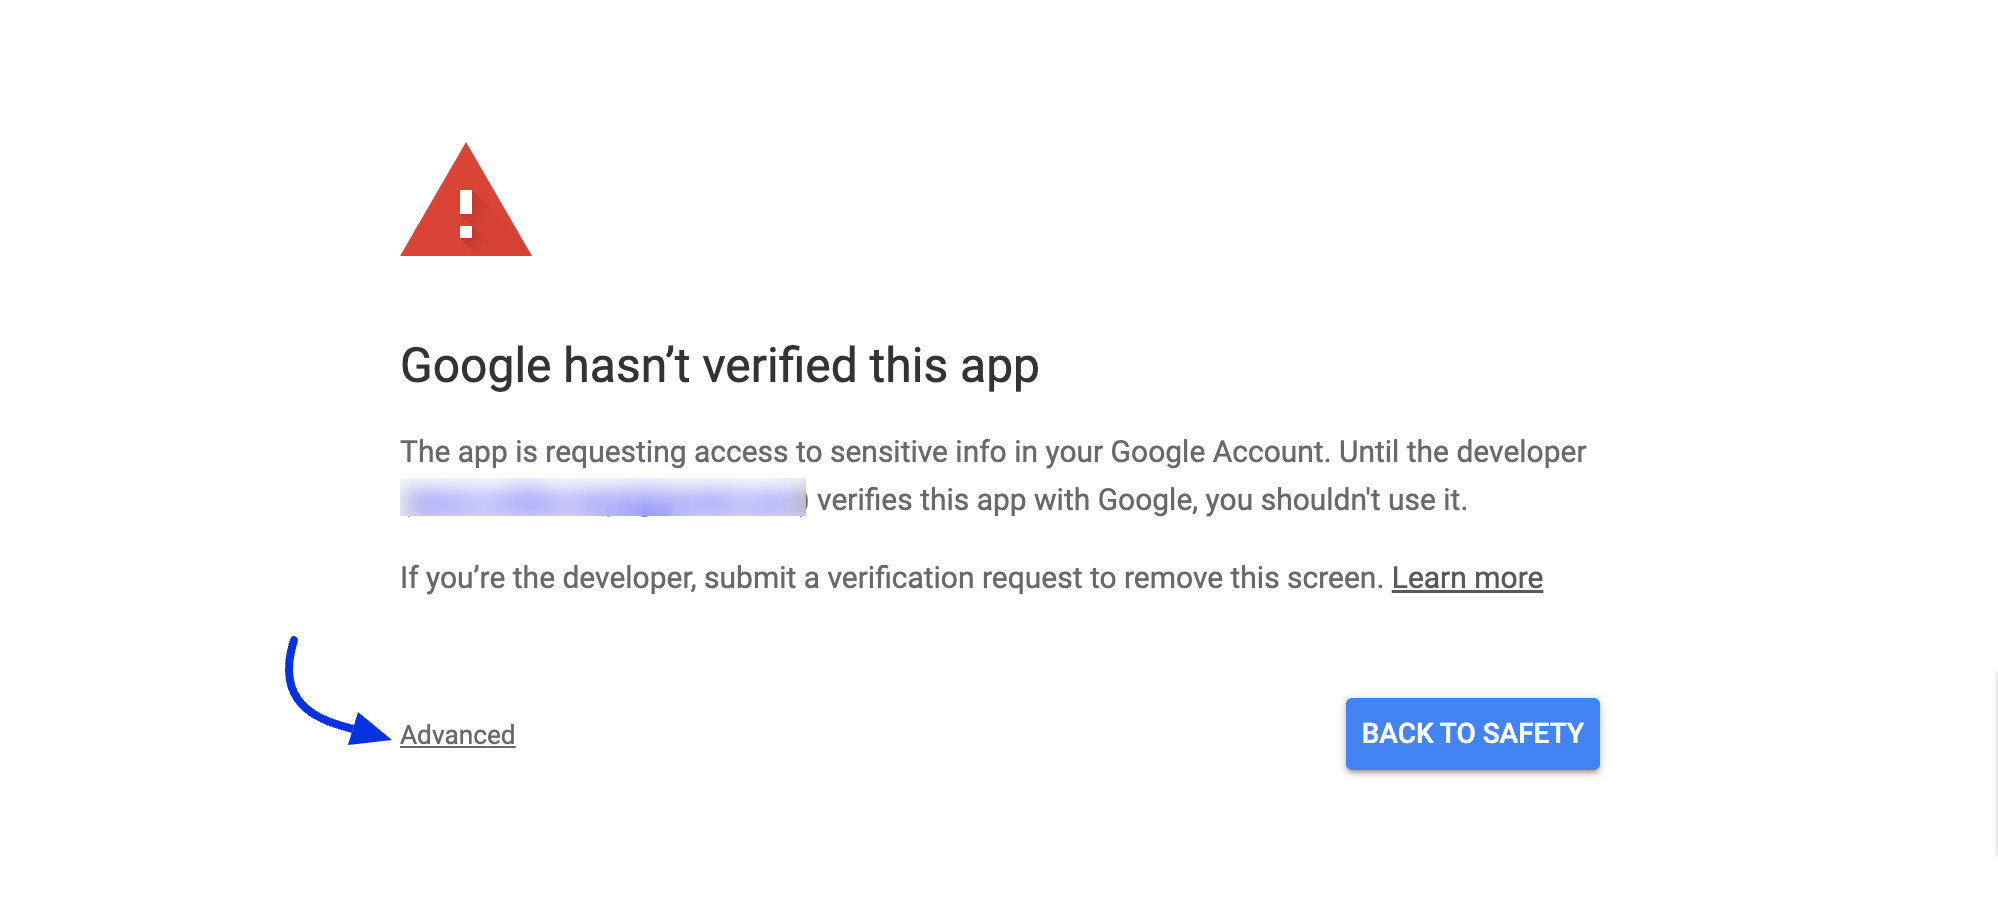
You will see a warning saying, “Google hasn’t verified this app”. Just click on “Advanced” just like in the screenshot below:
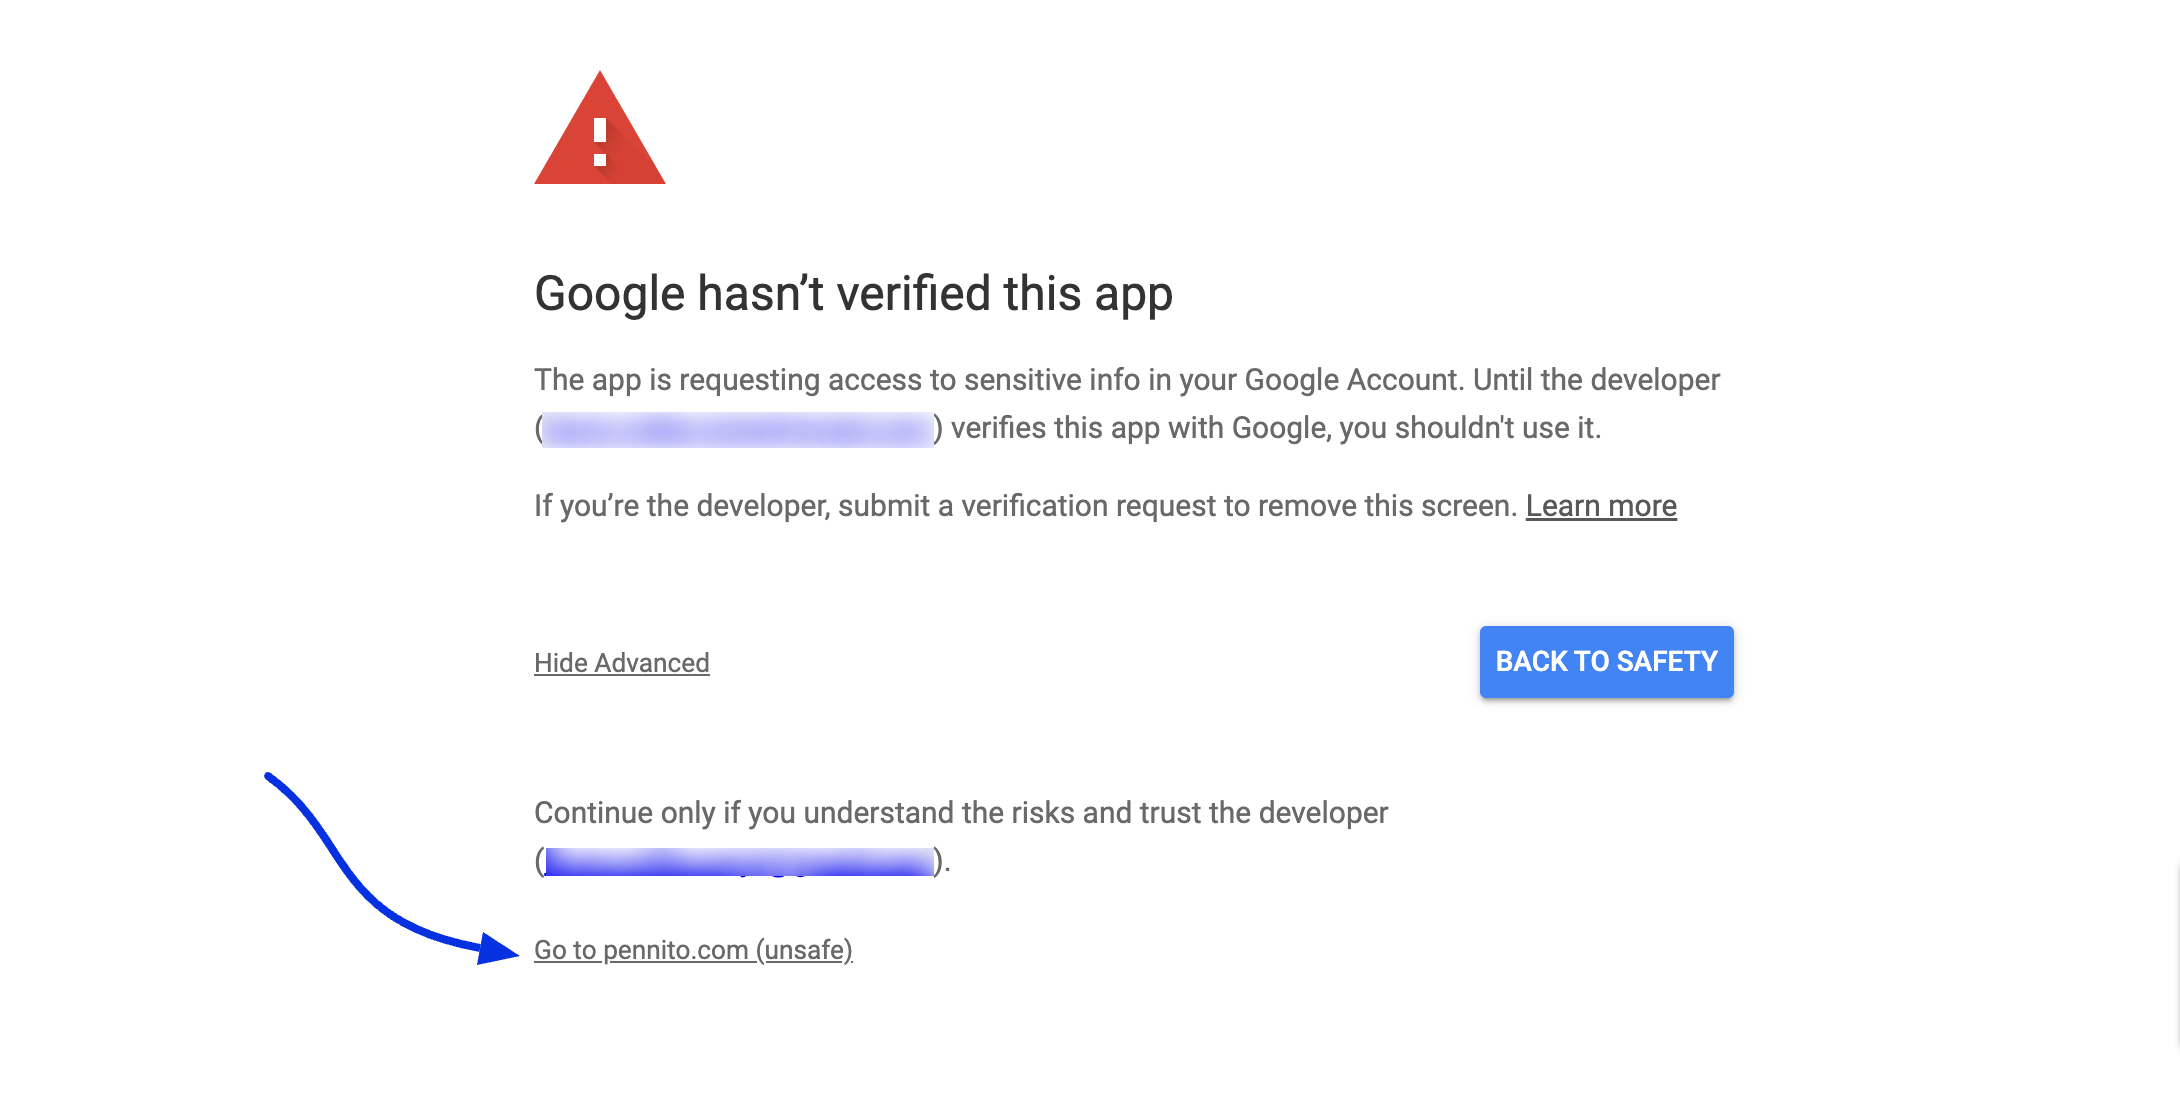
Now click on “Go to {yourWebsite.com}” and it will take you to the next step.
Lastly, select all checkboxes then click on Continue and your integration will be completely done.
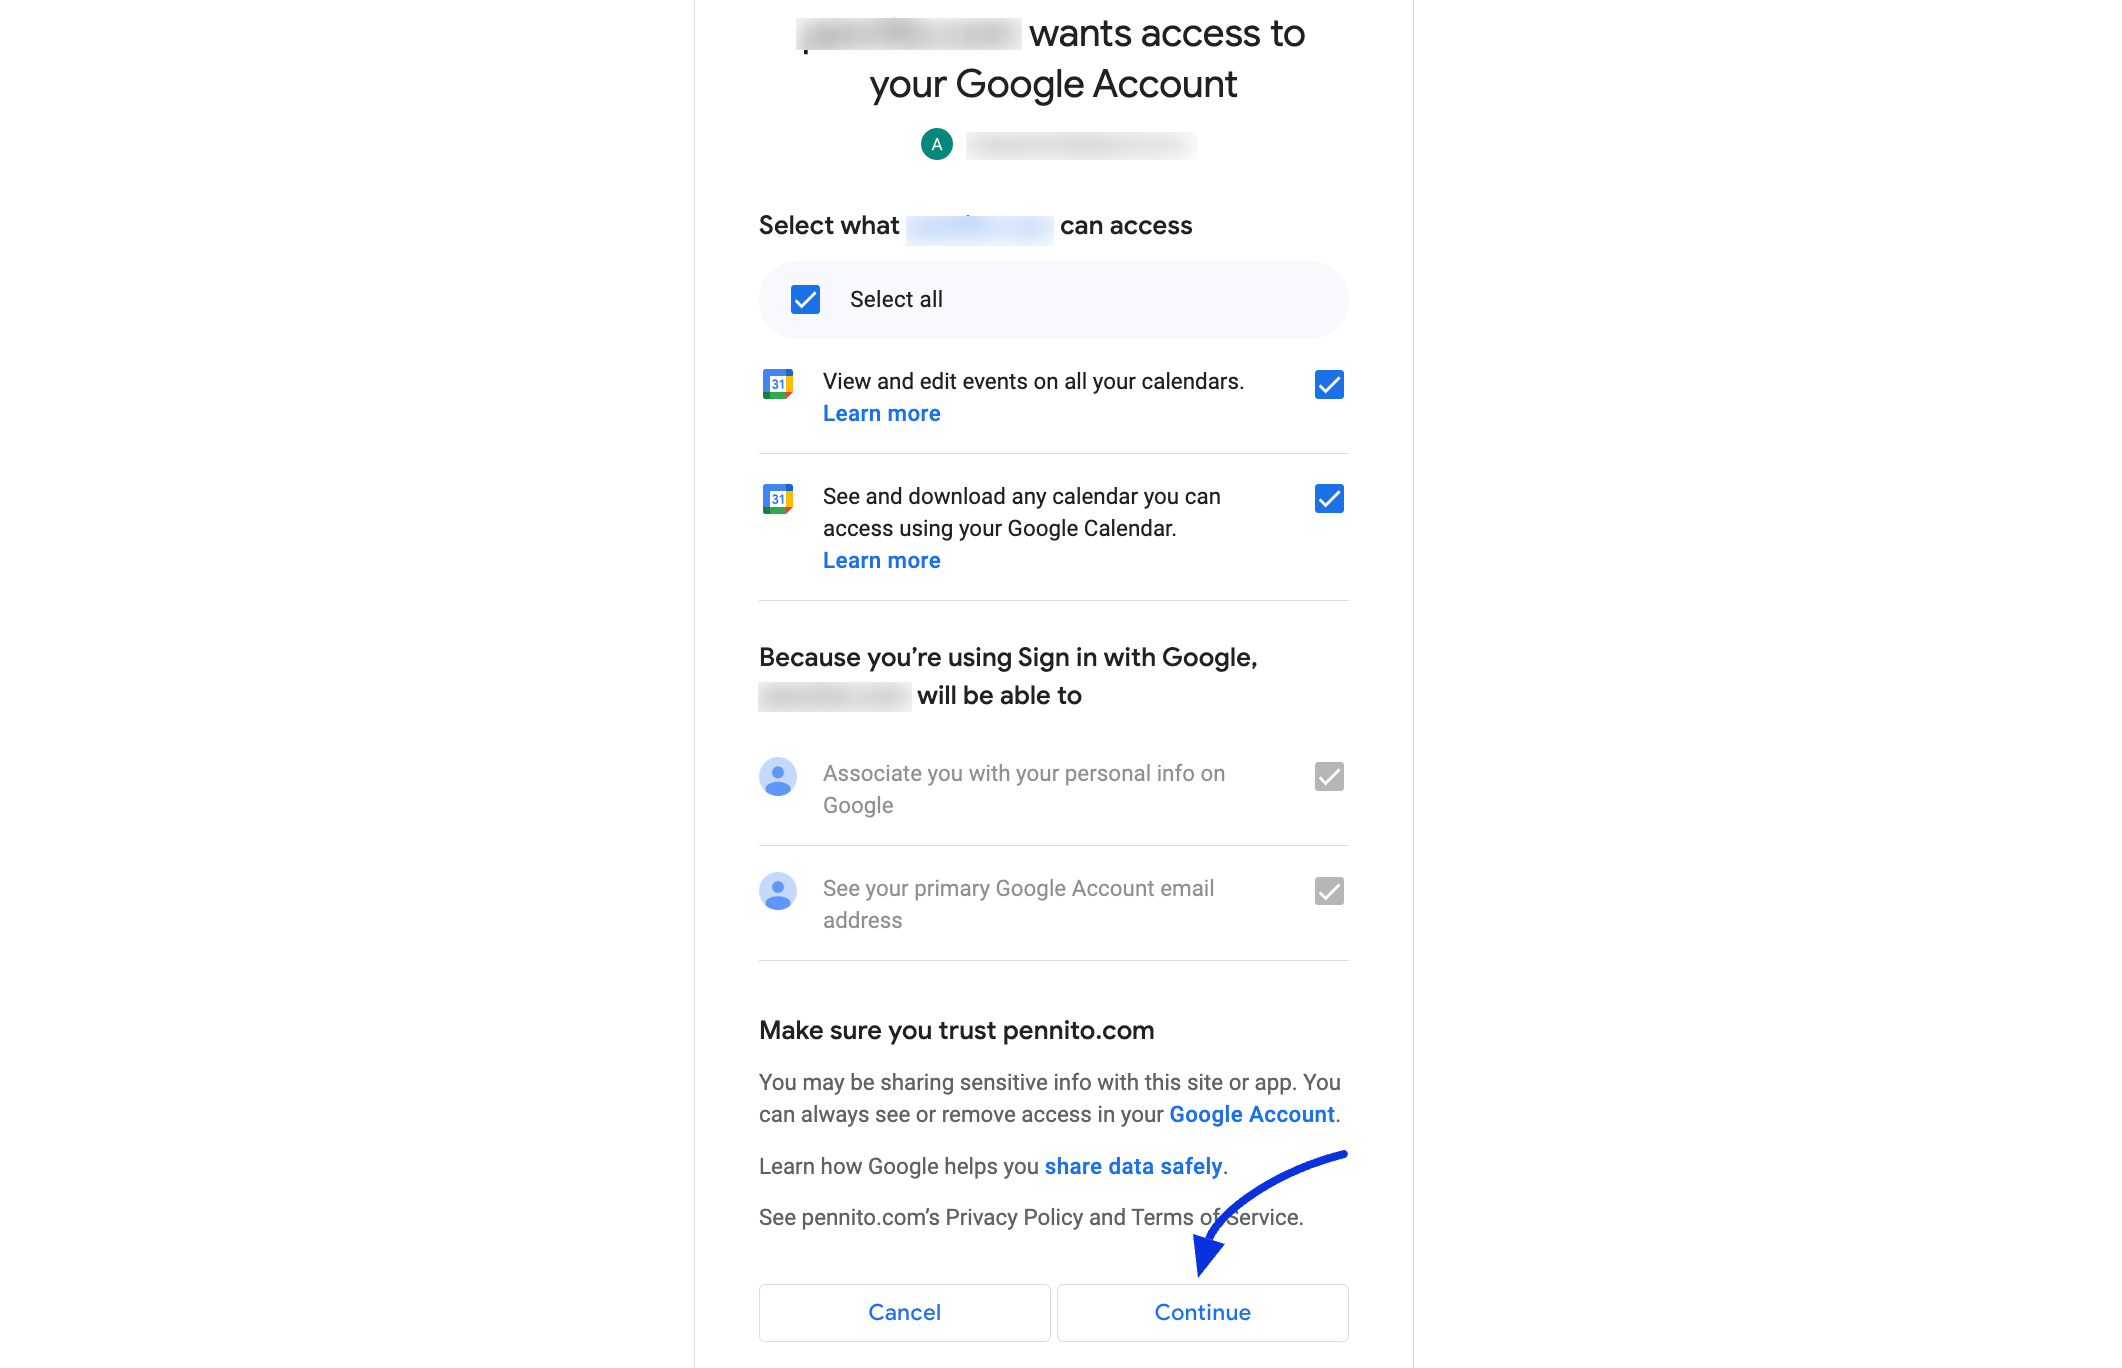
Congrats! You have successfully completed your integration with Google Calendar/Meet. Now Select the Remote Calendar and Enable it just like the below:

Your bookings can be found on your Google Calendar, just like in the below screenshot:
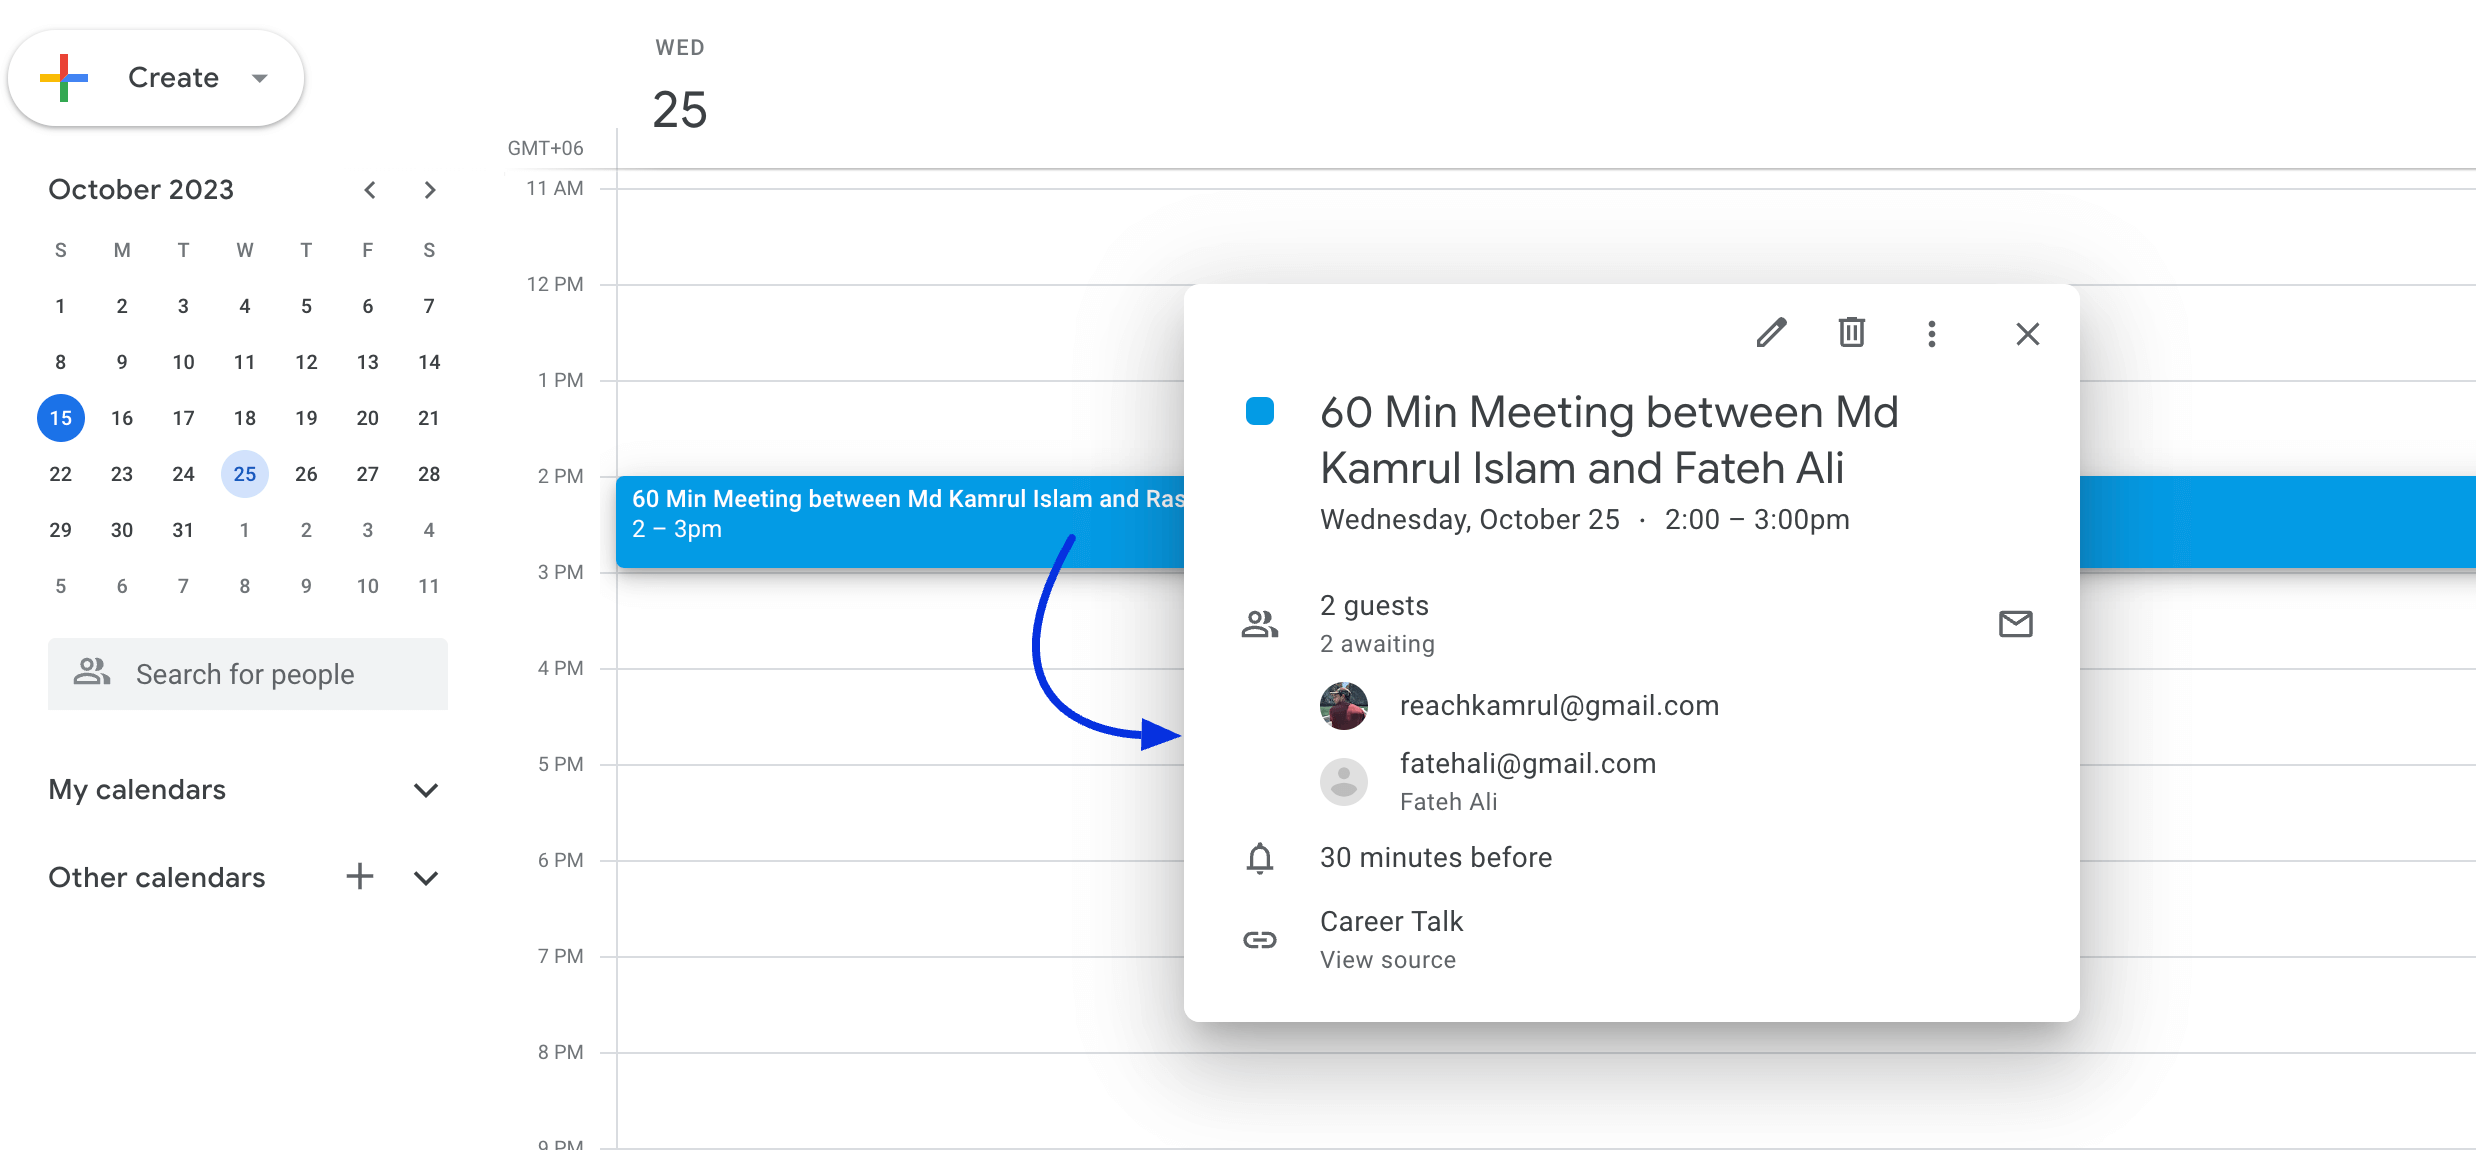


Hello! Is is possible to sync all the existing bookings with Google Calendar? Thank you!
Hey Erin,
Currently it’s not possible.
Hi there, will it become possible to sync all the existing bookings with Google Calendar when switching to the pro version of the plugin? Thank you!
If the host don’t use Remote Calendar Sync feature he can’t recevice any notification if a customer book a session ?
Hi there,
If an appointment is booked on my website and my Google Calendar is synchronized – will Google Calendar also send the notifications emails?
Will the notifications be sent out by both, my website and Google Calendar?
Can we avoid the notifications by Google Calendar?
Hi Khristt,
If Google Calendar notifications are enabled in FluentBooking, Google Calendar will also send notifications. You can enable or disable the Google Calendar notifications from Calendars > Host Settings > Remote Calendars.
When someone books a meeting – if I have google calendar integration, the meeting is automatically added to my calendar. Is it also automatically added to the user?
Hi!
Are we able to edit bookings directly in Google Calendar and have that be reflected in our FluentBooking platfrom? I read in one of the previous comments that it was possible to add an appointment directly in Google Calendar and have that be reflected in FluentBooking. But so far, I haven’t been able to do that. Only when I book an appointment directly from FluentBooking does it show in my Google Calendar.
Hi Jime,
I think you are in some confusion, and let me clear that up. FluentBooking supports two-way sync with Google Calendar to avoid scheduling conflicts between your FluentBooking events and Google Calendar events. However, there’s no edit/update support, so any editing in Google Calendar won’t reflect in FluentBooking
Can you setup a booking that checks the availability of 2 hosts, so you can book a time slot with them both?
Hi midevmanager,
Yes, it’s possible if you use the Round Robin meeting feature in FluentBooking.
I’ve created a round robin, all hosts have connected their Google/Meet accounts in their host settings, BUT I am not allowed to select Google Meet in the ‘Location’ drop down box. It still says ‘All hosts need to Set Google Event Creat First’. What does this mean? How do I sort it?
Hi Kate,
You need to select the connected Google account under ‘Remote Calendar Sync Settings.’
Hi,
I have integrated Fluent Booking with Google Calendar successfully. However, i would like to ask if there is a way to set an appointment on google calendar directly and that also appears (blocks) in fluent booking?
Thanks
Hi Laura,
Yes, you can set appointment in Google Calendar and it’ll appear in FluentBooking.
How can you remove the integration if you want to disconnect Google Calendar from the booking calendar?
Hi Bea, You can disconnect Google Calendars by going to Host Settings>Remote Calendars and click the delete button.
sorry found the error, maybe a hint in the documentation would have been great 🙂 you can delete this comment
Hi Leon, Happy to see you’ve fixed the issue. We’re about to release a one-click integration for Google Calendar so we’ll keep your suggestion in mind for our future documentation.
Hi Team, I connected everything but sadly the appointment is not showing up on my google calendar. What could be wrong?
Is there some news about external user issue?
Hi Francesco, We will release an update solving the external user issue this week.
Hi, is there a 2way sync with the Google calendar?
Hi Heiko, yes, it’s a two-way sync.
This is precisely the type of Google Calendar integration that I have been requesting WP Amelia to incorporate! It seems like it’s time to make the switch, as Amelia has been a major source of frustration in numerous ways. Although it boasts features that meet all of my requirements, the majority of them have been implemented in a way that renders them completely useless for my purposes. Despite having purchased an LTD of Amelia over a year ago, I have yet to use it on a single project for which I originally bought it, as it only provides the bare minimum in order to add another feature to their list. For instance, their Google Calendar integration can only verify availability against a single calendar per account! As a result, if you have a business calendar and another personal one that you want to check for busy time slots, you’re out of luck with Amelia. However, based on the documentation above, FluentBooking appears to be more similar to SSA’s configuration options, allowing us to select multiple calendars to check against while also enabling us to choose which calendar to add the bookings to – precisely what I’ve been seeking.
Hi Ingo, thanks for the kind words. The integration will become even smarter this week. Stay tuned!
These are the most complicated instructions I have ever seen.
Hi Ry, we’re sorry you’re having trouble understanding the documentation. We are planning to release Google One-click integration which will make it simpler. 🙂
Why would you even release the product without that?
I also find the set up horribly complicated and not in line with the ease of use of your other products. Would not have purchased if I had known that I have to set it up like this.
Please fix this.
Hi Joe, most WP appointment plugins I know use the same method for Google Calendar integration. We went the extra mile to get an app for one click integration which is coming very soon. Hope this explains why we released the product. 🙂