The Coupons feature in FluentBooking Pro allows you to offer discounts for your paid events. Creating and managing coupons is an excellent way to run promotional campaigns, reward loyal clients, or boost bookings during slow periods. This guide will walk you through enabling the feature and creating your first coupon.
Enabling the Coupon Module #
Before you can create coupons, you must first activate the coupon module, which is part of FluentBooking Pro.
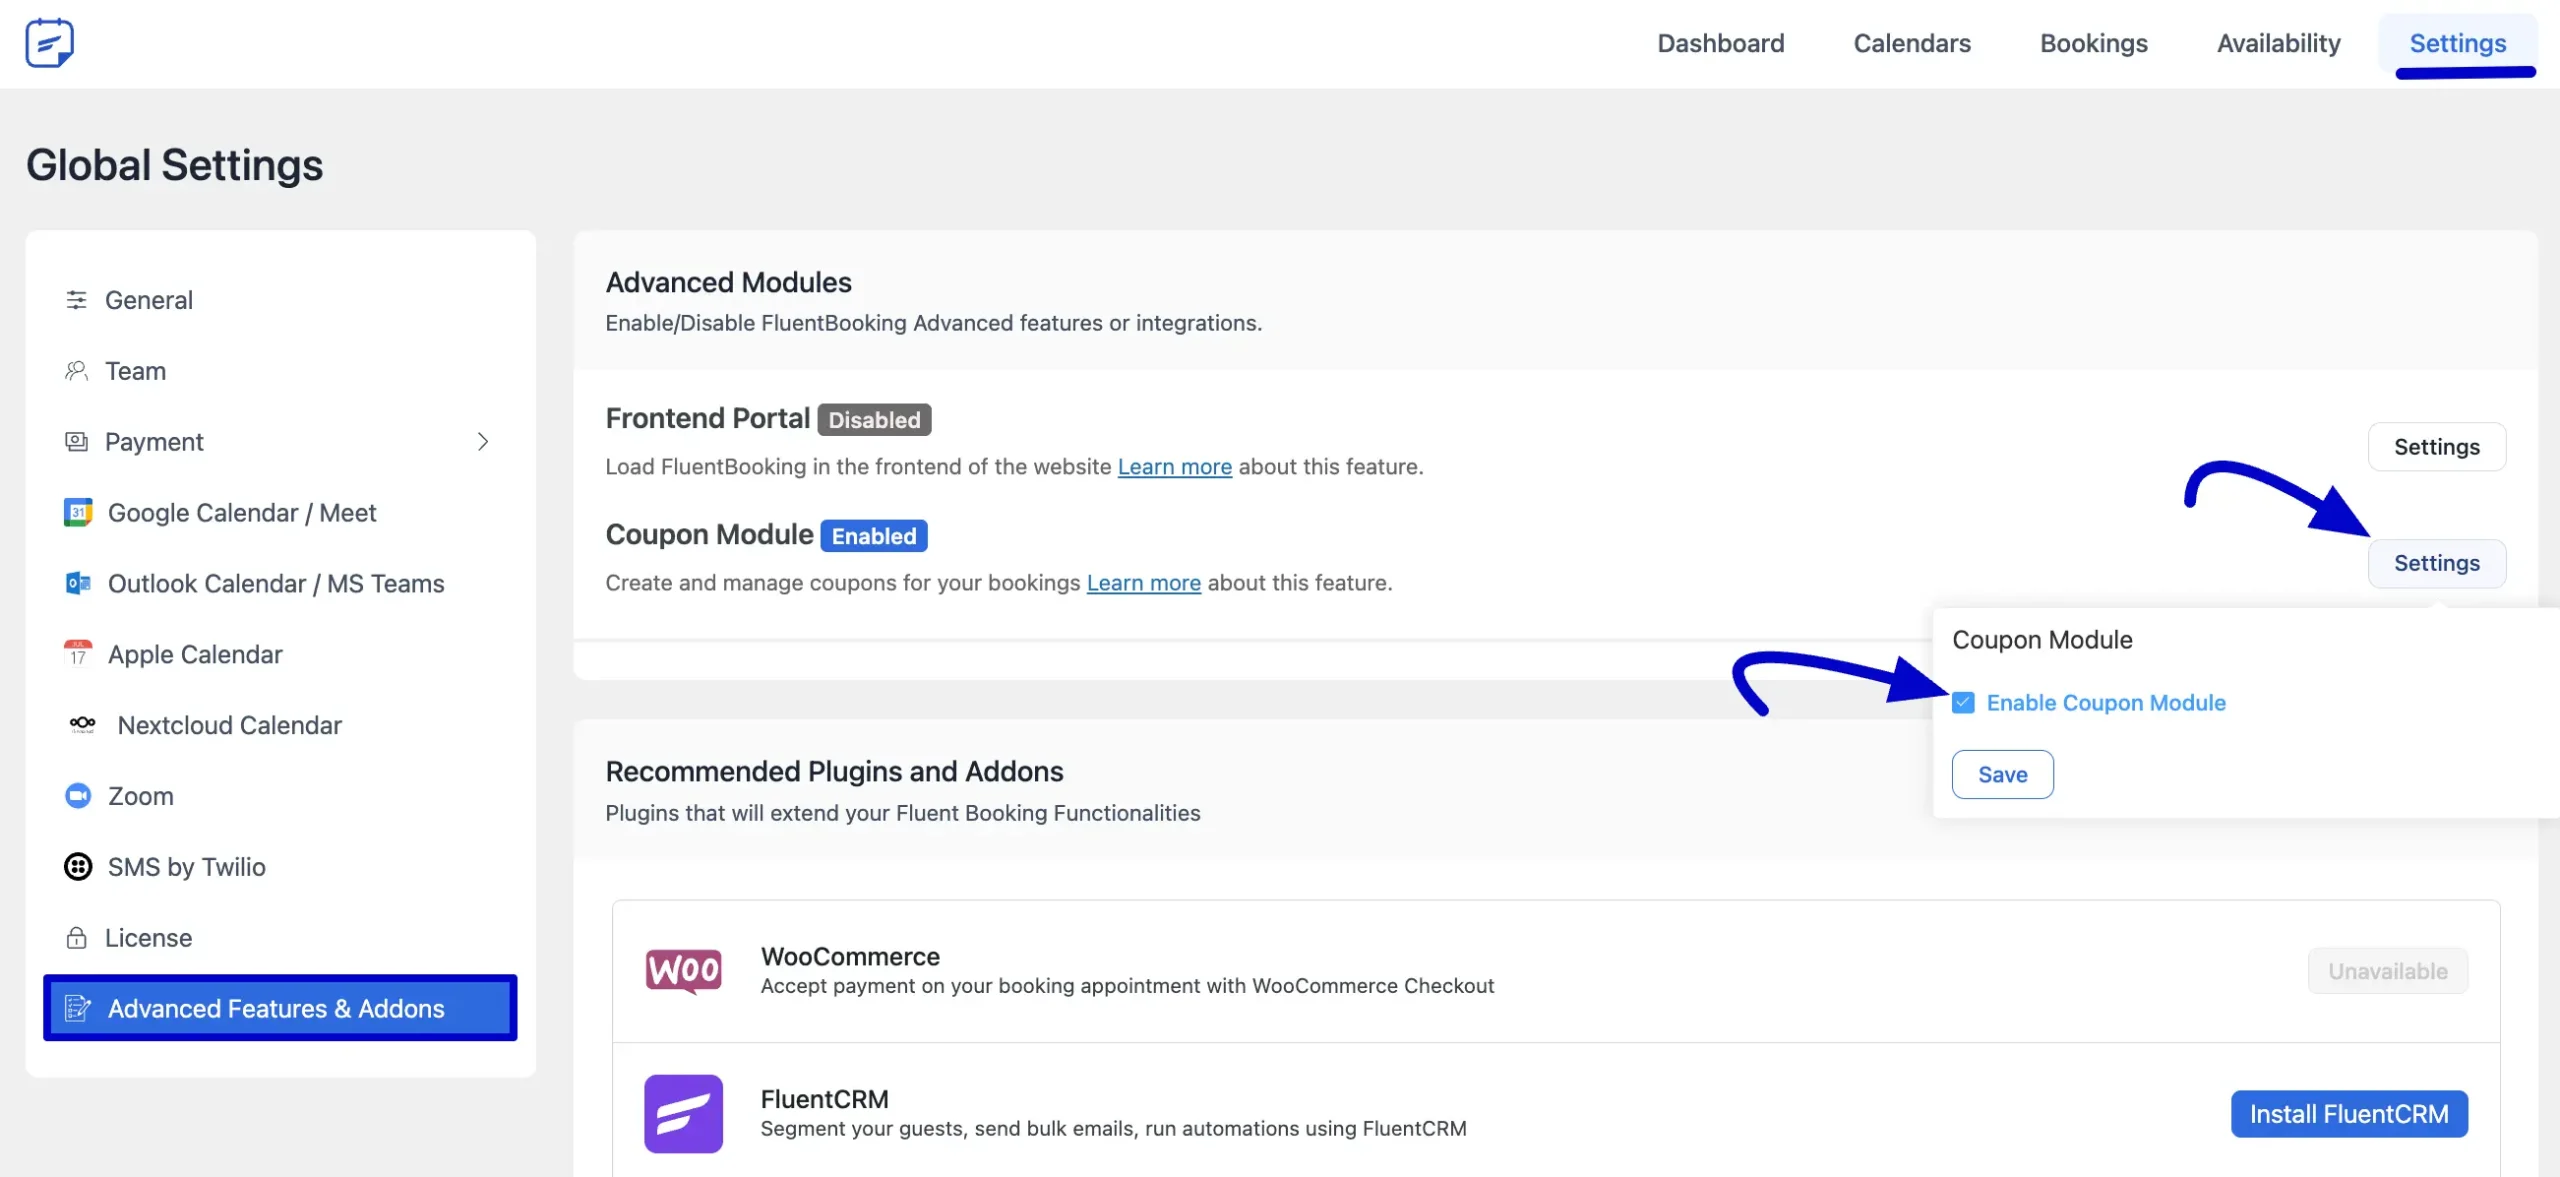
To do this, go to your FluentBooking Settings and select Advanced Features & Addons from the sidebar.
Find the Coupon Module in the list, click its Settings button, and then check the box in the pop-up window to enable the feature before saving your changes.
Creating a New Coupon #
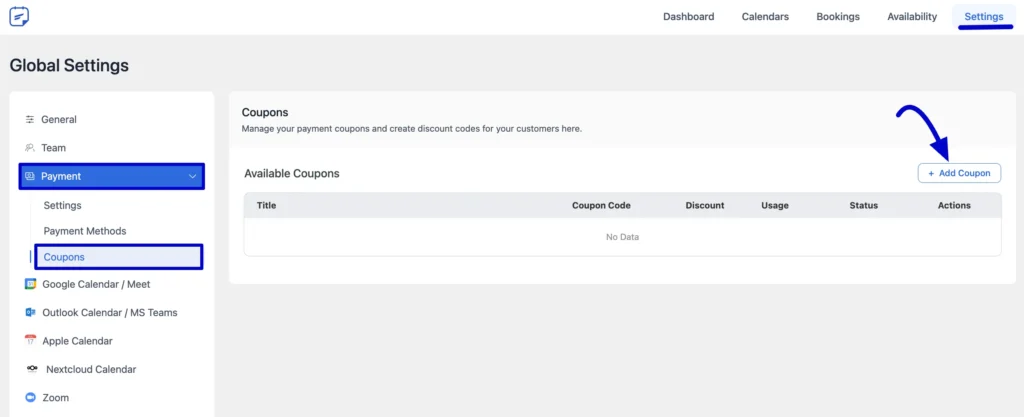
Once the module is active, you can start creating coupons for your paid booking events. Return to the Settings page, which unlocks payment options in the Pro version. Then, navigate to the Payment tab on the left.
From there, select the Coupons sub-tab, where you will see a list of all existing coupons. Click the Add Coupon button at the top of the page to begin configuring your new discount.
Configuring Your Coupon #
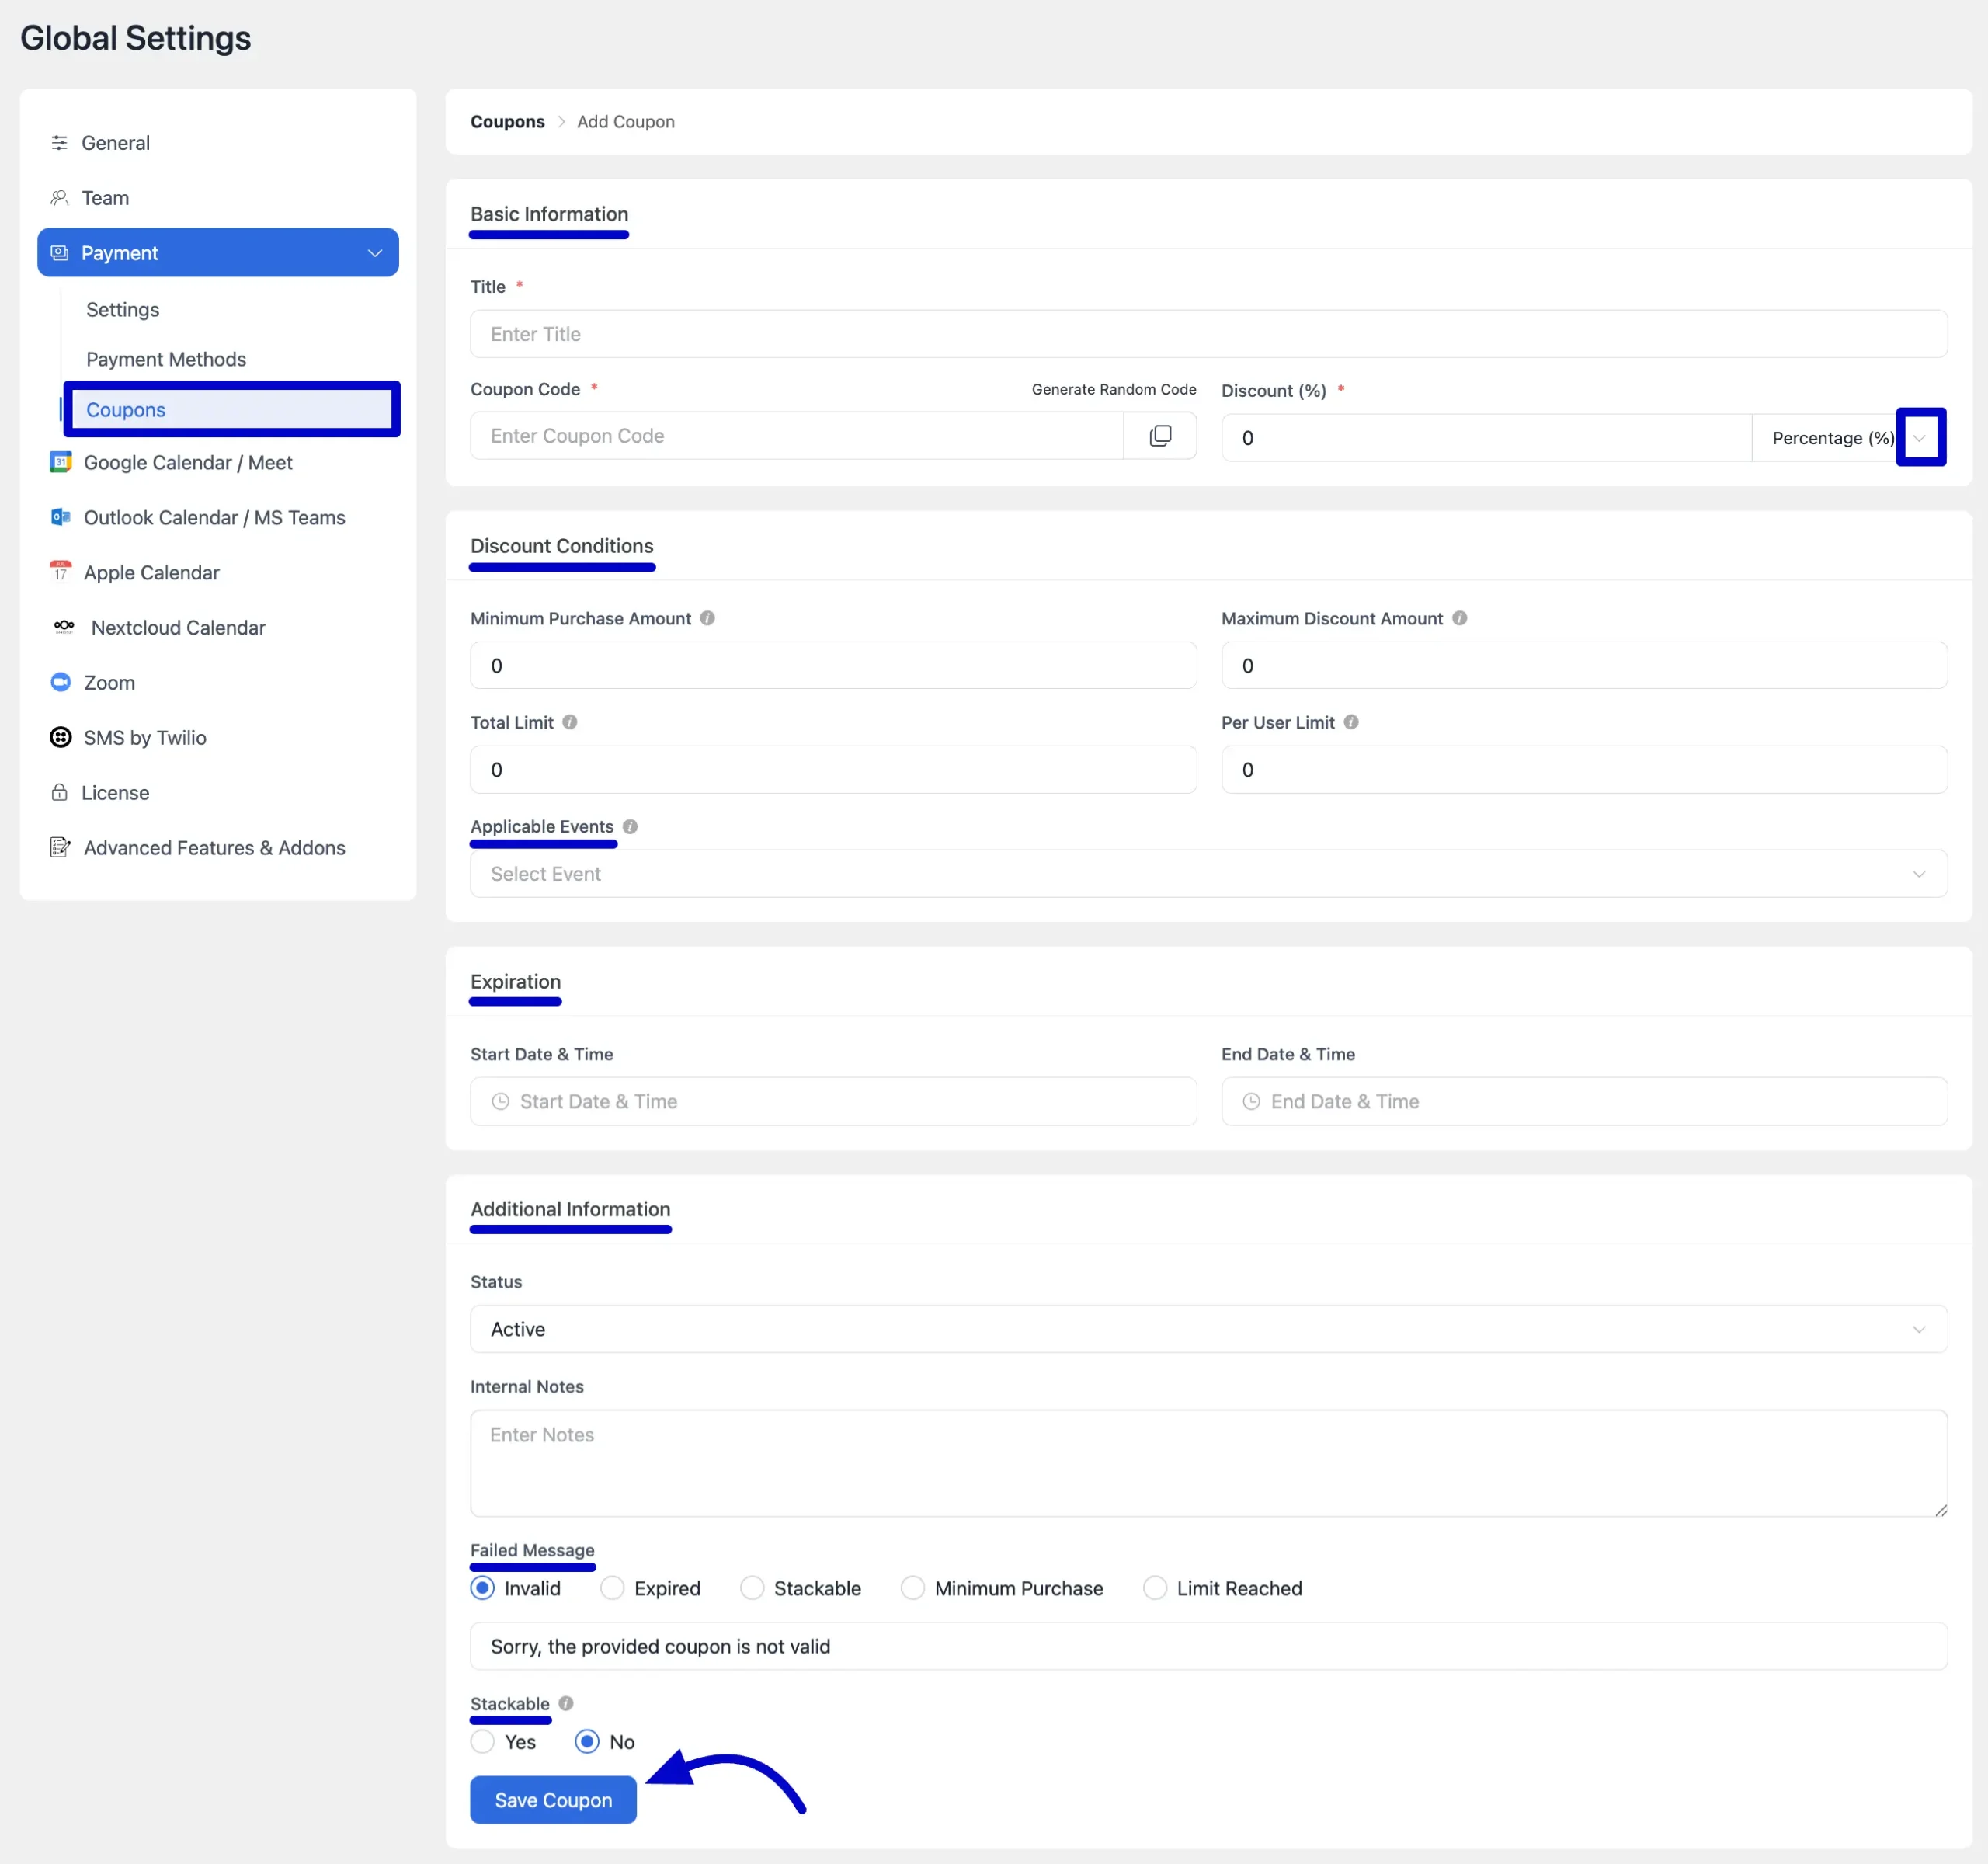
Fill in the following fields to define how your coupon will work.
Basic Information #
- Title: Give your coupon a recognizable name for internal use (e.g., “Summer Sale 2025”).
- Coupon Code: Enter the code your clients will use at checkout (e.g., SUMMER25). You can also click Generate Random Code for a unique, secure code.
- Discount: Enter the discount value. You can choose between a Percentage (%) or a Fixed amount from the dropdown menu.
Discount Conditions #
- Minimum Purchase Amount: Set a minimum booking value required to apply the coupon. Leave at 0 for no minimum.
- Maximum Discount Amount: For percentage-based discounts, you can set a maximum monetary value for the discount.
- Total Limit: Define the total number of times this coupon can be used across all users.
- Per User Limit: Set how many times a single user can use this coupon.
- Applicable Events: Choose the booking events this coupon applies to from the dropdown. Leave blank to apply it to all paid events.
Expiration #
- Start Date & Time: Set the exact date and time when the coupon becomes active.
- End Date & Time: Set the exact date and time when the coupon will expire and can no longer be used.
Additional Information #
- Status: Set the coupon to Active or Inactive.
- Internal Notes: Add any private notes about this coupon for your team.
Failed Message #
The Failed Message feature provides a better experience for your clients by showing them specific, helpful error messages when a coupon code fails. Instead of a generic “Invalid Code” notice, you can explain exactly why it didn’t work. Enter the corresponding custom message you want your clients to see.
Here are the different failure reasons you can customize a message for:
- Invalid: This message appears when the user enters a code that doesn’t exist or has a typo.
- Expired: Shown when a client tries to use a coupon after its designated end date has passed.
- Stackable: This message appears if a client tries to use the coupon along with another coupon when the Stackable setting for this coupon is set to No. For example, you could write, “Sorry, you can not apply this coupon with another coupon code”.
- Minimum Purchase: Shown if the booking total is less than the minimum purchase amount required for the coupon.
- Limit Reached: This message appears when the coupon has reached its maximum number of uses, either in total or for that specific user.
Stackability #
The Stackable option allows you to determine if a specific coupon can be used in conjunction with other coupons on a single booking. Here you will find two options:
- Yes: Select this option if you want to allow customers to apply this coupon along with other discount codes in the same transaction.
- No: Select this option to prevent this coupon from being combined with any other offers. If a customer tries to use it with another coupon, it will not be applied.
After choosing your desired option, click the Save Coupon button to apply the changes.
Edit & Delete #
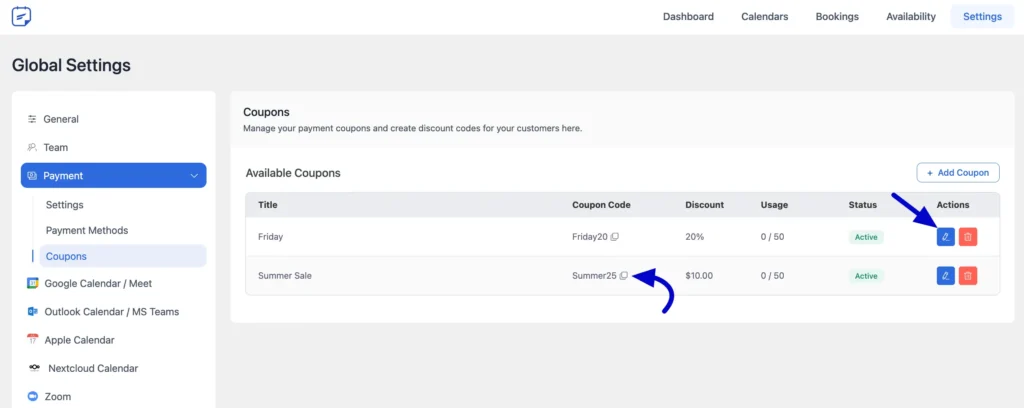
You can copy the coupon code and share it anywhere. You can edit it with the pencil icon or delete it with the delete icon.
Applying the Coupon During Booking #
When you offer paid events, your clients can easily apply coupon codes you’ve created to receive a discount. The coupon field is seamlessly integrated into the booking process, ensuring a smooth checkout experience. This guide shows the steps your clients will follow to apply a discount. The process is straightforward and happens on the booking details page before payment.
- Select a Time Slot: First, your client will choose an available date and time for the paid event and click Next to proceed.
- Enter Booking Details: On the next screen, the client will enter their personal information, such as name and email address.
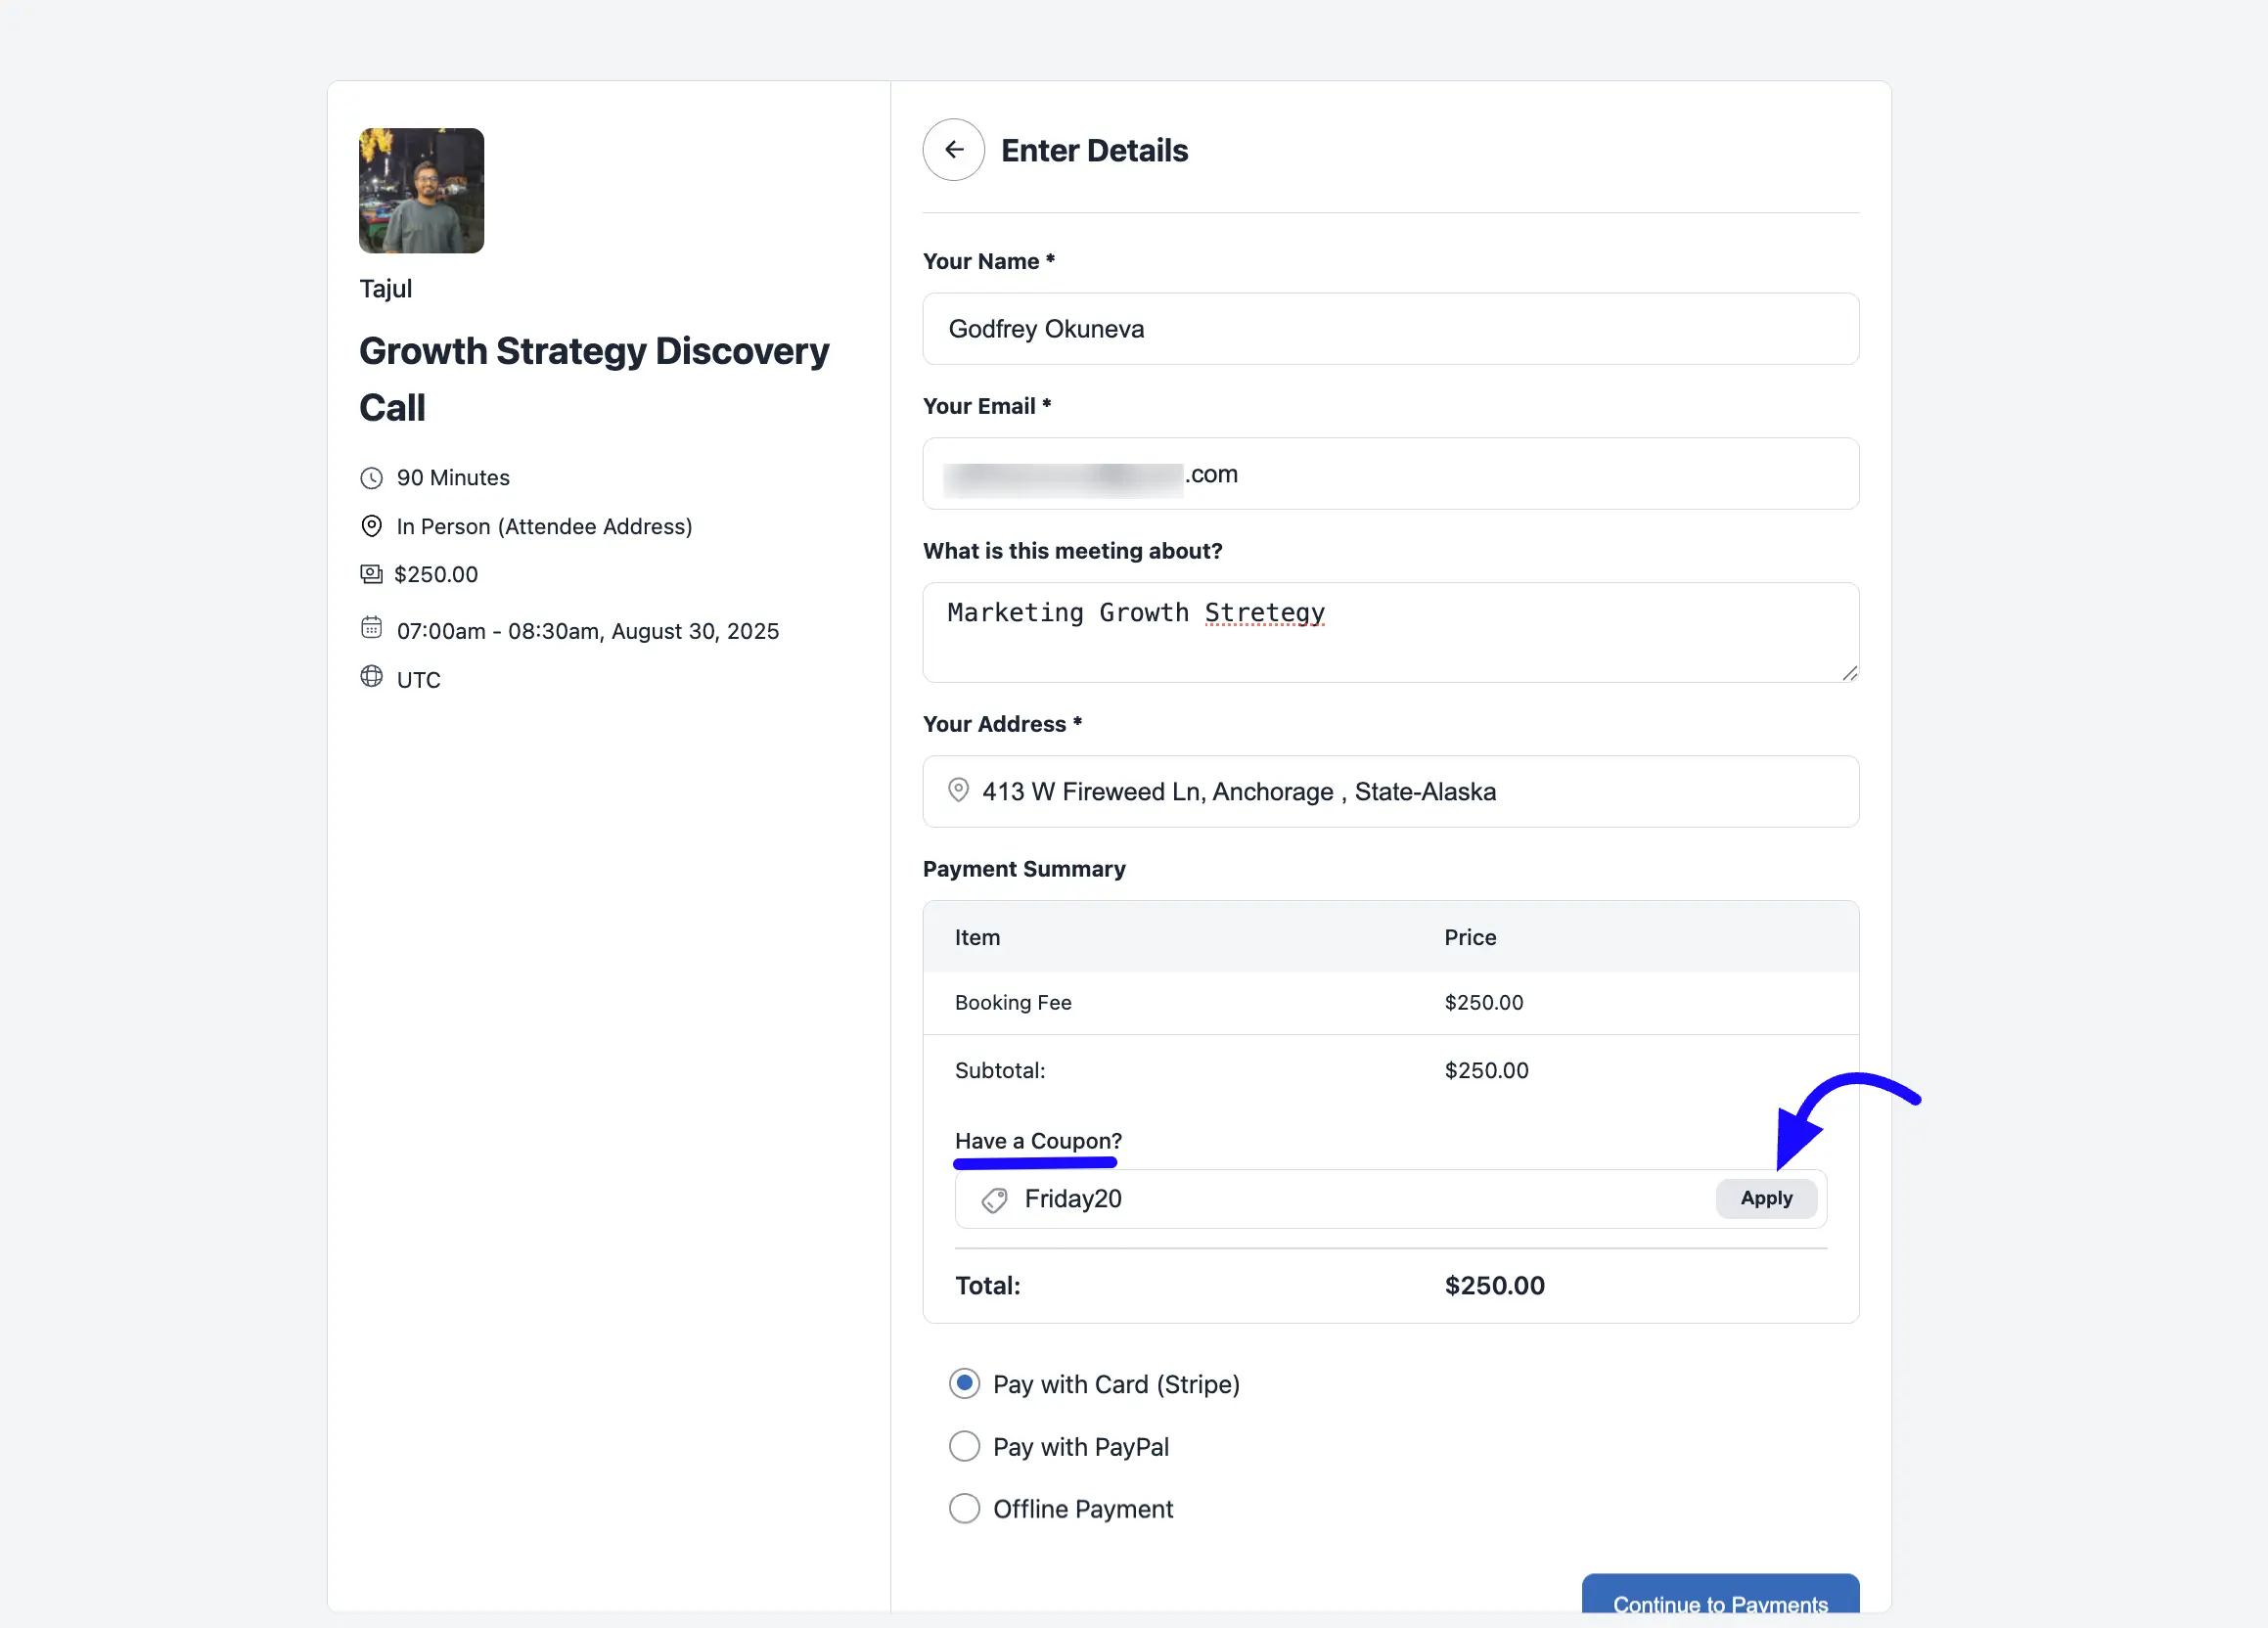
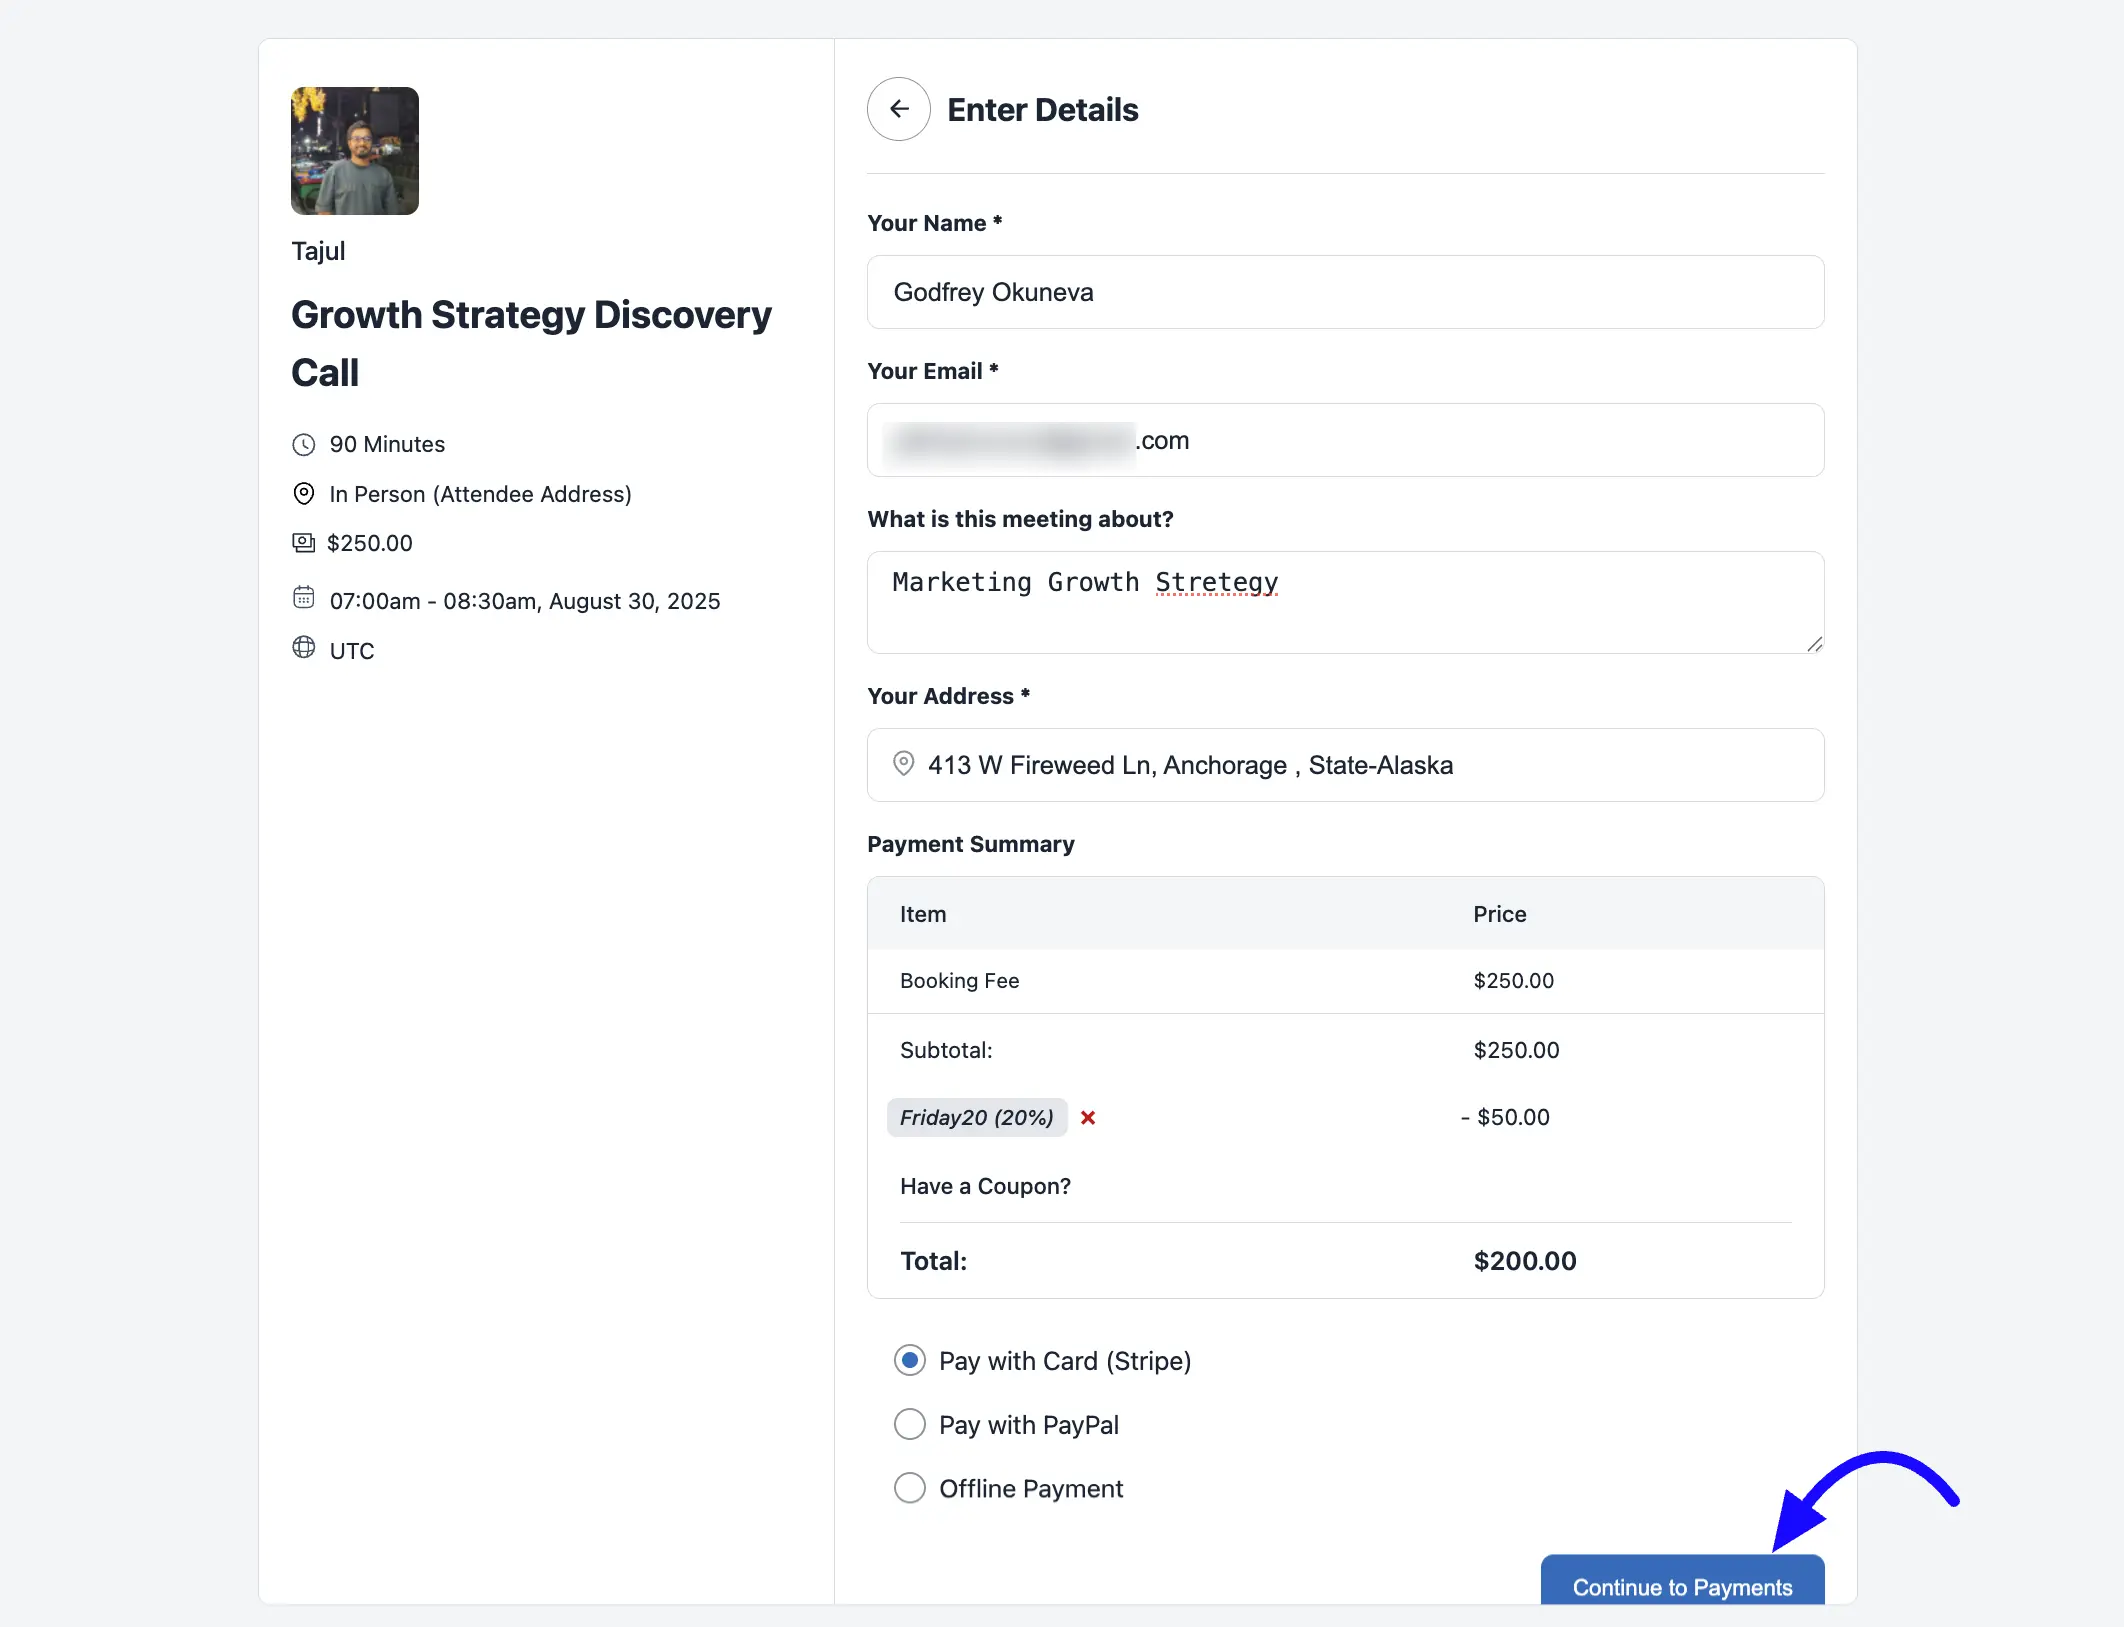
- Apply the Coupon Code: In the Payment Summary section, there is a field labeled Have a Coupon?. Your client will enter their valid coupon code here and click the Apply button. The Total amount will then update to reflect the discount.
- Complete Payment: After applying the code, the client will select a payment method (like Stripe or PayPal) and click Continue to Payments. They will then enter their payment details to complete the transaction.
- Confirm the Booking: Once the payment is successful, they will see a confirmation screen summarizing their booking details, including the successful payment.
Troubleshooting Common Issues: #
Here are the most common troubleshooting issues:
- Check the Status: Ensure the coupon is set to Active. If it is set to Inactive, it will not be accepted during the booking process.
- Check the Dates: Verify that the current date falls between the coupon’s Start Date and End Date. A coupon will not work if it has expired or has not yet become active.
- Check Usage Limits: Make sure the Total Limit for all users and the Per User Limit have not been reached. The coupon will be invalid once its usage limit is met.
- Check Booking Conditions: Confirm that the booking meets all required conditions, such as the Minimum Purchase Amount and being valid for the selected Applicable Events.
That’s all there is to it! Your client has now successfully applied a coupon code and booked their discounted event.
If you’re stuck or have any questions, please don’t hesitate to contact our support team.


